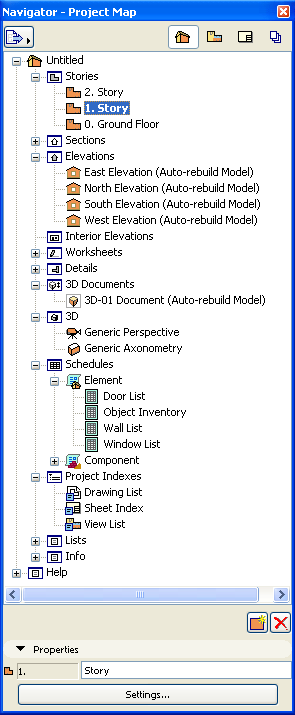
The Project Map provides a tree structure of the components (viewpoints) of your Virtual Building Model.
See also Project Map Controls.
.
A Viewpoint represents a window onto a particular part of your project, but its settings have not been saved yet. The Project Map Viewpoints are:
•Stories
•Sections
•Elevations
•Interior Elevations
•Worksheets
•Detail Drawings
•3D Documents
•3D
•Schedules
•Project Indexes
•Lists
•Info
•Help
Double-click a viewpoint to open it in the project. Once you save a viewpoint’s settings, it becomes a view (listed in your View Map) and can then be placed onto a Layout for editing.
At the top level of the project map hierarchy, the house icon represents the project and is followed by the project name. (The project gets a name once you save the project file, but if you assign a Project Name in File > Info > Project Info, that is the name that will be shown in the Navigator.)
Below, folders store the available viewpoints of the project (one folder named for each type of viewpoint). Project Map folders are a fixed list of item types; you cannot add or delete folders here. You can display the contents of each folder by clicking the plus sign in front of it (in Windows) or the little arrow (in MacOS). In Windows, double-clicking the folder icon or name also opens the folder.
The Stories folder contains all the Stories defined for the project. When you first start a new project, your Stories folder contains three items, whose names will vary depending on the local version of ArchiCAD being used.
The Sections, Elevations, Interior Elevations, Worksheets, Details and 3D Documents folders contain the list of corresponding windows. If there is no plus sign in front of a folder, this means that no such viewpoint has been created yet in the project.
See ArchiCAD Model Views for information about each of these viewpoint types.
The 3D folder contains elements for the various projection and camera types.
•By default, two items are present on starting the project: Generic Perspective and Generic Axonometry.
•When you place Cameras in the Project, their names appear in the 3D folder of the Project Map, grouped under the Path. The Path can be renamed in Camera Tool Settings, and more Paths can be added. All these additions and changes are updated in the Project Map.
See Camera Tool Settings.
The Schedules folder contains the interactive schedules (Elements and Components) created as part of the project documentation. The Interactive Schedule serves as a basis for ordering doors, windows, and other construction elements from the manufacturers and for checking the consistency of elements based on a set of criteria.
See Interactive Schedule.
The Project Indexes folder contains three sets of table of contents type items. Project indexes include view list indexes, layout sheet indexes and drawing list indexes based on a set of filtering criteria.
See Project Indexes.
The Lists folder contains three items: Elements, Components and Zones. When opened, all three show the list of predefined list schemes available for the project. All these items also appear in the Document > Schedules and Lists menu.
For more information, see Calculation.
The Info folder contains two items: Project Notes and Report Window. They represent the corresponding windows also available from the Window menu.
For more information, see Project Notes and Session Report Window.
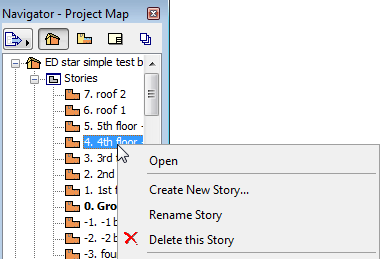
If you click an item with the right mouse button, a set of relevant commands appear in a context menu (for example story-related commands for Stories or 3D-related commands for Perspectives).
Double-clicking any of the items of the Project Map activates the corresponding window and shows its contents with its last used zoom and display settings. (These zoom and display settings can be checked in the Quick Options Palette.)
See also Quick Options Palette.
Remember, a viewpoint’s settings change along with edits in the window. When you have set up the viewpoint settings as desired, you can save it as a view.
You can make this process automatic - saving Project Map viewpoints as views with specific settings - using the Clone Folder function.