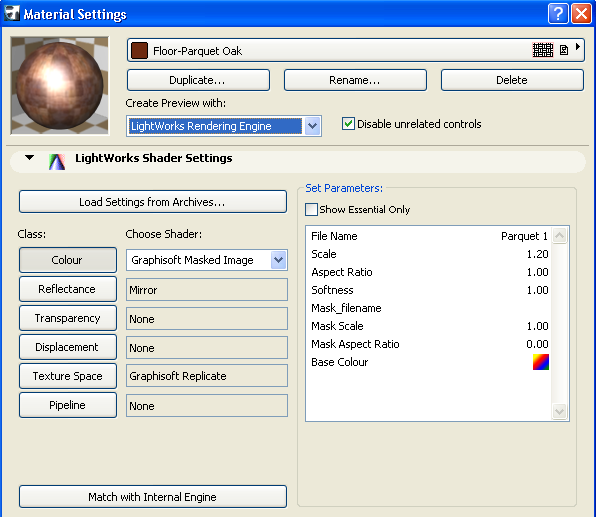
Use this Shader Settings panel in Surface Settings (Options > Element Attributes > Surfaces) to customize surfaces with LightWorks shaders.
LightWorks uses shaders to define the properties of surfaces in photorenderings.
To see this panel, you must select the LightWorks Rendering Engine in the Create Preview with drop-down list. Checking the Disable unrelated controls checkbox will make invisible all panels of the Dialog that are not related to the currently selected Rendering Engine.
The Load Settings from Archives button leads you to another Dialog where you can load shaders.
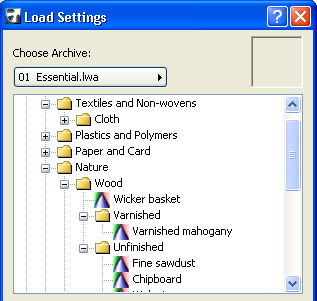
Select from the popup list the Shader archive you want to browse. Then you will have a list of shaders organized in a folder structure. Select the shader you wish to use and click OK. In the upper right corner of the dialog box, a preview window displays the selected shader.
The Class buttons will have their values filled up by those of the loaded shader and the preview will be updated. By clicking on any of the Class buttons, you can start modifying the various parameters belonging to that group of parameters of the shader.
The Colour button gives you access to shaders defining the colour of the Surface. You can choose from among dozens of shaders if you wish to modify it. There are simpler shaders (like Plain) that have few parameters and others having many parameters. The Plain Color shader has one parameter defining the color of the shader applied to the Surface. In the Set Parameters area are listed all parameters belonging to the currently selected shader. Checking the Show Essential Only checkbox will list only those parameters that are necessary for the correct definition of the shader. When it is unchecked, you have access and are free to modify any and all parameters of the shader.
The Reflectance button lets you choose shaders that will help you define or modify shaders that specify how the surface of the Surface reflects light. Click the Reflectance button and its shaders in the list next to it will become available for viewing or editing. The method is the same for each button: select the button, select the shader from the list next to it, then modify its parameters appearing in the list on the right side of the Dialog panel.
The Transparency button gives you access to shaders that define how much and in what pattern the Surface will let light go through its surface.
The Displacement button contains shaders that can help define a bumpy appearance for the surface of the Surface.
The Texture Space button lets you access shaders that define a 2D rectangular area having a certain unit size and repeating itself in a tiled way over the surface. When you are using certain shaders (most wrapped shaders), all the effects of those shaders on the surface will be applied by taking settings in the Texture Space area into consideration. With these shaders you can scale, rotate, mirror and offset the 2D texture space.
The Pipeline button’s options include GRAPHISOFT Emission: this lets you set the properties of the surface’s fluorescence (i.e., the light emitted by its surface).
•Use the Attenuation control to adjust the emission intensity of the selected surface. Emission intensity decreases as attenuation increases (i.e., the viewpoint is moved farther from the object).
•Click the Colour parameter to bring up a color-picker dialog box. Select your color graphically or numerically by mixing the HSL (Hue-Saturation-Lightness) or RGB (Red-Green-Blue) components.
When you have set all surfaces to your liking, you need to set the LightWorks Rendering Engine parameters in the PhotoRendering Settings Dialog. The Dialog has two panels specifically related to the LightWorks Rendering Engine.
To define shaders and their parameters for the chosen surface:
1.Click the name of the class to activate the list of associated shaders. (Such as “Reflectance,” in the image below.)
2.Choose a Shader from the list. (Such as “Conductor,” in the image below.)
Note: Some shaders, such as GS Masked Image in the Color class, and GS Replicate in the Texture Space class, replicate the surface’s Internal Engine settings in this category.
3.Edit its parameters in the right side of the panel: click on a parameter (such as “Mirror Factor” in the image below), then edit its settings at the bottom of the panel. (Depending on the parameter, you will use color tables, sliders, text fields or radio buttons.)
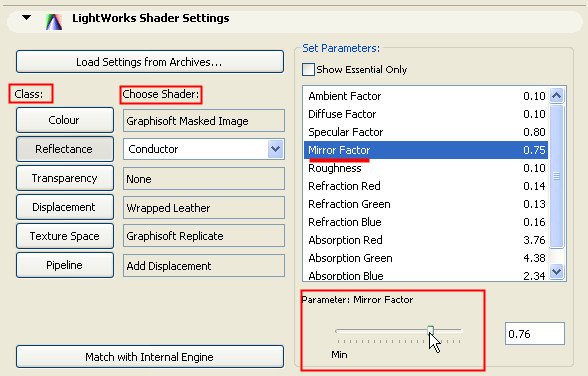
Note: To limit the number of editable parameters for the shaders, check the Show Essential Only checkbox.
Using LightWorks Shader Archives
To use LightWorks shaders for your surfaces (instead of adjusting shader parameters individually):
1.Click the Load Settings from Archives button in Surface Settings to open the Load Settings dialog box.
2.Browse the archive folders to find the shader that best suits your needs. A small preview picture gives you an idea of shader qualities.
3.Click OK to load the settings into the Surfaces Settings dialog box
4.Edit the shader further if desired.
Note: The files in the archives cannot be edited, but you can edit their settings once you have applied them to a surface in ArchiCAD’s Surface Settings dialog box.
Using Internal Engine’s Surface Settings with LightWorks
By default, ArchiCAD surfaces are defined according to settings of the Internal Rendering Engine. When you select a surface to edit in the LightWorks Shader Settings, its initial shader parameters are set to coincide, as much as possible, with the surface’s default appearance.
Once you begin editing the shaders, you may change the surface settings so much that its appearance when rendered with LightWorks is very different from its original appearance as rendered with the Internal Engine.
To revert the LightWorks surface to its default appearance (i.e. to correspond with the Internal Rendering Engine appearance), press the Match with Internal Engine button.
Note: This process of translating settings between the Internal Rendering Engine and LightWorks is not exact, since LightWorks shaders encompass many more and different parameters than those used by the Internal Engine.