Custom Stair Based on Manually Drawn Elements
Custom stairs can be generated from a set of manually drawn elements using the Line, Arc and Fill tools. Design > Create Stair Using Selection command launches the StairMaker add-on to allow you to add the necessary options and details of the custom-made geometry.
With the Create Stair Using Selection tool (Design menu), you can create custom stairs from a stair contour and a line of travel designed with ArchiCAD’s 2D drawing tools.
Standard Stair types work with fixed geometrical data. If you cannot find the stair type you want among the predefined templates that cover most of the common stair forms, you can define the geometry of your Stair within your ArchiCAD project.
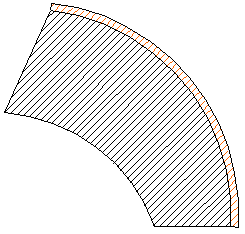
1.Draw the exact contour of the stair with the Fill tool. The fill that defines the stair cannot contain any holes.

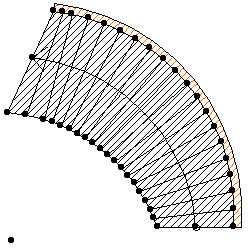
2.Define the line of travel by using connected Lines and Arcs inside the fill polygon. The segments of the line of travel need to be connected properly, i.e., they cannot cross each other or the sides of the fill. It has to be a continuous chain of lines. Begin drawing the arcs and lines from the starting edge of the stair to define the appropriate direction of the line of travel.

Notes: The endpoints of the line of travel must snap exactly to the sides of the fill polygon but cannot connect adjacent edges or nodes of the fill polygon. Corners within the line of travel define landings. If the connection of two segments of the line of travel is not tangential, it will define a landing.
3.Select the fill polygon and all segments of the line of travel.


4.Choose the Design > Create Stair Using Selection command in order to transform these floor plan symbols into a stair object.
5.The Stair Type dialog box appears. StairMaker automatically finds possible stair types for your draft. If none of the predefined Stair Types match the sketch, you can only define a Custom Stair.

Note: If the defined geometry cannot be interpreted by StairMaker, you will receive a warning message describing the problem. Make the necessary changes according to the rules of the stair definition, and try again.
6.Select the required Stair type and click the OK button. StairMaker then displays the stair editing window. For custom stairs, some of the basic geometry parameters are not available and story height is locked by default:
You can still customize:
•stair shape parameters
•the number of treads
•inclination angle (parameters of the riser and the run)
When finished, click the OK button to automatically create the stair and save it in the Embedded Objects folder of Library Manager.
You will then see the new stair displayed on the Floor Plan and can also view it in 3D. The original 2D elements are not deleted automatically.

