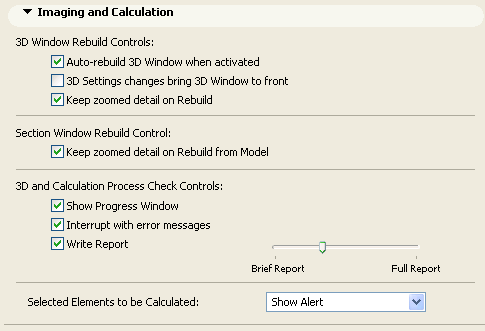
This dialog box (Options > Work Environment > Imaging and Calculation) provides options for rebuilding the 3D and Section/Elevation/IE windows, creating reports and dealing with error alerts.

•Auto-rebuild 3D Window when activated: Checking this box means the 3D display of your plan is updated after each modification to the model, as soon as you activate the 3D Window.
If this box is unchecked, the 3D model does not show the modifications until you choose the View > Refresh > Rebuild command. Switching this option off can be useful if you want to keep an already existing 3D image in the window for a longer period, and you want to avoid accidentally rebuilding it.
Note: If you edit elements in an outdated 3D view, deleted elements will be visible but cannot be selected. Moved elements can be selected, but their selection dots are displayed at the real location and you cannot edit them. Modified elements can be selected and edited, but this will trigger the rebuilding of the view.
•3D Settings changes bring 3D Window to front: Check this box if you want to activate the 3D window and rebuild its content every time you make a change in either the 3D Projection Settings or the 3D Window Settings dialog box.
•Keep zoomed detail on Rebuild: Check this box to preserve the last zoom made in the 3D Window even if you choose View > Refresh > Rebuild. If you uncheck it, the 3D Window will recreate the 3D view at the original zoom level.
Section Window Rebuild Control
Keep zoomed detail on Rebuild: If you mark this checkbox, then the zoom level of your Section/Elevation/IE Window will be retained even after you execute a Rebuild command.
For more information on ArchiCAD windows, see Updating Sections.
3D and Calculation Process Check Controls
Show Progress Window: If this box is checked, the progress of 3D and list processing is indicated by a special timer. This will help you evaluate whether to cancel lengthy 3D redraws or calculations, change some settings (for example by selecting a smaller area, setting more specific filters or less precise imaging options or reducing the 3D Window’s size).
Note: The movement of the indicator is proportional not with the elapsed time, but with the amount of data processed.
Interrupt with Error Messages: If this box is checked, any error messages will appear on the screen (in the Report Window) before the imaging or calculation process is completed. If the box is left unchecked, error reports appear only after the process is completed.
Write Report: Use this checkbox to enable or disable the creation of a report on the 3D conversion and list calculation processes. Use the sliding switch to set the amount of detail it should contain.
The report is more than just a list of alerts. It can be used to keep track of and compare imaging time for different images. New information is always added to the end of the report. The Report is cleared when you close the Project. If you wish to preserve it, save it as a text file.
Selected Elements to be Calculated: This pop-up field gives you three options for handling a possible conflict between a listing command and items selected in the workspace.
•Select List All to calculate all selected elements in the list, even though they do not correspond to the filtering criteria.
•Select Use Filters to apply the filters defined for the list scheme to the selected elements. Elements that do not correspond to these filters will be ignored.
•Selecting Show Alert will display a warning about the situation and you will be able to choose between the two options above.
For more information on calculation, see Calculation.