Enables or disables the depth of field for the Physical Renderer.
Strictly speaking, a real camera can only focus clearly on a single distance at a time. Everything in front of and behind this plane appears increasingly blurry. The area between the nearest and farthest objects that appears focused is known as depth of field.
Camera F-Stop
The F-Stop value is used to adjust the focal aperture. The larger the focal aperture (i.e. the smaller the F-Stop value), the smaller the depth of field will be and vice-versa. F-Stop is the most important setting for adjusting the depth of field. Small values result in correspondingly small depth of field. F-Stop will also define the amount of light that can enter the camera.
Camera Exposure
If Exposure is enabled, the camera will simulate the exposure process, i.e. the rendered image will vary in its brightness in correspondence with the ISO, F-Stop and Shutter Speed settings.
In a real camera, the amount of light to which the film is exposed determines how bright the film will be. The more light to which the film is exposed (the larger the aperture opening is larger, or the slower the shutter speed), the brighter the film will turn out and vice-versa.
Camera ISO
ISO is used to define the film’s sensitivity to light. Higher ISO values make the film more sensitive and thus the images brighter.
Camera Shutter Speed
The shutter speed defines how long the shutter will remain open when a picture is taken. This setting defines the amount of light that reaches the film (only relevant if Exposure is enabled). Slower shutter speeds produce brighter images.
If you don’t use Exposure, this setting has no relevance for the rendered image.
Camera Chromatic Aberration
Chromatic aberration occurs in lenses when differently colored parts of light (depending on the wavelength) are refracted with varying intensities. Chromatic aberration only occurs in blurred image regions; without blur, no chromatic aberration will take place.
The value that can be defined here defines how strong the “color offset” will be rendered. It can also be described as the degree of saturation in the blue-red regions.
A value of 0 turns chromatic aberration off.
Remember that enabling this effect also increases render times accordingly.
Camera Aperture Shape
The following settings are used to create the bokeh regions. These are regions that lie outside of the camera’s area of focus and are therefore displayed as blurred. Small, bright regions are displayed on the shape of the aperture. Bokehs can have a strong effect on the image’s “impact,” because blurred regions can have very different shapes depending on the shape of the aperture.
The Aperture Shape option is either circular (when disabled) or can be given a different shape by changing the Camera Blades Count setting (see below).
In general, the best looking bokeh (i.e. the softest and most flowing) can be achieved with a circular aperture (Aperture Shape option disabled).
Note that rendering high-contrast bokeh effects is a complex procedure and takes correspondingly long to render.
Camera Blades Count
The bokeh is defined primarily via an aperture shape. The aperture shape in turn is dependent upon the defined number of blades. The more blades are defined, the rounder your aperture shape will be. The least number that can be defined is 3.

Number of Blades from left to right: 3, 6, 12
White balance (K)

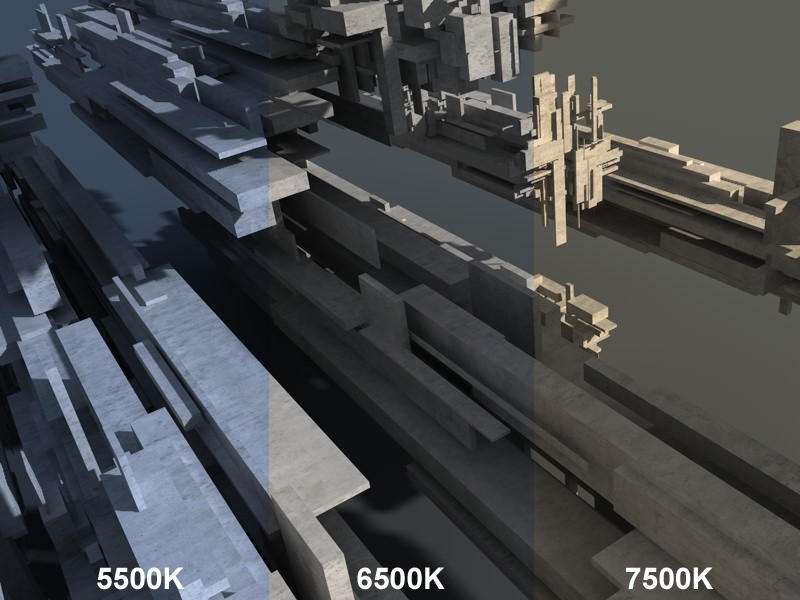
An outdoor scene (with sky), with 5500K, 6500K and 7500K White Balance, respectively
White balance is used to prevent light sources (e.g., sky, sun, candles, etc.) from colorizing white surfaces. Set the White Balance value to that of the light source’s color (Tungsten refers to the filament coil in a light bulb). If the presets do not quite match your needs, you can select the Custom option and define a custom temperature via the Custom Temperature (K) value. Color hues can be defined without having to change the color of the light itself.
As you can see in the image above, 5500K produces a slight blue hue and 7500K a slight yellow hue. The value 6500K (which is representative of daylight conditions), produces a grayed, cement-like hue (cement textures were applied to the objects in the image).
Color temperature is measured in Kelvin.
Of course white balance can be used to colorize renderings. The neutral value is Daylight (6500K). Generally speaking, lower values result in hues of blue and higher values in hues of yellow (directly opposite to the depiction above; the white balance, after all, is a corrective value).