For an overview of this process, see Place Module.
The controls in this dialog box apply to the currently chosen Hotlink, as displayed in the “Hotlinked to” field in the bottom half of the dialog box. To choose a different hotlink, click the Choose Hotlink button to open the corresponding dialog box.
See Choose Hotlink.
The name of the chosen hotlink will appear in the Place Module dialog box. Use the controls to adjust its settings:
The whole module is placed on a Master Layer, which you can check or change in the Place Module or Module Settings dialog boxes.

The elements of the module keep their element-specific layer assignment and are placed on the corresponding layers of the current Project, if layers with these names exist. If necessary, new layers will be created.
The Master Layer controls the visibility and locking of a module as an entity. This Master Layer is an ordinary layer of the host file and can include any other elements.
•Different instances of the same module can be assigned to different Master Layers.
•Element-specific layers control the visibility of the elements within the module.
•Locking a Master Layer has priority over the Delete and Break Hotlink commands in the Hotlink Manager dialog box. These commands only act on modules with an unlocked Master Layer.
•Layer Combinations of the source file are not imported with the modules.
Note: For best results, use the same layer structure in both the source and the host file.
Define a custom Master ID to every Hotlinked Module instance.
•For example, if your hotlinked module is a hotel room, then R213 would be the Master ID for the 13th room hotlink on the second floor.
Once this instance is placed in the host file, its Master ID is assigned to every element of that Hotlinked Module, as an extension of their element ID: the original element ID is kept, but is extended based on the Master ID of the hotlink.
As a result, all elements have unique IDs, yet for Hotlinked Module elements, their IDs remain protected from editing in ID Manager.
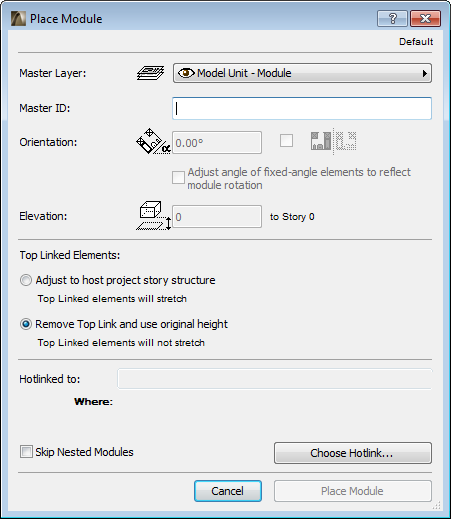
Orientation
•Type a value in the Orientation field if you want to place the Module at an angle that is different from the one defined in the original file.
Note on Fixed-angle elements in rotated modules:
By default, fixed-angle elements (e.g. labels or zone stamps set to “Fixed Angle”) will not rotate if you rotate your module; the angle remains fixed.
However, if you do want to rotate these fixed-angle elements to reflect the module’s new orientation, check the box: Adjust angle of fixed-angle elements to reflect module rotation.
•Check the box next to the Orientation field to place a mirrored Module.
•Height/Elevation values: Positions relative to the actual story of the original file are applied. When placing the module, you can type a value in the Elevation field to define the height at which the Module will be placed, i.e., an optional vertical offset added to the elements’ original story-relative elevation.
•Adjust to host project structure: Top Linked elements will stretch or shrink to match the corresponding story structure of the host file. (Doors/Windows whose sill or header is linked to a particular story will adjust to the host file’s story structure.)
•Remove Top Link and use original height: Top Linked elements will be transformed into “Not Linked” elements, and will retain their fixed original heights. (Doors/Windows whose sill or header was linked to a particular story in the source file will lose the story link, and instead will be linked to the Wall base.)
Even after you place a module, you can modify these options, in Hotlinked Module Settings.
Check this box if you do not want to include this module’s nested modules when placing the current instance.
This dialog box lists the Hotlinks that have already been established between the current Project and other ArchiCAD files. Select a Hotlink in the list and click OK to return to the Place Module dialog box.
Click the Place Module button to place an instance of the chosen Hotlinked Module in your Floor Plan.