This dialog box opens when:
•you use File > External Content > Attach XREF
•you click “Attach” from the XREF Management dialog box. (File > External Content > XREF manager.)
XREF Name: Specify the name of the file to be attached as an external reference.
•Use the Browse button to select from a file selection dialog box.
•Alternatively, select from the pop-up list of already attached files if you want to place another instance of the file into the Project.
Path: Shows the exact path to the selected file.
Reference Type: Choose a radio button to set how nested XREFs will be handled.
Note: Nesting occurs when you load an external reference to a file that has external references loaded to other files.
Attachment: All levels of nesting can be displayed in the Project file.
Overlay: Nested XREFs from the referenced file will not be visible in the Project.
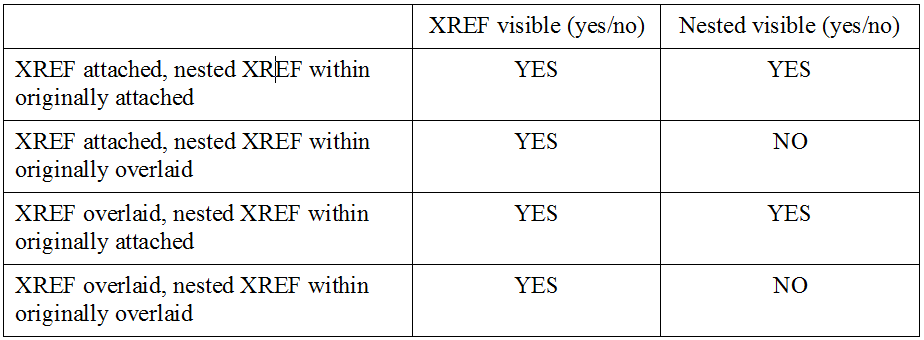
The following table shows what happens when you attach/overlay DWG files that contain attached/overlaid XREFs.

Examples:
1.A DWG file named BASE.DWG that has an attached XREF named COMMON.DWG is attached to the ArchiCAD Project. Both files will be visible on the Floor Plan.
2.A DWG file named BASE.DWG that has an overlaid XREF named COMMON.DWG is attached to the ArchiCAD Project. BASE.DWG will be visible on the Floor Plan but COMMON.DWG will not be visible.
3.A DWG file named BASE.DWG that has an attached XREF named COMMON.DWG is overlaid to the ArchiCAD Project. Both files will be visible on the Floor Plan.
4.A DWG file named BASE.DWG that has an overlaid XREF named COMMON.DWG is overlaid to the ArchiCAD Project. BASE.DWG will be visible on the Floor Plan but COMMON.DWG will not be visible.
Placement Parameters: Use these controls define where and how you want the XREF to be placed on the ArchiCAD floor plan.
•Insertion point: In the X and Y field, you can enter the exact coordinates of the location of the lower left corner of the enclosing rectangle or of the Drawing origin. Alternatively, you can check the Specify On-Screen box to enter these coordinates by clicking on the Floor Plan.
•Scale: Either specify a scale factor in both X and Y directions, or check the Specify On-Screen box to define scale on the screen.
Note: If you specify scale factors, the XREF’s enclosing box will be scaled to the appropriate size. If not, you will be able to stretch the enclosing rectangle just as if you were stretching an ArchiCAD object. It is possible to input or specify negative or positive values for scale factors. By specifying negative values you can achieve mirroring effects.
•Rotation: You can define an angle by which the whole placed XREF will be rotated around its insertion point, or check the Specify On-Screen box to define rotation manually, on the screen.
Note: If you specify a rotation angle, the XREF is rotated and then drawn. If not, you can rotate the enclosing rectangle until you input the value with a mouse click or coordinate input.
Anchor Point: Use these controls to define by which point of the XREF to place the drawing.
•Drawing’s own origin: the Global Origin (0;0 coordinate) of the attached XREF will be located at the coordinates specified by you on screen or in this Dialog.
•Drawing’s own anchor point: the attached XREF drawing’s own anchor point (if any) will be located at the coordinates specified.
•Bounding box node: ArchiCAD calculates the size of the bounding box of the attached XREF. You choose any of the 9 significant points of the bounding box, and that position of the XREF will be located at the coordinates specified fro placement.
Place on Story: Use this drop-down list to choose the story onto which to place the XREF. Before the actual placement, ArchiCAD will switch to that story.
Translator: This field displays the currently selected DXF/DWG Translator to be used during the conversion of the attached AutoCAD drawing. You may select any of the currently available Translators from the drop-down list. Clicking the Settings button will bring up the Translator Dialog where you can make modifications to the Translator Settings before attaching the XREF file.
For more information, see DXF/DWG Translation Setup.
Description: This field shows a short explanation and note about the currently selected Translator so you can decide if it fits your needs.
Attach: Click this button to execute the attach operation.
Note: When you attach an external reference file to an ArchiCAD Project, a layer will be created for it. The resulting layer names will have the following format:
‘XREF_NAME | LAYER_NAME’.
For example, the PEN_56 layer of a DWG file that was attached to the project with the XREF name 3D_STUFF will become the layer 3D_STUFF|PEN_56.