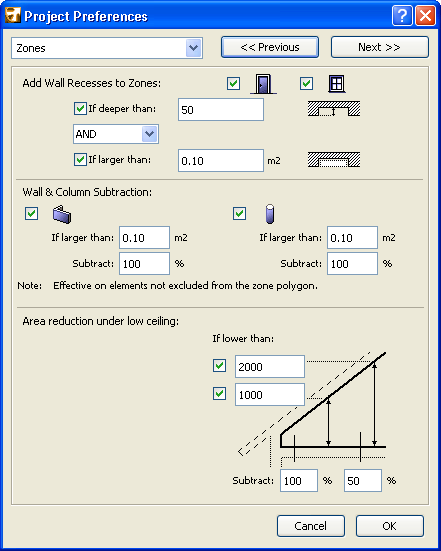

To access this screen, go to Options > Project Preferences > Zone Preferences. These options define how zones are calculated in Zone Lists.
The settings you make here are Project Preferences: specific to the Project you are working on and are saved with it. If another user opens the Project on his or her own computer, the same settings will be applied.
Add Wall Recesses to Zones: These options define how to take large door/window recesses into consideration when calculating Zones.
Door/Window recesses which meet the criteria defined here will be included as part of Zones when ArchiCAD calculates Zone size.
Check the Door and/or Window icons if you want to consider Door and/or Window recesses in zone calculations.
•If deeper than: Check this box to enter a minimum depth for the recess to be considered, then enter this minimum depth into the text box.
•If larger than: Check this box to enter a minimum surface area for the recess to be considered, then enter this minimum area into the text box.
•Click AND or OR from the pop-up menu to further define the recess size (minimum depth and/or minimum area) to take into consideration.
Walls & Column Subtraction: Click here to define the minimum size of walls/columns that should be subtracted when calculating the size of the zone they are in.
Check the Wall and/or the Column icon, then define the minimum size of walls/columns to be subtracted from zones.
(Any walls/columns smaller than this minimum limit will be included in the zone size.)
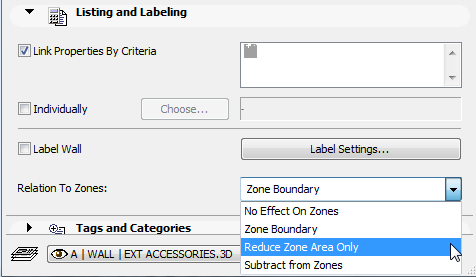
Note: These options will affect only walls/columns that are set to “Reduce Zone Area Only” or “Subtract from Zones” in the Listing and Labeling panel of their Settings dialog box.

•If larger than: Enter the minimum area of Walls/Columns whose areas should be subtracted when calculating the size of Zones containing them.
•Subtract: Enter how much (in percent) of the Wall/Column should be subtracted from the Zone area. (The default is 100%.)
Area reduction under low ceiling: Use these controls if you want to exclude areas under low ceilings as part of a zone’s area.
You can set one or two height limits.
•First checkbox: Check this box to define a height limit to take into account for calculating Zone sizes.
•Second checkbox: Check this box to define a second height limit to take into account for calculating Zone sizes.
•Subtract: Use these text boxes to define the percentage of the area underneath ceiling that should be subtracted from the zone area. You can enter up to two different subtraction percentages, one for each height limit you defined.
To see how much of a zone’s gross area has been reduced due to this Area Reduction setting, select the zone and view the data in the Zone Area Calculation Panel.
See also Zone Area Calculation Panel.