
For a description of generic settings common to all tools in the Toolbox, see Working in Tool Settings Dialog Boxes.
The Text tool offers multiline texts, full-scale font options, multiple styles and justification in any direction.
For details, see Text Blocks.
Format settings in this panel are uniformly applied to all text in this placed text block.
Font Type: Use the Font pop-up field to choose from available fonts loaded on your computer.
Font Script: Use the pop-up field at the right to choose a Font Encoding standard (Font Script in the Info Box) available on your computer (Windows only).
For more information, see Note on Font Encoding in ArchiCAD.
Font Height: Enter the height of the text line here. The unit of measurement depends upon your Working Units settings, and on the Scalability option (either Fixed or Scaled) set in the Text Block Formatting Panel.
Pencolor: Choose a pencolor for the text.
Text Format: Check one or more of the following checkboxes to apply formats to all text in the text box.
•Bold
•Italic
•Underline
•Strikethrough
Alignment: Choose either Left, Right, Center or Justify to align the text in the text box.
Leading (or Line spacing) is set to 100 percent as a default. Leading is a measure of the vertical space between lines, measured from the baseline of one text line to the baseline of the previous line. To increase or decrease leading, type in any new value, or use the arrows to adjust the value in increments of 25 percent.
Width factor: Modify the original text box width by entering a percentage value. The length of your text lines will be adjusted accordingly (i.e., if you increase the text box width factor, the length of your text lines will also increase).
Spacing factor: Modify the original text box width by entering a percentage value. The character spacing of your text will be adjusted accordingly (i.e., if you increase the text box spacing scale, the spaces between the characters will also increase).
Note on Font Encoding in ArchiCAD
Text block and label elements in ArchiCAD are now unicode-based. All encoding systems are supported when you print, plot, edit or display Text Blocks or labels, or convert them to DXF/DWG format. However, even though Texts and Labels support unicode characters, certain other ArchiCAD functions do not:
•text saved with a GDL object,
•text operations performed by Add-Ons: Spell Check, Search & Replace,
•text in listing windows,
•dimension text,
•text typed in text fields of dialog boxes or palettes.
Because of these limitations, it is wise to select the appropriate font encoding system for your Text Blocks and Labels to ensure accurate display and output in other contexts. (For each language version of ArchiCAD, the default font encoding system is generally the right one.)
Settings in this panel define the overall appearance of the Text Block as a whole:
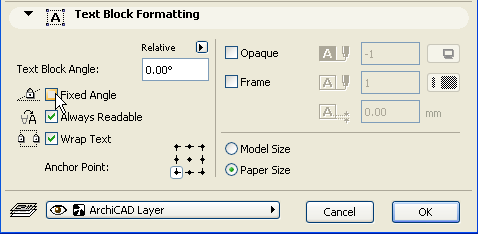
•Text Block Angle: Enter a rotation angle for the Text Block. Click the black arrow and choose either
- Relative to Orientation (the angle will be measured relative to the Oriented View -
See Oriented View.
- Absolute to Coordinate System (the angle will be measured from the (0,0) point of the project coordinates).

•Fixed Angle: To keep the Text Block Angle fixed relative to the screen, even if you rotate the view, check the Fixed Angle checkbox.
See Oriented View.
To allow the Text Block to rotated along with the view, leave the checkbox empty.
•The Always Readable option (on by default) means that the program will automatically “flip” the text to make it legible on screen (as opposed to upside down) regardless of the view’s orientation. This automatic “flip” occurs if the text is at an angle between 90 and 270 degrees.
•Wrap Text: As its icon suggests, this checkbox “locks” the width of a placed text block (including those placed as non-breaking text blocks) so that if you add text that would extend beyond the text block margin, it will wrap to the next line.
Note: If you leave this box unchecked, the text block size is determined by the length of the text it contains.
•Anchor Point: Click one of the nine buttons in the Anchor Point icon: this point represents the part of the text block that will be anchored when you click to position the text block. The Anchor Point will remain fixed even if you change the size of the text block (for example, by editing font sizes). A Text Block with a non-fixed angle will rotate along with the oriented view; in this case, the Text Block will rotate around the Anchor Point you set here.
•Opaque: Check this box to set a background color for your text block and activate the pencolor selection settings at right: open the pop-up menu to choose a color. The pen of this Fill may also be set to 0 (Transparent) or -1 (Window Background). Henceforth your text editor will also have this background color.
Note: If you check “Override Fill Background Color” in Model View Options, any color you set here will be replaced with either a transparent background or the window background color.
See also Model View Options Override Fill Display.
•Frame: Check this box if you want the text block frame to be visible. Checking the box activates the pencolor selection settings at right: open the pop-up palette to choose a color for the frame.
•Offset: Enter a value to offset the frame or opaque background from the bounding box of the Text Block.
•Scalability: Set your text size to either Scaled or Fixed:
If you choose Scaled, then text size will be automatically adjusted if you change the scale of the model. In this case, text size is given in model units, just like any other model element in the project.
If you choose Fixed, text size will remain constant regardless of changes in the scale of the model. In this case, text size is given in paper units.