Migrating Libraries to ArchiCAD 18
The new version of ArchiCAD will work perfectly well with any older-version ArchiCAD libraries. However, if you stay with your older libraries, you will not get the full benefit of library improvements and fixes in ArchiCAD 18.
We recommend that when you migrate a project to ArchiCAD 18, you also migrate your older-version Library to the ArchiCAD 18 Library, using the easy and automatic Migrate ArchiCAD Libraries function.
IMPORTANT: When migrating an older-version project, if you want to use the newest library, make sure you use the Migrate ArchiCAD Libraries function. If you add and delete Libraries using Library Manager, you may end up with a large number of missing library parts.
Note: The automatic Migration process described below is available only for projects that use ArchiCAD Libraries 10 and later.
Migrate ArchiCAD Libraries when Opening Older-Version Project
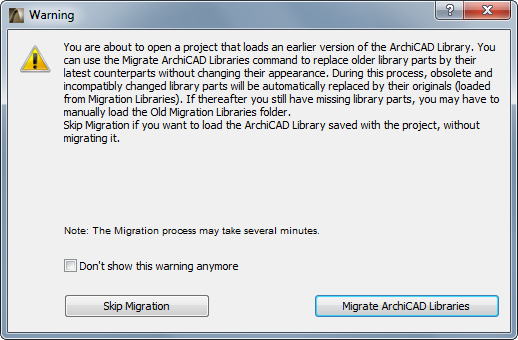
When you open an older-version project in ArchiCAD 18, and if your project includes an ArchiCAD Library, you are prompted to use the Migrate ArchiCAD Libraries function:
Click Migrate ArchiCAD Libraries. This process will do the following:
•load the new ArchiCAD library
•load the ArchiCAD Migration Libraries folder (What is a Migration Library? See below.)
•automatically replace placed objects from the older libraries (versions 13-17) with their latest compatible version in the ArchiCAD 18 library
•remove ArchiCAD libraries with lower version numbers
The Migrate ArchiCAD Libraries process may take several minutes. Once it is complete, if your project includes objects from pre-ArchiCAD 13 libraries, you may still have missing library parts. In this case, use Library Manager to load Old ArchiCAD Migration Libraries. (What is a Migration Library? See below.)
If instead you choose Skip Migration, you will load the old Library that was saved with the project. All placed objects will be available from that library, but you will not be able to use any library improvements and fixes from the latest version.
Migrate ArchiCAD Libraries for a Running Project
You can use the Migrate ArchiCAD Libraries process at any time, not only when migrating an older-version project. For example:
•if you did not use the Migrate ArchiCAD Libraries process when opening an older-version project, but now would like to
•if you have new issues with missing library parts as the project develops (e.g. new library parts added as a result of Teamwork or Hotlinked Modules)
Use the Migrate ArchiCAD Libraries button in Library Manager.
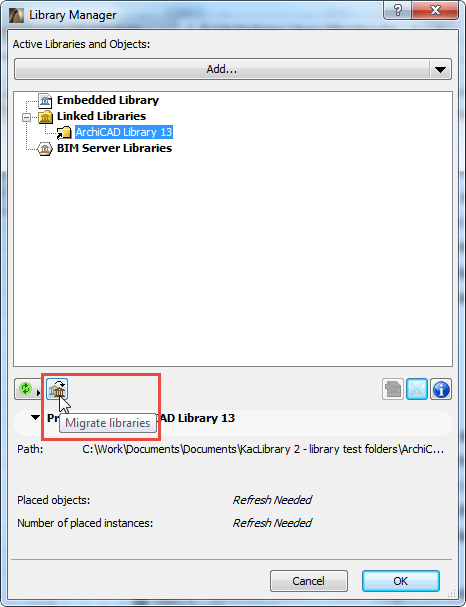
Note: If the button is not shown in Library Manager, this is because ArchiCAD has determined that there is no need for it: all needed libraries (latest ArchiCAD library plus Migration libraries) have already been loaded; and the project has no missing library parts.
Migrating Libraries in a Teamwork Project
To migrate a Teamwork project, use the Migrate Project process described here: Migrating a Teamwork Project (v. 13, 14, 15, 16 or 17) to ArchiCAD 18.
During this process, make sure that the Migrate ArchiCAD Libraries checkbox is checked. This will ensure smooth migration of your ArchiCAD Libraries together with the Teamwork project.
Note: Some objects in your migrated Teamwork project may be listed as “Temporarily Missing” in the Library Manager or in the Library Loading Report. As soon as other users do a Send and Receive, this problem will be solved automatically.
Each new version of the ArchiCAD Library contains many objects that have been updated since the previous version. For the most part, these updated objects are compatible with placed older versions of the same object, and will automatically replace the older versions.
Some objects from older ArchiCAD libraries, however, have no counterpart in the new ArchiCAD 18 library (typically, these are “discontinued” objects deemed obsolete). But if you have such objects placed in your project, you want them available even if after migrating to ArchiCAD 18.
ArchiCAD Migration Libraries serve this purpose: they contain only those objects from an earlier-version ArchiCAD Library that do not have counterparts in the latest-version ArchiCAD Library. A Migration Library is much smaller than full-version ArchiCAD Library.
When Are Migration Libraries Used?
Migration Libraries are loaded automatically with two workflows:
•Migrate ArchiCAD Libraries: This function, used when opening an older-version project in ArchiCAD 18. Migration Libraries are loaded automatically.
See Migrate ArchiCAD Libraries when Opening Older-Version Project.
•Consolidate: If you have placed objects from multiple ArchiCAD libraries and have loaded all the libraries, you will be prompted to Consolidate your libraries. As part of the consolidation process, Migration Libraries are loaded automatically.
See Consolidate Multiple ArchiCAD Libraries.
If you do not use these workflows which load the needed Migration Libraries, then some of your placed objects from older-version projects may not have a compatible corresponding object in ArchiCAD 18. In this case:
•Those incompatible older objects will be “Missing Objects” in ArchiCAD 18 if you have removed your old libraries. In this case, you must replace these missing objects with new ones from the ArchiCAD 18 library, and reset their parameters as needed.
•Keeping your old libraries alongside your new libraries is not recommended, because a great many of the loaded objects will be duplicates and/or superfluous, and increase library loading time and potential errors.
Notes:
•If you still have missing library parts, it may be because you are using library parts from ArchiCAD libraries earlier than version 13. If so, you must manually add the Old ArchiCAD Migration Libraries folder to the project, using Library Manager.
•If your ArchiCAD Libraries are BIM Server Libraries (for example, for a Teamwork project) and you want to consolidate them, ArchiCAD will not be able to locate the migration libraries automatically. In this case, you must upload the migration libraries from your hard drive to the BIMcloud/BIM Server.
Where to Find Migration Libraries
Migration Libraries are installed on your computer as part of ArchiCAD installation. They are divided into two folders:
•ArchiCAD Migration Libraries (for ArchiCAD library versions 13 and up)
•Old ArchiCAD Migration Libraries (generally available for ArchiCAD library versions 10-12)
You can also download Migration Libraries from the GRAPHISOFT website.
Note: Available migration libraries may vary, depending on your localized version.
Migrating Libraries and Objects from ArchiCAD 12 and Earlier
Note the additional Library-related changes when migrating projects from ArchiCAD 12 and earlier:
•Active Libraries - Linked Libraries
The active libraries of older-version projects will be loaded in ArchiCAD 18 as linked libraries. (They will be listed in the Linked Libraries folder of the Library Manager.)
•Other Objects - Embedded Objects
“Other Objects” items in the older ArchiCAD projects will appear in the “Embedded Objects” folder of ArchiCAD 18.
•Other Objects in Hotlinked Modules
If you place a hotlinked module from ArchiCAD 12, any objects placed from the source file’s “Other Objects” folder will be missing in ArchiCAD 18. The solution is to embed these objects in your host ArchiCAD 18 project, using Library Manager, or to place those objects in a library on the BIMcloud/BIM Server, and add that library to the project.
•Missing Libraries - Unavailable Libraries
Any library “missing” in the Library Manager of the older version will be listed as “unavailable” in the Library Manager of ArchiCAD 18. Locate these libraries and add them as linked libraries, using the Library Manager’s “Add” command.
•Missing Objects
Missing objects in the older-version project are also listed as “missing” in ArchiCAD 18, both in the Library Manager as well as the Library Loading Report. To solve the problem, locate the source files of these missing objects and add them to the project, using Library Manager.
These files reference unsupported image formats.
For more information, see Image Files in the Embedded Library.
Objects are “obsolete” in two cases:
•the object has been discontinued entirely as of the new ArchiCAD version (e.g. a computer or TV object that is no longer current)
•the object has a counterpart in the new ArchiCAD version, but due to changed parameters or functions (e.g. a window whose sash has been altered), the old object will not be replaced automatically
If you use the Migrate Libraries or Consolidate functions as described above, the Migration Libraries will be loaded automatically, together with the necessary obsolete objects, and you won’t have any missing objects.
Note: You will only be able to access only those obsolete objects from the Migration Libraries that have already been placed in your project.
Replace Obsolete Object with Latest Library Part
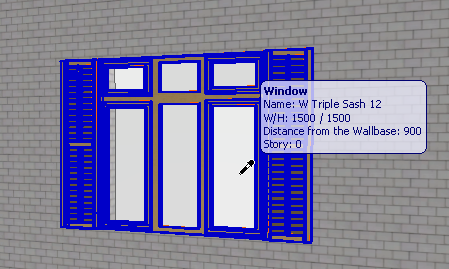
If you are using an obsolete object (e.g. window from an earlier version) and wish to replace it manually with the newest corresponding library part, be aware that the new window will not be exactly the same as the older one (otherwise, it would have been replaced automatically): something will work differently.
Therefore, when you do replace the old window with the new one, you should reset the new window’s parameters as needed.
To expedite this, use Parameter Transfer: this way, you will pick up the old window’s parameters and inject them into the new window before placing it. This still won’t produce an exact replica, but everything that can be replicated will be, and this will save you manual work.
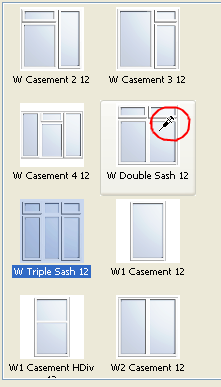
1.Use the Pick up Parameters shortcut (Alt+click) to pick up the parameters of the placed object.
2.Select the old window in the project.
3.Open the Window Settings dialog box.
4.In Window Settings, navigate to the new library folder and the corresponding new window that you want to use.
5.Move your cursor to the new replacement window- and press Ctrl+Alt (MacOS: Cmd+Opt). The cursor will change to a syringe shape.
6.Now click on the new window object to inject the parameters. All transferable parameters of your old window will be transferred to the newly activated window.
7.Click OK to close Window Settings and to replace the old window with the new one, using the changed parameters.
These modifications to the new window are in effect only until you close the dialog box and place the window; the new window’s default settings will not change.