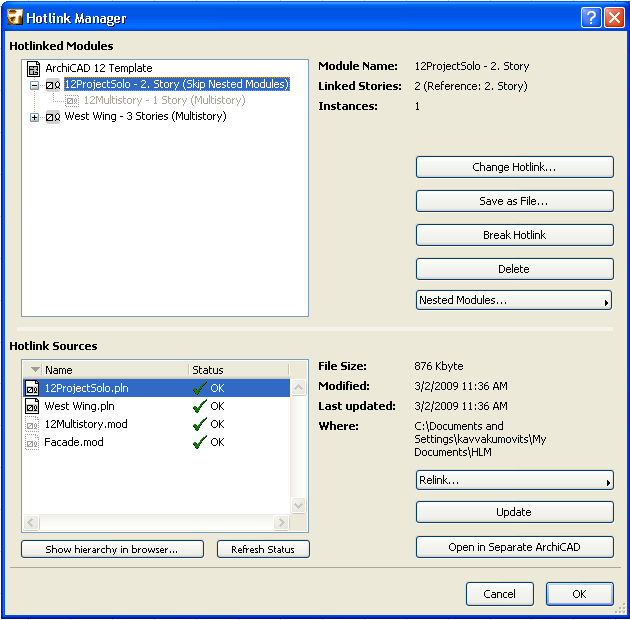
Use the File > External Content > Hotlink Manager command to open this dialog box.
Use the Hotlink Manager to gain an overview of all the modules in your project and to manage them.

Hotlinked Modules
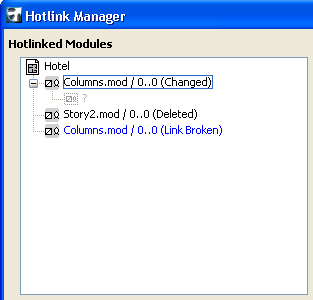
The “Hotlinked Modules” list (in the top half of the dialog box) displays the hierarchy of modules hotlinked into the current project. Hover the cursor over any module to view an information tag showing the module’s location in the host file.
Select any module in this list to view the module type (single- or multistory), the names and numbers of the Story it contains, and the number of placed instances of this module in the current project.
For any selected module in the list, you can do the following operations:
Note: Once you click any of these commands, the actions are noted in parentheses next to each module name. The actions are not carried out until you press OK to close the Hotlink Manager dialog box.

Change Hotlink: Click this button to select a different hotlink. The selected module will be replaced on the Floor Plan by the newly linked module.
Note: The Change Hotlink command is not available for the source files of nested modules.
Save as File...: Use this command to save the Hotlinked Module elements as separate file. This can be useful if you want to edit the elements of the module, then place them again in edited form as a new module.
Break Hotlink: Click this button to break the hotlink between the module elements and their source file. The result: the elements contained in the module are now regular editable ARCHICAD elements, no longer part of a module and no longer linked to any other source file.
Note: The Break command is not available for the source files of nested modules.
Note: The Break command is not available for Hotlinked Modules in Teamwork.
Delete: Click this button to delete all instances of the selected module in this project.
Note: The Delete command is not available for the source files of nested modules.
Nested Modules: This pop-up has two states: Skip or Include. If you choose “Skip”, the nested modules in all instances of the selected module will be skipped (they will not be shown on the Floor Plan). If you choose “Include”, all nested modules in all instances of the selected module are shown.
Note: You can override this setting for any instance of a module: select the placed module and go to Module Settings. Check or uncheck the “Skip Nested Modules” box as desired.
To set update preferences when opening a file containing hotlinks, go to Options > Work Environment > Data Safety & Integrity > Hotlink Update.
For more information, see Hotlink Update.
Hotlink Sources
The “Hotlink Sources” list displays the sources of the hotlinked module files together with the status of each of these files.
Select any file in this list to view, on the right:
•File size: Size of the source file.
•Modified: the modification date of the source file.
•Stored: the modification date of the source file as currently stored in the host project. If this date is older than the “Modified” date shown above, your source is out of date and should be updated.
•Where: file path of the source file.
In the header, click the fields to sort data by that column. Use the splitter bar between Name and Status to edit the column width of the Name column.
For any selected file in the list, you can do the following operations:
Update: For any file having the status of “Modified,” click the Update button to update, from the selected source file, all instances of the module placed in your project.
Relink: Use this command to replace the selected Hotlink Source with another file. This means that all module instances based on the original source will now be replaced by modules based on the new source you relinked here.
Note: The Relink command is not available for the source files of nested modules.
Use Relink if any of your Hotlinked Sources are shown with “Missing” status: use the appearing “New Hotlink” directory dialog box to provide the location of the Hotlink Source (which is probably missing because it was moved to a new location.) As long as a Hotlinked Source is missing, ARCHICAD cannot update its module instances.
See Restoring Missing Hotlinks.
Relocate: This command is available if you have selected multiple Hotlink Sources. It brings up a directory dialog box allowing you to choose a folder location. Selected source files will be replaced with identically named files located in the designated folder.
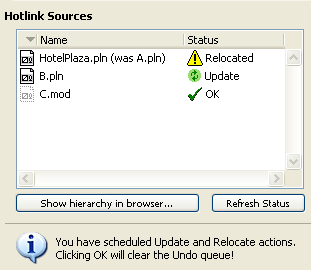
Note: If you click the Update, Relink or Relocate commands for selected Hotlink Source files, these scheduled actions are noted in the files’ status column with a yellow triangle (at this point, you can still cancel the operation). The actions are not carried out until you press OK to close the Hotlink Manager dialog box.
Warning: Carrying out these actions means that your ARCHICAD project’s entire Undo queue will be cleared!

Open in Separate ARCHICAD: Use this command to open the selected source file in a new instance of ARCHICAD. This way you can edit the file. If you wish, save the edited source file and click Update in Hotlink Manager to have all placed module instances based on this source file reflect your edits.
See Updating Hotlinks.
Hotlink Source File Status Messages
Each hotlink source file’s status is indicated by one of the following:
•OK: This Source file’s modules are up to date.
•Modified: Source file has been changed. To update the modules in your project that originate in this source file, you must use Update.
•Missing: You have placed modules from this file in your project, but ARCHICAD cannot locate the source file. To enable the updating of these modules, you must first locate the source file (use Relink to identify the missing file’s location).
•Not Accessible: The source file is either an old Teamwork file (a Teamwork file format from a pre-13 version of ARCHICAD), or it is an ARCHICAD 13 or later Teamwork project located on a BIM Server. You do not have access to this source, because you are using either a Demo version of ARCHICAD, or a non-Teamwork network key.
•Legacy: Legacy source files are those saved in an ARCHICAD version prior to ARCHICAD 12. To enable these modules to be updated, you must first open the legacy source file and re-save it in version 12.
See the Migration Guide for ARCHICAD 19 for details on migrating legacy hotlinks.