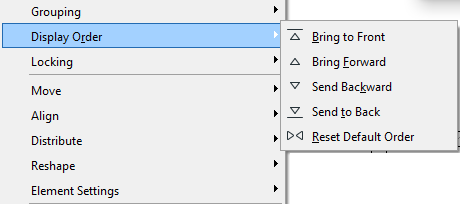
When drawing a Project with ARCHICAD, overlapping elements will be drawn according to a specified stacking order. By default, elements are stacked in an order typically used in architectural drawings.
By default, stacking order is determined by element classes, of which there are six. Regardless of the sequence in which elements are placed, those in the first class will be placed in the foreground, second class in the level behind it, and so on.
The element classes are in descending order of class:
1.Annotation (Text, Labels, all Dimension types, Zone Stamps)
2.2D artwork (Lines, Circles, Splines, Hotspots)
3.Library Parts (Objects, Lamps, Stairs)
4.3D structures (Walls, Beams, Slabs, Doors, Windows, Columns, Roofs, Meshes)
5.2D polygons (Fills, Zone Polygons)
6.Figures
Display Order of Overlapping Elements
Overlapping within the same class depends on the order in which you place the elements, although walls with the same fills will display clean intersections.
When selecting overlapping elements within the same class, you can select them in sequence using Tab.
See Feedback on Overlapping Elements.
ARCHICAD’s default stacking order is appropriate in most cases, but you may wish to place elements in a different overlapping position. For instance, for a Fill to overlap a 2D element or an Object, a set of commands in Edit > Display Order hierarchical menu or the relevant buttons of the Arrange Elements toolbar let you override the default stacking order element by element.

On newly placed elements, the commands work as follows:
•Bring Forward: On this command, selected element(s) will overlap all the unchanged elements of their own and any lower classes, but will still stay below the elements of higher classes.
•Bring to Front: On this command, selected element(s) will overlap all other existing elements.
•Send Backward: On this command, selected element(s) will be overlapped by (sent behind) all the unchanged elements of their own and higher classes, but will overlap the elements of lower classes.
•Send to Back: On this command, selected element(s) will become overlapped by all other existing elements.
•Reset Default Order: This command restores the default overlapping order described previously.
Mechanism of the Stacking Order
Both the default stacking order and the customization commands are based on two ordering mechanisms: classes and stack levels.
ARCHICAD places elements in 14 stack levels. Each level can contain any of the element types. The final stacking order you see on screen and on printouts is based on stack level and element class. All elements on a level will overlap elements on lower stack levels, regardless of class.
New elements are always placed into the preferred stack level of their own class. Stack level preference is as follows:
1-4: Void by default
5: Annotation
6: 2D Artwork
7: Library Parts
8: 3D Structures
9: 2D Polygons
10: Figures
11-14: Void by default
By default, the upper and lower 4 stack levels are empty. You can bring or send elements of any type into these stack levels with the Edit > Display Order commands detailed above.
The Bring to Front and Send to Back commands move the selected elements until they overlap (or are overlapped by) all of the existing elements. This is not necessarily the 1st or the 14th level, which means that in most cases it will still be possible to place other elements above or below them.
Text or Dimensions brought up to the top stack level cannot be overlapped. For example, if you want a Fill to overlap them, you will have to send the Text one level backwards.
When moving several elements placed at different stack levels forward or backward, each element will only move one level.
When bringing to front or sending to back elements of different types, they will overlap (or be overlapped by) all existing elements, and will retain their stacking order in relation to each other.
Zones and Fills are compound elements consisting of components of two different classes (Zone Polygons and Zone Stamps, Fills and their area texts). These two components always keep their order according to their classes, for instance area texts always overlap their fills. Although you can change their overlapping order separately, Fills and Zone Fills can never overlap their own area texts and zone stamps and vice versa, forcing the other component to move with them if necessary.
In DXF/DWG output, all elements will be transparent, meaning that hidden or partially overlapped elements will be entirely visible.