Multi-selection of Panels and Frames
Any placed Curtain Wall instance is defined by Curtain Wall System Settings. However, you can use Edit mode and its dedicated member-specific tools to access and change the individual members of a selected Curtain Wall, or to add new custom members to it, using the same input, selection and editing methods as in the normal ARCHICAD workspace.
In Edit mode, each member (Scheme, Frame, Panel, Accessory, Junction) has its own Settings dialog box and its own tool, enabling you to change settings and place new Members in this Curtain Wall. (You cannot create a new Curtain Wall in Edit mode; the purpose of Edit mode is to provide a deeper level access to the components of an existing, selected Curtain Wall.)
Once you change the parameters of any selected Curtain Wall member in Edit mode, that member is no longer tied to Curtain Wall System Settings; it is a Custom member, and its parameters are locally defined, in its individual tool settings dialog box (e.g. Scheme, Frame, Panel, Junction, and Accessory Settings). Custom parameters are set in Edit mode only.
Please note that changing the settings of any selected Curtain Wall member in Edit mode will NOT affect the Curtain Wall’s System Settings.
Curtain Wall Tool Settings in Edit Mode
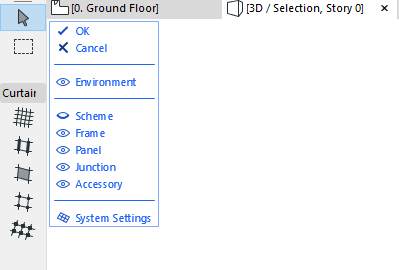
Tools can be accessed in the familiar way from the Curtain Wall Toolbox, available in Edit mode only:
Note: The color settings of the Curtain Wall Toolbox are the same as for the Tracker. Set these colors at Options > Work Environment > Tracker and Coordinate Input.
Each of these tools has its own settings dialog, with the same appearance and arrangement of controls as the corresponding page of Curtain Wall Settings.
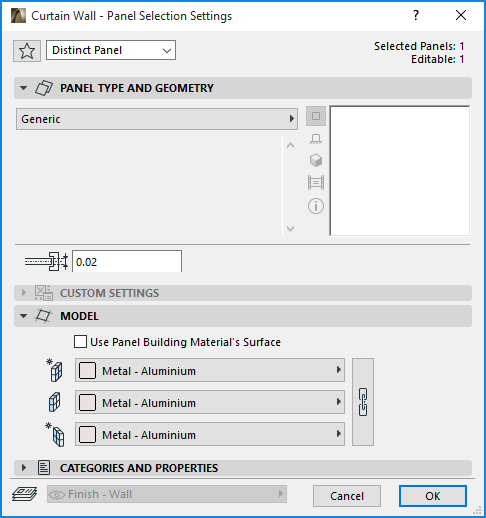
The only difference is that member-specific Tool settings do not display the navigation tree seen in Curtain Wall System Settings, and they display a different header.
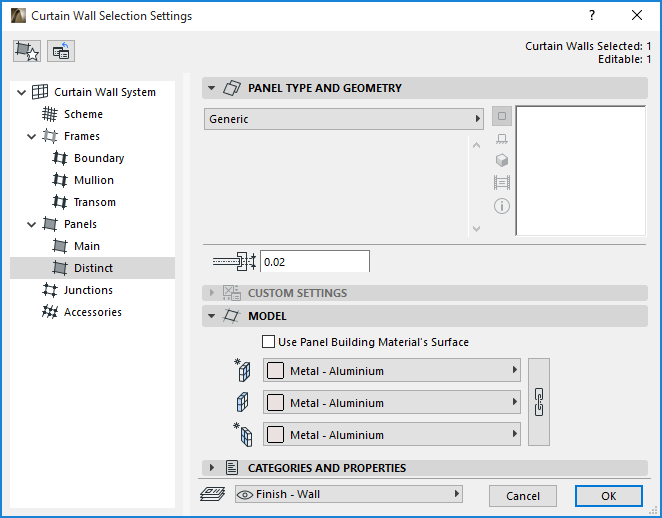
Panel Settings, System Level:
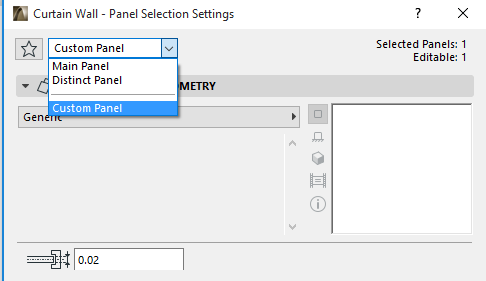
Panel Selection Settings, Edit mode:
For each selected member in Curtain Wall Edit mode, Tool Selection Settings displays the parameters of the currently selected member. If, for example, you have selected a panel of class “Main”, the top panel displays, by default, “Class: Main Panel.” These parameters are those defined in the System Settings: Main Panels dialog box.
However, as soon as you change any parameter in this Selection Settings dialog box, the top panel display changes to “Custom.” Clicking OK will apply these Custom parameters to the selected panel(s) only.
A Custom member means that its link to the settings of the Curtain Wall has been broken, and any changes to the Curtain Wall Settings will not affect it.
You can always renew this link by changing the class field back to the default setting (e.g. “Main Panel”).
To edit the System-level Settings without leaving Edit mode, click the System Settings command at the bottom of the Edit mode display palette.
See Edit Mode Display Palette.
When in Edit mode, you can save and load your Favorite settings individually for each tool, as with any other ARCHICAD tool.
In the individual Tool Settings for Curtain Wall members in Edit mode, layer assignment is displayed but cannot be edited. All Curtain Wall members will be placed on the layer determined by the Curtain Wall Settings; layer assignment cannot be individually set for its members.
Enter Curtain Wall Edit Mode
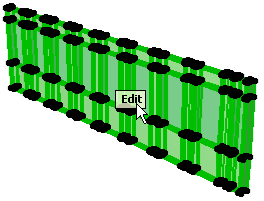
To enter Edit mode, first select the Curtain Wall. Then click the Edit (or Edit in 3D) button which appears on the selected Curtain Wall.
Another way to enter Edit mode: select the Curtain Wall, then the Design > Modify Curtain Wall > Edit System command.
Note: This only works if you have selected a single Curtain Wall. If the selection includes several disparate Curtain Walls, the Edit button will not appear, and you cannot edit individual members of any of them.
When in Curtain Wall editing mode, the model is shown in the 3D window (even if the original Curtain Wall selection took place in a Floor Plan or S/E/IE window). The rest of the building (the “environment”) is shown in background mode.
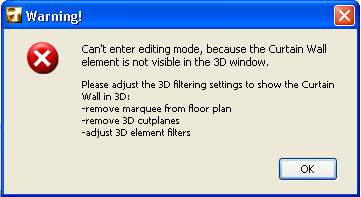
Note: If the contents of the 3D window do not include the Curtain Wall, you cannot use Curtain Wall edit mode. Make sure that the Curtain Wall can be seen in the 3D window before entering Curtain Wall edit mode.
Once you are in Curtain Wall Edit mode, the regular ARCHICAD toolbox is replaced by a special Curtain Wall toolbox.
To edit the System-level Settings without leaving Edit mode, click the System Settings command at the bottom of the Edit mode display palette.
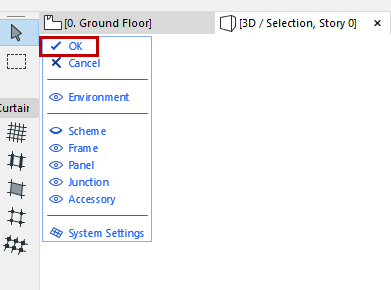
When you have completed your modifications to the selected Curtain Wall in Edit mode, click OK in the Edit mode Display palette to save changes and return to the 3D window, or Cancel to discard changes.
(The same commands are available from a menu: Design > Modify Curtain Wall > Finish Edit System or Cancel Edit System.)
While you are in Edit mode, each Undo command will discard only the last modification.
Right after you leave Edit mode, clicking Undo a single time will discard all the changes you just made in Edit mode.
The Edit Mode Display palette appears automatically whenever you enter Curtain Wall Edit mode.
To make editing easier, use the Edit mode display palette to show/hide the Curtain Wall elements as needed (click the eye icons to open or close them). You can click them on and off even during an editing operation.
Right-clicking any of the components (e.g. “Scheme”) means that component will be displayed and the rest hidden.
Note: The Edit mode display palette is a display-only editing aid and does not affect the construction or the output of the Curtain Wall element.

“Environment,” in this display palette, refers to the rest of the building model, which you can show or hide as needed to assist in editing. Preselection tags will identify the Environment’s model elements in dimmed form, but in Curtain Wall Edit mode, you can edit only Curtain Wall Members.
Note: If you have trouble identifying the edges of these model elements shown as the Environment, try checking the Contours box (use Draft or Best) in View > 3D View Options > 3D Window Settings.
Select Curtain Wall Member in Edit Mode
Use the selection tools to select any member(s) of the Curtain Wall. To select all instances of any of the members, activate the tool and click Ctrl+A.
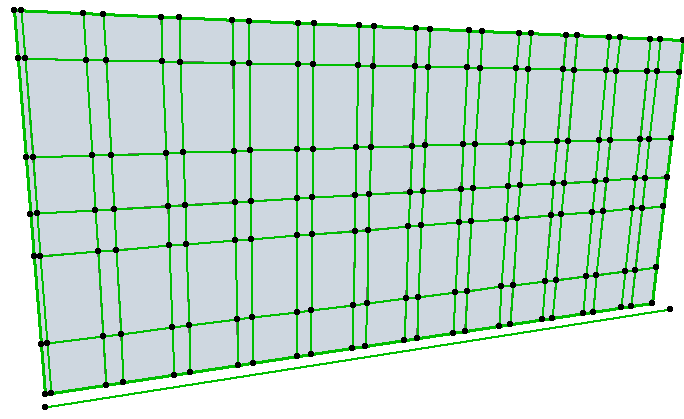
For example, to select the Scheme, activate the Scheme tool and click Ctrl+A: all parts of the Scheme (Grid lines, the Boundary and the Reference Line) are now selected. If you also turn off the display of Frames and Panels (by clicking the eye icons in the Edit Mode Display palette), the Scheme is now easy to edit.
Note: In Curtain Wall Edit mode, you can use the Marquee to limit the scope of the Find & Select function - to find certain Curtain Wall members either inside or outside the Marquee.
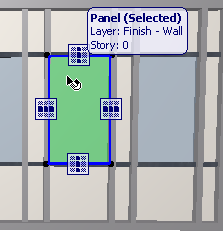
Multi-selection of Panels and Frames
When you select a single Panel or Frame of a Curtain Wall in Edit mode, an editing aid called a “Grip” appears. The Grip appears at the same time as the pre-selection Info Tag. The Grip gives you a shortcut for selecting multiple Frames or panels, based on the Curtain Wall Grid.
When selecting a Frame, you can click one of two buttons on the Grip:
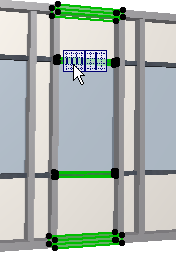
•the button with the single line will select all the Frames along the full gridline underlying the selected Frame:

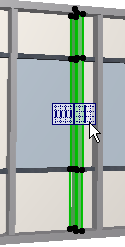
•the button displaying multiple parallel lines will select all the Frames that are parallel to the selected Frame segment.

When selecting a Panel, the “Grip” selection shortcut enables you to select all Panels along either the grid’s primary direction or its secondary direction.