Define Horizontal/Vertical Range of Section Viewpoint
Note: This process is identical for Elevations.
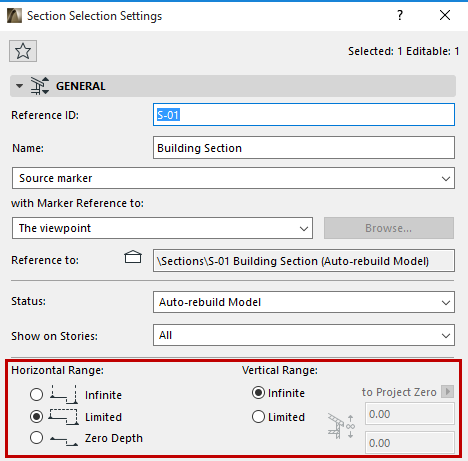
Use the controls in the General Panel of Section Settings to define the Section geometry.
•An infinite Horizontal Range shows the full extent of the visible model from the Section line.
•A limited Horizontal range shows the model between the Section line and its limit, which is placed automatically. Once it is placed, you can select the limit line and move it, if necessary.
•A zero-depth range shows only the parts of the model cut by the Section line, at the cut location only. (For Elevations, there is no “zero depth” option.)
For more information, see Horizontal Range (for Source Section markers only).
Vertical Range
•A Section with an infinite Vertical Range shows all stories of the model.
•If you choose limited Vertical Range, enter the elevation values corresponding to the vertical range of the model you wish to include in the Section.
For more information, see Vertical Range (for Source Section markers only).
Editing a Section’s Horizontal Range and Distant Area Limit
You can change the depth (horizontal range) of a selected section by moving the limit line: make sure that the Section tool is active, then move the line by clicking it and dragging to the desired position.
You can also move the Distant Area limit line, if such a limit has been defined in Section Settings.
Note: An optional “distant” area of your Section viewpoint, with separate colors/effects, is created if you check the Marked Distant Area box in the Model Display panel of Section Settings. The Distant Area limit line is then displayed as part of your Section.
See Section Model Display Panel.
Both the Section limit line and the secondary “distant” line are on-screen-only elements.
•To show or hide the Section limit line (horizontal range) and the Distant Area limit line on the Floor Plan, use the toggle control in View > On-Screen View Options > Marker Range.
•To change these line types/colors, use the control in Options > Work Environment > On-Screen Options.
For more information, see Display of Marker Range Lines.