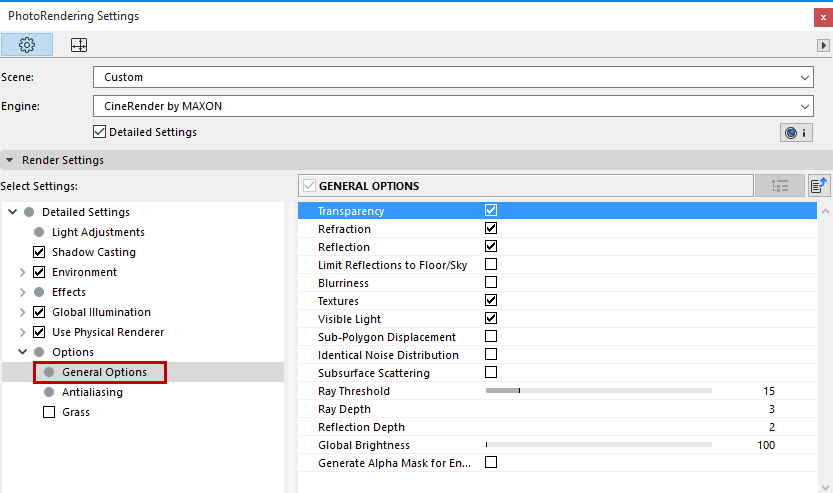
These settings are available in the Detailed view of PhotoRendering Settings for the CineRender engine.

This list of options affect the rendering as a whole: if you uncheck an option here, it is disabled for the whole rendering model, regardless of what else you have set elsewhere. It is worth considering which of these can be turned off so as to minimize render time. For example, you can turn off all blurriness with a single click.
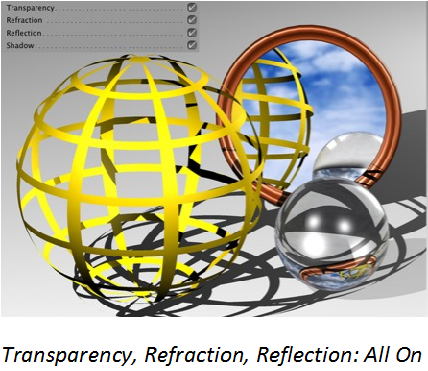
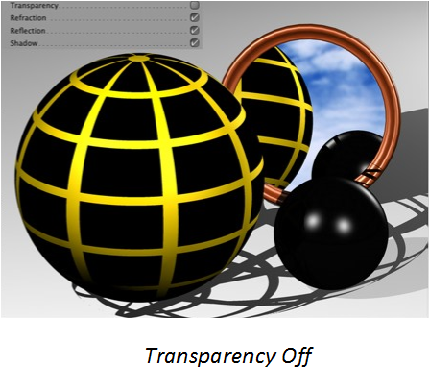
This option defines whether the Transparency or Alpha surface channels should be included in the calculation.
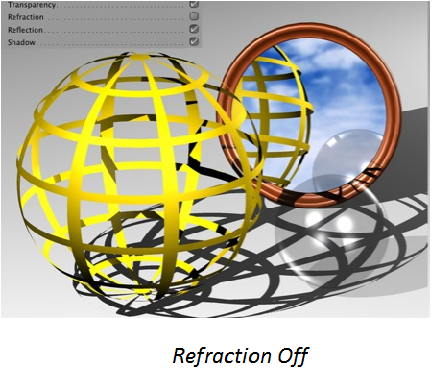
Defines whether or not refraction index values should be included when rendering transparent surfaces. Surfaces such as glass or water only look realistic if rendered using a refraction index, but the render time will increase accordingly. However, no additional render time will be added if a scene does not contain materials that refract light.
Tip: Occasionally, transparent objects that lie behind other transparent objects are rendered black. If this should occur, increase the Ray Depth value (below).
Defines whether or not reflections should be calculated. If this option is deactivated, objects will only be rendered in their base color. This option can also be used in conjunction with the Limit Reflections to Floor/Sky option (below).
Here are some illustrations of these effects:
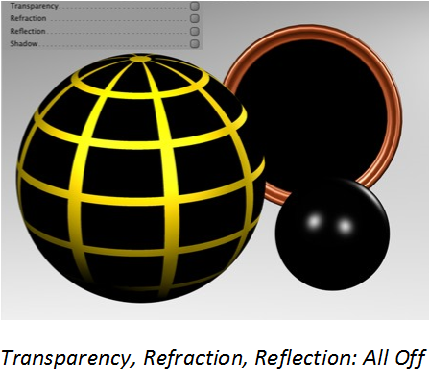
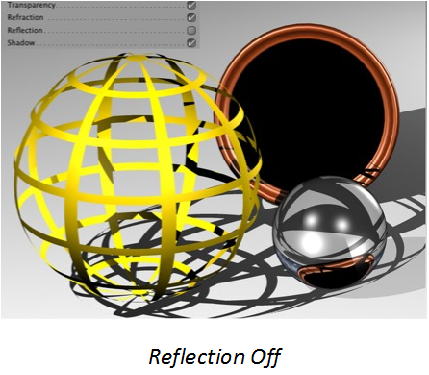
Limit Reflections to Floor/Sky
Enabling this option will cause the raytracer to only calculate the reflection of the floor and sky onto reflective surfaces (and not onto other objects!). This method is not computationally intensive and is therefore recommended for use in time-critical situations.
Use this option to enable/disable the blur effect for the Reflectance and Transparency surface channels.
Using this option, you can enable or disable textures when rendering; only bitmaps and shaders remain unaffected. For example, you can disable the textures for a test render or when using the cel renderer.
•If Textures is enabled, bitmap textures will be rendered.
•If Textures is disabled, bitmaps will be replaced by the color black.
You can use this option to deactivate visible lights globally for the entire scene, without having to do it separately for each light source (lamps, lights, Sun).
You can use this option to deactivate SPD globally for the entire scene, without having to do it separately for each SPD surface. This option can be turned on and off quickly for test renders.
See Sub-Polygon Displacement in Surface Settings.
CineRender uses numerous effects that (if low values are used) produce grainy results, which are often referred to as “noise”. Some examples are:
•Subsurface Scattering
•Depth of field
•Motion blur
•General Sampling in the Physical Renderer
•GI and Ambient Occlusion.
If Identical Noise Distribution is enabled, the noise distribution will be random for each rendered image, which means that successively rendered images will all have a random noise distribution. This reflects the real-world behavior of film or image sensor sampling in digital cameras, which also contain a certain amount of “noise”.
To render stills as identically to one another as possible, this option should be enabled. However, note that other effects can still produce randomness. This can, for example, be seen in GI renderings in which slightly differing results are produced despite identical noise distribution.
Subsurface Scattering (SSS) is an effect in which light penetrates slightly transparent surfaces, which then virtually transport, scatter and - in part or entirely - absorb and color the light. “Slightly transparent” means every material through which light can pass, however slightly. Such materials include porcelain, marble, skin, milk or various plastics, just to name a few.
SSS also works in conjunction with GI, i.e light that GI casts onto an SSS object will be included in the calculation. On the other hand, light that is generated by a SSS will only be recognized by other objects when in QMC GI Mode.
Limitation: Keep an eye on the object surface Normals. In some cases it can occur that the SSS doesn’t work correctly if the Normals are oriented incorrectly (e.g. if on a sphere they all face inward).
This value helps to optimize render time. With complex scenes, particularly those containing many reflective and transparent surfaces, 90% of the processed rays contribute less than 10% to the general picture brightness and color. With a threshold value of, for instance, 15%, the rays stop their movement from the camera into the scene as soon as their brightness falls below this value.
For reflections/transparencies, this generally means that the higher the value, the greater the degree to which very small reflections/transparencies will be taken into consideration - with correspondingly longer render times.
The Ray Depth determines how many transparent objects (or areas made invisible using the alpha channel) can be penetrated by the renderer. The lower you set the Ray Depth, the fewer the number of objects that can be seen through. Those areas that cannot be penetrated are rendered black.
The higher the Ray Depth value, the further the rays are followed into the scene for rendering purposes.
A Ray Depth of 1 means that calculations are finished for a pixel once its ray hits something in the scene. Transparencies and alphas therefore will not be visible.
A value of 2 means that after a ray has hit a surface a second ray is calculated for the transparency.
The higher the Reflection Depth, the further rays are followed into the scene and the results rendered.
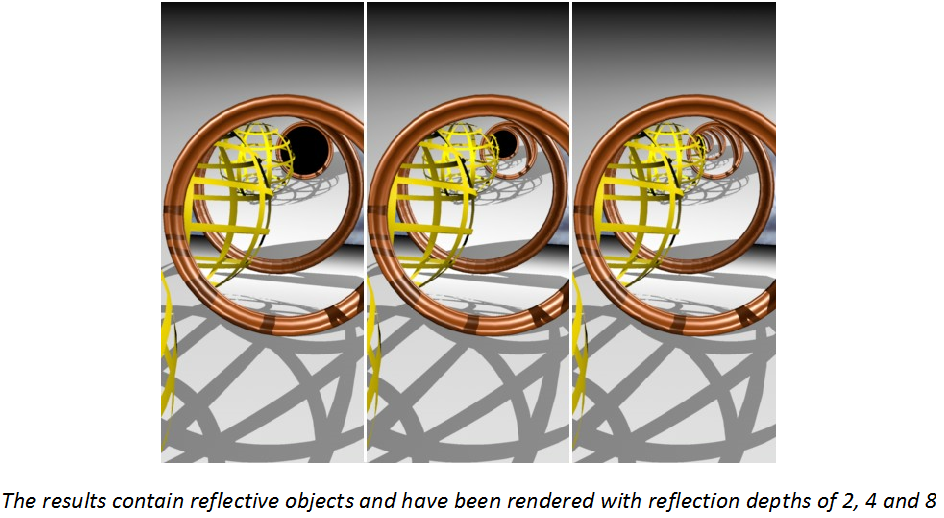
When a ray is sent into the scene, it can be reflected by reflective surfaces. With certain arrangements, e.g. two mirrors opposite each other, it is possible that a ray will be reflected forever, trapped between the mirrors, and the raytracer would never finish rendering the picture. In order to prevent this, you can set the maximum number of reflected rays.
You can also use Reflection Depth to limit the render time for the picture. Often, only the first generation of reflections is important. Further rays tend to add little to the image quality, but increase the render time considerably.
A Reflection Depth of 1 means that calculations for a pixel are finished once a ray hits something in the scene. Reflections therefore will not be visible.
A value of 2 means that after a ray has hit a surface a second ray is calculated for the reflection.
This setting lets you simultaneously set the global brightness for all light sources present in your scene. A setting of 100% will utilize the intensity set in each light, 50% will decrease the intensity of each light proportionally by half, while a setting of 200% will double the intensity of each light.
Generate Alpha Mask for Environment
If you enable this option, a pre-multiplied alpha channel will be calculated during rendering.
The alpha channel is a grayscale image of the same resolution as your color picture. Pixels in the alpha channel are either black or white. A white pixel in the alpha channel indicates the presence of an object at that position in the image while a black pixel indicates no object.