Toolbar Customization Dialog Box
Open the Options > Work Environment > Toolbars dialog box to create a new toolbar, or customize any of the available ones.
To create a new toolbar, use the New Toolbar command from the Toolbar Options pop-up menu.
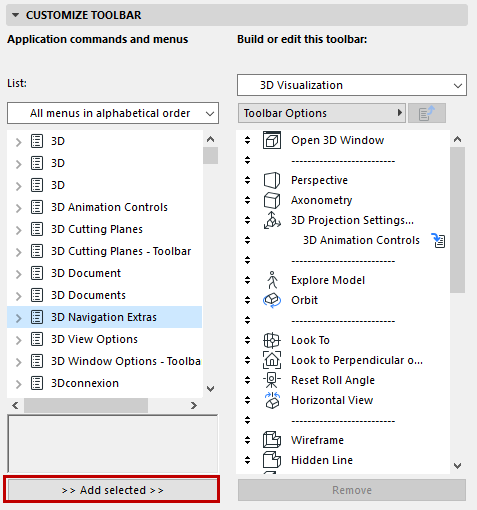
To customize a toolbar, choose one from the pop-up list at the top right of the dialog box.
The left side of the dialog box (Application commands and menus) lists all of ARCHICAD’s commands and menus. You can display this list in one of five formats: Current menu structure; All commands by theme; All commands in alphabetical order; All menus in alphabetical order; All New commands in alphabetical order.
The last item in the list is a Separator bar.
Add a command or menu to the desired toolbar by selecting it from the list window, then click the Add Selected button at the bottom, or simply drag it to the right. It is possible to place the same command or menu into more than one toolbar.
To change the order of the items (including separator lines) within the toolbar, use the up/down arrows at the left of each command.
For example, you might add the 3D Navigation extras menu to the predefined 3D Visualization toolbar.
If you have placed a menu into the toolbar, it is indicated by a special icon:
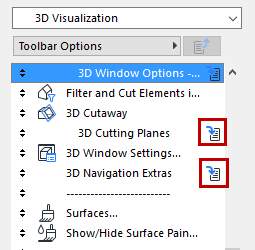
If you click on it (or double-click the menu name), that menu opens to let you modify its contents (commands), if you want.
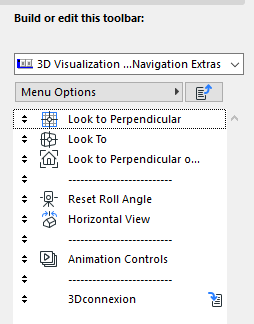
The Options button will accordingly change to “Menu Options” instead of Toolbar Options.
Click the Remove button to remove a command or menu from the selected toolbar. (Removing the menu from the list of toolbar items does not delete the menu from the interface entirely.)
Toolbar Options
Using the Toolbar Options pop-up menu, you can:
•Rename, Delete, Duplicate, or create a New toolbar
•Set a view mode for the selected toolbar: for every command in the toolbar, you can show its Icon, or its Name, or both Icon and Name. You can also choose “Icon and Name selectively”.
Note: Icon and Name Selectively means that the Icon will be shown for every command, but the name will be shown only selectively, depending on what you set in the Further Options panel.
The settings in this panel apply to selected commands individually.
Show command name in case of “Selective” option: This checkbox is relevant only if you have chosen “Icon & Name Selectively” from Toolbar Options. In this case, select a command in the list for which you want to show both Icon and Name, then mark this checkbox.
Any command for which you do not check this box will be displayed with its Icon only.
Sticky pop-up menu: This option is available only if you have placed a menu as an item in the toolbar and then selected it. Check this box to associate the selected pop-up with the previous item in the toolbar. The effect: the sticky menu will be displayed on the toolbar as a black pop-up arrow.
For example, the Tracker command on the Standard toolbar contains an associated (sticky) pop-up menu, represented by a black pop-up arrow, which in turn accesses Tracker-related commands.