
An Info Box is available for each tool in the toolbox. When you activate a tool or select a placed element, its Info Box palette will display current settings for that tool/element. If several elements are selected, the Info Box displays the controls for the last selected element.
Note: If the Info Box is not visible on screen, use Windows > Palettes > Info Box.
The Info Box contains a condensed collection of input and parameter controls that are specific to the selected tool/element. While some of these controls are also available in the Tool Settings dialog box, the Info Box is a quicker way to access these controls, because it stays on screen while you work.
By default, the Info Box is docked at the top of your workspace in a horizontal position. To show it vertically, dock it at either side of your screen.
Header texts indicate what each Info Box control represents.
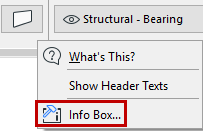
If you don’t need header texts, or to save space, right-click anywhere in the Info Box and choose Hide Header Texts.

•Selected/Editable: The current Info Box gives you feedback on the number of Selected Elements, as well as how many of those are Editable. Changes made to Info Box settings will affect the Editable elements. (An element might not be Editable if it is on a locked layer.)

•Default Settings. If there is no selection, the Info Box displays the active tool’s Default Settings.
Customizing the Info Box
You can customize the order and visibility of panels in each Tool’s Info Box: go to Options > Work Environment and open the Info Box Customization Dialog Box.
An easy way to access this dialog box is to open the Info Box context menu by right-clicking anywhere in the Info Box, then click Info Box...
See Info Box Customization Dialog Box.
You can store your customized Info Box settings as part of a Tool Scheme in your Work Environment.
For details, see Work Environment Schemes.