Note: The following descriptions are based on the Windows interface.

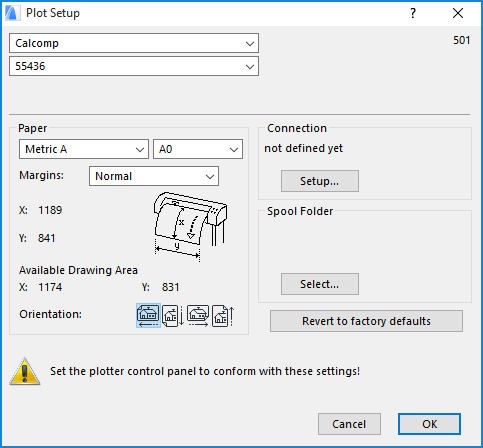
Use the two drop-down lists at the top of the dialog box to choose the plotter driver. The first lists manufacturers and the second the plotter driver for the given manufacturer. The contents of this list depends on the contents of the PlotWare folder.
•If the manufacturer of your plotter is listed but that particular model is missing, browse through the other models and select one with a similar paper size (e.g., E size). If there are several models with these criteria, experiment with all of them.
•If the manufacturer is not listed with any model, check the user manual of the plotter for compatibility and emulation modes. If the plotter accepts HPGL-2 and/or RTL data, there is a good chance of making it work. In this case, choose the HP DesignJet 755C model.
See also the list of supported models in the PlotWare folder/Read Me for Plotter Users.html file.
Paper: Use these controls to choose a paper size for your plotter. Invalid paper sizes are grayed in the menu and are not selectable.
If you choose Custom in the Paper area, the second pop-up list contains by default two items: Current paper and Modify list.
Choosing Modify List opens a dialog box in which you can define your own custom paper sizes.
Click OK when you have finished defining sizes manually. The new custom sizes will appear in the custom size pop-up. Custom paper sizes are saved with plotter settings.
Margins: Choose either “Normal” or “Extended” for the paper margins. The values in the X and Y fields below give you feedback on the result.
X/Y: These fields display the horizontal and vertical paper size. If you are using a “Custom” paper size, enter the desired paper size here.
Available Drawing Area: The X and Y values shown here indicate the size of the usable drawing area of the chosen paper.
Orientation: Use these controls to determine the location/direction of the output on the paper.
In the Connection area, specify the connection type you intend to use with your plotter.
To configure and use a plotter connected to one of your own computer’s ports or to a network plotter, use the Add Printer tool of the Windows Printers Control Panel.
When first using a plotter with ARCHICAD, you need to connect to it by clicking the Setup button in the Connection area. The Select Plotter dialog box appears.
You can choose one of the installed printer drivers from the pop-up menu. This driver will serve as a gateway to the plotter; ARCHICAD will use the specific plotter driver selected on top of the dialog box for actually plotting data.
Below the Connection options, you can define a folder for spooling files to be plotted either from your own computer or anywhere on the network in the background.