Element Input Using Tracker Coordinates
When placing a new element, you can define its coordinates in the Tracker during input.
With the Tracker displayed, do one of the following:
•Start typing a value for the default parameter (the one shown in bold.) The cursor will automatically jump to the Tracker and enter the value.
Note: This input method works if the “Enable direct input into Tracker fields” box is checked in Options > Work Environment > Tracker and Coordinate Input. This is the default setting.
•Press Tab as many times as needed to activate the required Tracker field, then type in the desired number.
![]()
•Click a field in the Tracker to activate it, then type in the desired number.
•Type a shortcut (X, Y, Z or D/R or A) to activate the corresponding Tracker field, immediately followed by the value. For example: X3 or Y-4.
Notes:
–This input method works if the “Coordinate Shortcuts prefer Tracker” box is checked in Options > Work Environment > Tracker and Coordinate Input. This is the default setting.
–The + prefix is optional for positive values.
–You can type coordinate values in any order.
–If the Tracker is displayed in its compact form, typing the shortcut for a hidden parameter (or clicking Tab) will display it.
For another method of coordinate input, see Coordinates Palette.
Complete Element Input
Press Enter or click the checkmark icon in the Tracker.
Display Snap Guides at Coordinate
Click the crosshair icon in the Tracker. The edited element will then jump to that coordinate value and, if Snap Guides are active, the applicable Snap Guides will appear.
For more information, see Pin or Place a Snap Guide Manually.
Cancel the last operation
Press Esc.
Add to or Subtract from Current Value
Type + or – after the value. For example, typing x3+ will add 3 to the x value shown in the Tracker box.
Notes for users of U.S. dimensions:
–Two dashes are required for subtraction of whole feet because the first dash is interpreted as an indication that inches are to follow.
–When 3 is entered, ARCHICAD assumes you mean three feet. Typing 3’6, 3’6’’, or 3-6 will enter three feet, six inches.
Copy-Paste Coordinate Values
Coordinates can be copied and pasted using the clipboard. The Cut, Copy and Paste menu items are inactive during numeric input, so you must use the standard shortcuts or the context menu.
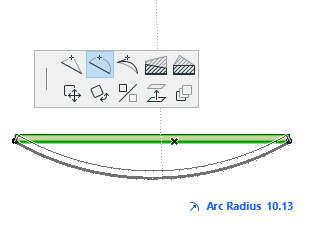
The parameters appearing in the Tracker vary depending on the type of editing action that is underway. For example, if you select a straight segment and choose the Curve edge command from the pet palette, then the Tracker shows the “Arc Radius” parameter.

The Tracker always shows one of its parameters in bold; this is the default parameter.
Depending on your choices in the Tracker pop-up menu in the Standard Toolbar, the Tracker will display only the XY or the DA (distance/angle) coordinate pair (switch from one to the other by clicking “Prefer XY Coordinates/Prefer Polar Coordinates” during editing/input), and will show or hide the names of the coordinates (“Show/Hide Parameter Tags”).

![]()
Hint: To switch between DA and XY coordinates on the fly, use the / (slash character) shortcut.
As a rule, the parameters in the Tracker will be listed in order of relevance, with D/A coordinates followed by X, Y and Z coordinates.
If you have activated the Expand Tracker Automatically option from the drop-down Tracker menu, then all the parameters will be shown as soon as you enter the Tracker (by entering a value or by pressing Tab).
Note: The same option, “Expand Tracker automatically during numeric input,” is also available as a checkbox in Options > Work Environment > Tracker and Coordinate Input.
Otherwise, if you want to expand the Tracker, enter the Tracker by pressing Tab, then click the arrow at the bottom of the Tracker to expand it.
![]()
Coordinate Input Logic: Expert Options
Special Tracker options are available to let you further customize the Tracker function, using the Coordinate Input Logic checkboxes in Options > Work Environment > Tracker and Coordinate Input.
For information on all these options, see Tracker and Coordinate Input.