Layers (DXF/DWG Translation Setup)
These are options in the DXF/DWG Translation Setup dialog box.
See DXF/DWG Translation Setup.
You can convert layers in the DXF/DWG file by ARCHICAD layers, Pen Numbers or Element Types, or by combining layers with Pen Numbers. In case of ARCHICAD Layers and Element Types, you can not define Pen-based layer names conversion, in the other three, you can.
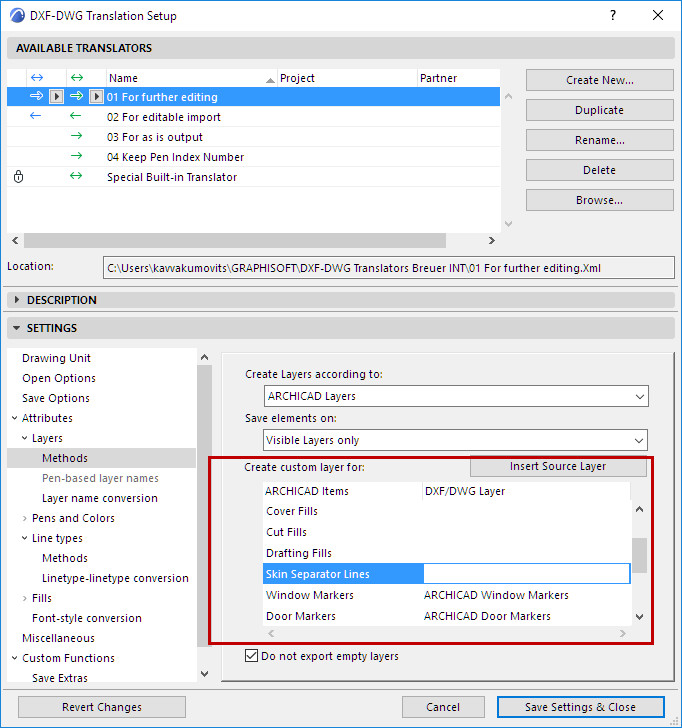
In addition, you can save either all layers or only visible ones and choose specific layers for Windows and Doors (in ARCHICAD, they are automatically placed on the same layer as their host Walls), all three Fill Categories and Skin Separator Lines.
Note: The Visible Layers Only option of the Save elements on field works for Drawings only if you save the Drawing file separately. If you save a Layout as a DXF/DWG file, all layers (both visible and hidden) of that Layout’s Drawings will be saved.
The options on the Methods tab are relevant for Save operations.
•ARCHICAD Layers: Create layers in the DXF/DWG file based on the layers used in ARCHICAD. The layers will carry their hidden and locked status with them.
Note: Pen-based layer names conversion is not available with this option, Custom Layer names take precedence. When you choose this option, the Layer name conversion dictionary will be used to replace some of the layer names.
•Do not export empty layers: This option is available only if “Create Layers according to” is set to ARCHICAD Layers. (If this box is checked, then only layers that contain elements will be exported.)
•Pen Numbers: This option places elements having the same color in a common layer. The Custom tags to Pen Numbers area has a Prefix field and a Postfix field. You can fill out these to specify the format of the created Layer names. The resulting Layer name will follow the following format: <Prefix>Pen No.<Postfix>. For example, if Prefix=’AA_’ and Postfix=’_PEN’, then all elements drawn using Pen 23 with be converted to Layer ‘AA_23_PEN’ in the resulting AutoCAD drawing.
Note 1: When you choose this option, the Pen-based layer names dictionary will be used to replace some of the layer names.
Note 2: Custom Layer names are not available with this option.
•Element types: Places common element types into a corresponding layer, such as a WALLS layer.
Note: There is no conversion dictionary associated with this layer creation method.
•Layer or declared Pen Number: Creates AutoCAD layers according to ARCHICAD Layers, but definitions in Pen-based layer names conversion dictionary take precedence over ARCHICAD Layer conversion. Within ARCHICAD Layer conversion, Custom Layers take precedence over normal Layer conversions.
•Layer extended by Pen Number: Creates AutoCAD Layer according to ARCHICAD Layers, but out of one ARCHICAD Layer it may create several Layers in the resulting AutoCAD drawing, because it will place elements located on the same Layer but using different Pens to different Layers in AutoCAD. The names of Layers will be created by the following pattern: <ArchicadLayer>_<Prefix>Pen No.<Postfix>.
Note 1: When you choose this option, the Pen-based layer names dictionary will be used to replace some of the <Prefix>Pen No.<Postfix> portion of the Layer names.
•All layers: Save elements regardless of whether they are on hidden layers or visible ones.
•Visible Layers only: Elements on hidden layers are omitted.
These fields allow you to assign Windows, Doors, Drafting Fills, Cover Fills, Cut Fills and Skin Separator Lines of Walls to separate layers, instead of remaining on the same layer as the construction element they belong to.
See also Fill Categories and Line Categories.

•Windows: If you enter a layer name into the ‘Windows’ edit field, all the Windows will be part of that layer instead of the layer of the Wall containing those Windows. If you clear it, Windows will go to their default layers (the layers of the Walls containing them). The same rules apply to Doors.
•Drafting Fills will go to the layer specified in the ‘Drafting Fills’ edit field.
•Cover Fills: Fills (if any) belonging to Slabs, Roofs, Meshes and Zones and Fills having the ‘Cover Fill’ category will go to the layer specified in the ‘Cover Fills’ edit field.
•Cut Fills showing cut surfaces or sections of construction elements and Fills having the ‘Cut Fill’ category will go to the layer specified in the ‘Cut Fills’ edit field.
•Skin Separator Lines of cut composite structures, plus Lines having the ‘Skin Separator Line’ category will go to the layer specified in the ‘Skin Separator Lines’ edit field.
•Contours of cut construction elements and composite structures (they belong to the ‘Cut Line’ category) and Lines having the ‘Drafting Line’ category will remain on the layer they were in.
•In case of a Column: if there is no veneer, the contour of the Column belongs to the ‘Cut Line’ category. If there is a veneer, the contour of the Column belongs to the ‘Cut Line’ category, and the lines between the core and the veneer belong to the ‘Skin Separator Line’ category and will be saved accordingly.
•In case of Fills: the contour of a Fill (if any) belonging to the ‘Cut Fill’ category will belong to the ‘Cut Line’ category. Contours of other Fill categories will belong to the ‘Drafting Line’ category.
•Window Markers
•Door Markers
•Zone Background (any visible zone cover fills)
•Zone Outline
•Zone Stamp (geometry of zone stamp)
•Zone Texts (textual content of zone stamp)
The Custom Layer names you define will work even if they do not exist in the ARCHICAD project.
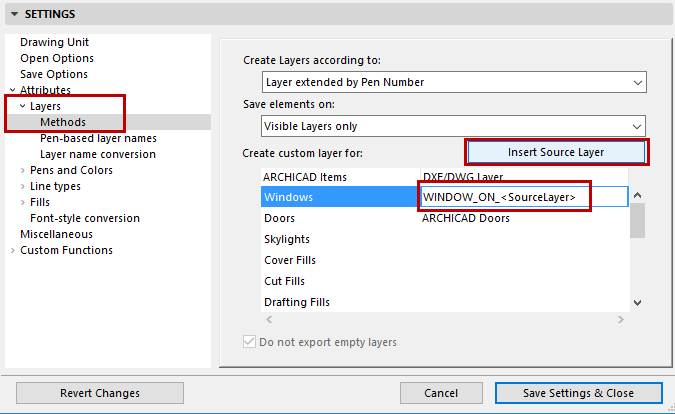
If you want your Custom Layer name to include the source layer name of the wall containing the element: click Insert Source Layer.
Example:
The Wall containing Windows is on the layer: EXTERIOR WALLS
If you enter in the Windows DXF/DWG Layer field the following: WINDOW_ON_
and then click Insert Source Layer, the Windows field shows: WINDOW_ON_<Source Layer>

Then the resulting layer name will be: WINDOW_ON_EXTERIOR_WALLS
If you save a DXF/DWG file with the “Create Layers according to” option set to Pen Numbers, the export file will contain a layer with the name PEN_<n> where <n> is a pencolor index. AutoCAD users may prefer the layer name to state the actual color name (i.e. PEN_BLUE). These options can be set here.
Pen-based layer names conversion is very similar to Layer name conversion – the only difference is that you have a standard ARCHICAD pen selection control instead of the layer name pop-up. You can write only valid pen numbers in the ARCHICAD pen field.
Use custom tag to indicate renovation status: Check this box to append a tag corresponding to the renovation status to layer names. This way, all elements on a particular layer in ARCHICAD will be assigned to one of three different DWG layers, depending on each element’s renovation status.
To create a dictionary item in the layer-name conversion dictionary, click on the “New” button and assign the layers in the dialog box.
Note: A problem may arise when you convert both “Exterior Walls” and “Interior Walls” to “WALLS” in AutoCAD. When converting wall layers back to ARCHICAD, the dictionary will not distinguish between the two types of ARCHICAD wall layers.
Pick a valid ARCHICAD layer from the pop-up under the edit field in the layer conversion dialog. Press OK to add the item to the dictionary. Then assign a corresponding layer on the DXF/DWG side.
To modify an existing item, just double-click on it, modify it, and write it back to the dictionary.
To delete one or more items from the dictionary, select them and click Delete.