Open the Composites dialog:
•Options > Element Attributes > Composites
•Attributes toolbar (Windows > Toolbars > Attributes)
•Context menu of a selected composite element:

Use this dialog to add, edit, and manage the project’s composite attributes.
Hint: In folder view, select a sub-folder to edit all its contents at once.
For general information: see Using the attribute dialogs.

“Use With” - define composite availability
For one or more selected composites:
Click one or more icons - wall, slab, roof and/or shell - to make the selected composite(s) available for particular tools.
•For example, you can define a composite structure to be used with roof and shell. So this composite will appear in the composite pop-ups of roof and shell settings.
•In the left-hand list of composites, click on column headers to sort the list by status

For a selected composite: the “Edit skin and line structure” panel lists its skins and separator lines.
Each skin consists of a Building Material, plus skin end lines that you can turn on or off
Check the preview to see the selected composite’s cut and surface appearance or line type. (The arrow indicates which part is currently selected.)

Insert skin
Select an existing skin, then click Insert skin to insert a new skin plus a separator above it.
Note: A composite structure can have up to 48 skins.
Remove skin
Click to delete the selected skin. The separator line above is also deleted.
Change skin order
The order of skins in a composite can be significant. The first listed skin is considered
•“Outside” when used with Walls
•“Top” for Roof and Slab
•“Reference Side” for Shells.
Drag a skin to a new position using the up/down arrows at the left edge of the selected row.

Edit skin’s Building Material
For a selected skin: click the pop-up to choose a different Building Material.

Show/hide skin end lines
For a selected skin: check the box to display its end lines.
Use the pop-up to choose a pen for these lines.

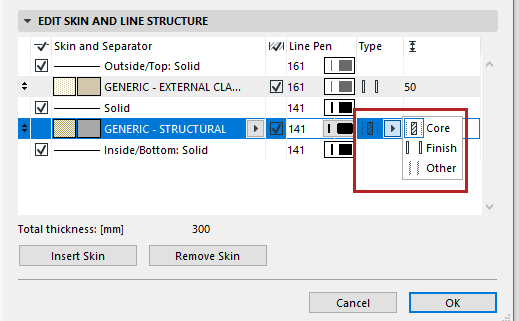
Define skin structure (core/finish/other)
Use the pop-up to define the selected skin as Core, Finish or Other. This will affect the Partial Structure Display of the composite.
See Partial Structure Display.

•You can define multiple skins as core, but these skins must be adjacent to each other.
•You can define multiple adjacent skins as finish, but they must include one or both of the outermost skins.
•If you change a skin type from core to finish, then every skin between the changed skin and the closest face will also change to a finish.
Skin thickness and Total thickness
For a selected skin: enter its thickness value.
The composite structure’s total thickness is shown below.

Show/hide separator line
For a selected line: check the box to display it.
Use the pop-ups to choose its line type and pen.
