Share a Teamwork Project in Archicad
To create a new Teamwork project, open a solo Archicad project file (.pln), then use the Share command to add it to the BIMcloud. All users who have access rights can then work on this shared project in Teamwork.
Follow these steps to share a Teamwork Project:
1.Open a solo Archicad Project file (.pln).
2.Use one of these commands to open the Share Project dialog:
•Teamwork > Project > Share
•File > New > Share

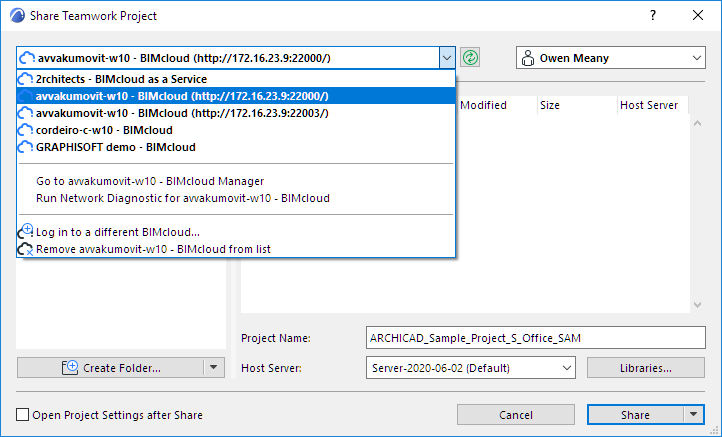
3.Choose a BIMcloud server from the list, which shows the addresses of all BIMclouds to which you successfully logged in at least once.
•If you don’t see the BIMcloud you need, you can add it with Log in to a different BIMcloud. (see Log in to BIMcloud)
4.Choose a user.
•If you are not logged in yet, choose Log in from the Select User field.
•If you don’t see the user you need, choose Log in as a different user.
See Log in to BIMcloud.
If you no longer need to see an item, select it and use the Remove command from the drop-down lists
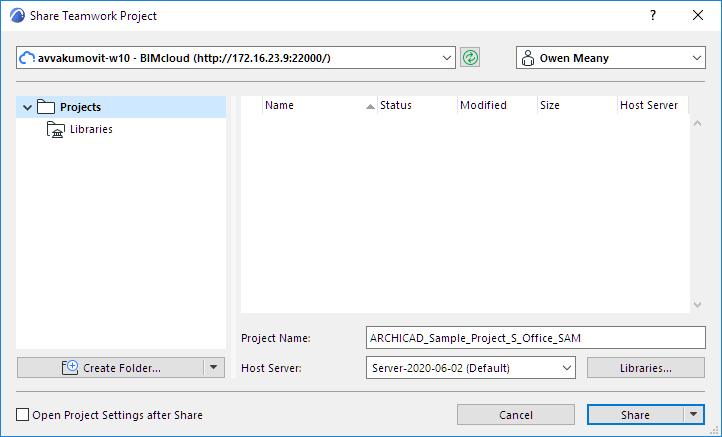
The Share Project dialog lists the folders and projects/libraries to which you have at least view permissions on the selected BIMcloud.
•If needed, click Refresh to refresh the BIMcloud status and content

5.Choose a folder and a name for the shared project
 Required permission:
-Simplified Management: Project or Server Administrator
-Detailed Management: Modify details and Modify folder content for the destination folder
•If needed, use Create Folder to create a new one
Note: To delete or otherwise manage folders, you must use the browser-based BIMcloud Manager. (Click the Manage Folders command from the Create Folder button to access the Projects page of the BIMcloud Manager.)
6.Enter a Name for the shared project.
Important: Use a different name for each project. Do not use the same name as an existing project, even if the letter cases are different (e.g. ParkingGarage and PARKINGGARAGE). If you do, users may not be able to Open or Join the project they need.
7.Check the displayed Host Server, which is the default Host Server of the selected project folder. If needed, choose a different Host Server.
Note: Not available in BIMcloud Basic.
 Required permission to access the pop-up:
-Simplified Management: Server Administrator
-Detailed Management: Modify details for the selected folder
 Available BIMcloud Servers in the pop-up:
-Simplified Management: All BIMcloud Servers for a Server Administrator
-Detailed Management: Those for which you have Modify Hosted Data on BIMcloud Server permission.
8.Click Libraries to open the dialog and decide how to handle the project libraries.
•When you share a solo project, use the Libraries dialog to optionally upload the solo project’s linked libraries to the BIMcloud.
See Libraries Setup for Teamwork Project Sharing.
Share
Click Share. The newly shared project opens.
If you do not want to open the shared project right away, use the Share without Join option from the Share button’s pop-up.
Open Project Settings after Share: Check this box to navigate to the Projects page of the BIMcloud Manager after the Share is complete.