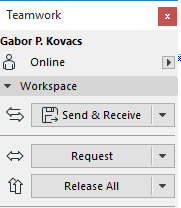
Open this palette either from the Teamwork menu, or from Windows > Palettes.
If you are not joined in to a Teamwork project, the controls of this palette are gray.
In Teamwork, availability of the controls of this palette also varies depending on whether you are Online or Offline; and whether you have the rights of a Server or Project Administrator.
See Working Online/Offline in Teamwork.

The top of the palette shows the User name and the user’s online/offline status.
If there is a problem with the server connection, click Network Diagnostic to open a dialog box with details and help in solving the problem.
See Network Diagnostic Information (BIMcloud).

To work offline, click “Work Offline” from the pop-up.
The Show New Message Alert option is enabled by default. This means that a temporary on-screen alert appears each time you receive a new Teamwork message.
See also Messaging (Teamwork).
The Teamwork palette has four panels: Workspace; Users; Messages; and Project Changes.
Workspace Panel
Send & Receive: Click this button to both Send and Receive project changes to/from the BIMcloud.
Click the pop-up to access separate Send and Receive commands.
•Send means that all modifications that you have made since your last send/receive are merged with the project data on the BIMcloud.
•Receive means that all modifications in the server’s project data that have occurred since your last “Receive” are merged with your local copy.
Note: No conflicts can arise between edits in your local copy and edits to the server’s project data, because you must reserve elements/data in order to modify them, and you cannot reserve elements/data until they are first synchronized with the server’s project data.

•Send Changes & Comment: This option lets you add a comment to the Activities Panel of BIMcloud Manager, in addition to Sending in your changes.
See Add Comment to Activities (Teamwork).
•Send & Receive/Receive, then Compare: These commands start the Model Compare process after Receive, so you can visualize what changed in the model as a result of Receive.
See Compare Teamwork Model Versions (Before and After Receiving Changes).
Reserve: This button takes several forms depending on whether you have selected an element, and its reservation status.
•If nothing is selected: The button says “Reserve...” and will take you to the Reserve Elements dialog box.
See Reserve Elements by Criteria (Teamwork).


•If you have selected elements that are, at least in part, free for reservation: The button says Reserve. After you issue this command, the available selected elements will be reserved for you. If any selected element could not be reserved, you are informed of the results.
See Reservation Results (Teamwork).
•If you have selected elements which are all unavailable, the command changes to Request. Clicking this starts the Ownership Request process.
See Request Elements or Project Data (Teamwork).
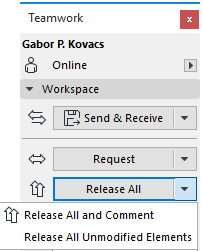
Release/Release All: If you have selected items reserved by you, the Release button will release them. Release All is available when nothing is selected; this command will release all of your reservations.
Two additional commands are available from the Teamwork Palette’s Release pop-up:

•Release (All or Selected Elements) and Comment: This option lets you add a comment to the Activities Panel of BIMcloud Manager, in addition to Releasing your reservations.
•Release All Unmodified Elements: This will release those of your reserved items that you have not modified.
Colored Workspaces: Use this drop-down to choose a method for distinguishing project elements by color depending on who owns them.
For details, see Colored Workspaces.
My Workspace: Click this button for an overview of all project items (both elements and non-elements) reserved by you.

Select any item in the list and click Show (to zoom to elements) or Open (to open the relevant dialog box).
Click Release to release the selected item.
See Review Your Workspace (Teamwork).

This panel lists the users who are currently joined in to the project. If the user is currently offline, the “person” icon to the left of the name is grayed. The color accompanying each user name can be used to identify his/her elements on your screen.
See “Show Reservations by Users” at Colored Workspaces.
The icon buttons on the Users panel, from left:

Force Leave
For information, see Force Leave.
Send Message
For information, see Create a New Message (Teamwork).
Set User Color
For information, see Redefine User Colors Locally.
This panel has three tabs. Click the three icons at the top to view the tab you need:

•The To Do list shows you items which await action from you.
•The Pending Requests list stores request messages sent by you, which are still pending.
•The Completed list is a repository of messaging actions that are no longer pending and no longer require action by you.
For any selected message, click the black arrow on the right to bring up a list of possible actions related to the message.

At the bottom of this panel, three icons represent three available actions for the selected mail message:
•Send New Message: Click to create a new message.
•Reply Message: Click to send a reply to the selected message.
•Move to Completed: Click to move this message into the Completed list.
•Delete Message (available only on the Completed list): Click to delete message.


Project Changes Panel