Special Settings for Image Textures (Cineware Surfaces)
Ensure Size/Ratio Compatibility When Using Multiple Images
•If the Surface channels use multiple images textures of varying sizes, you get immediate feedback and the chance to select a uniform texture size for all of them

•Similarly, if the image ratios vary, you are prompted to select a uniform texture ratio.
All image texture will be stretched to match this ratio. (This does not affect procedurals.) Check the “lock proportions” to maintain those proportions when further adjusting the Horizontal and Vertical size fields.
Image Parameters
If you have loaded an image as your texture, the following parameters can be set.

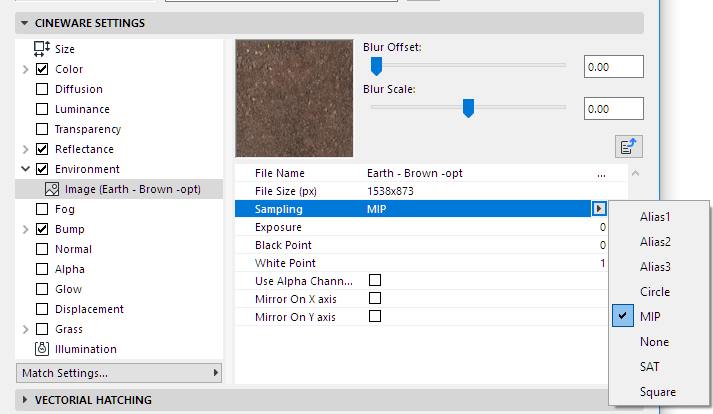
Use Sampling to control how the texture’s pixels are interpolated.
The actual pixel resolution of an image is also scaled during rendering, which depends how close the object to which the surface is assigned will be to the camera when rendered. The options in the Sampling control define which algorithm should be used for interpolation.

•MIP: Default Sampling Method: MIP stands for multum in parvo, which is Latin for many things in a small place. MIP is the default sampling type, and generally results in very smooth blending.
•SAT: Highest Quality Sampling Method: The SAT option is similar to the MIP option, but more exact. However, the SAT mapping method also requires about twelve times more memory and more time for its calculations. Furthermore, this method can only be applied to textures with a maximum size of 4000 x 4000 pixels. Therefore, MIP mapping should be used as the default mapping method and SAT mapping should only be used in instances where higher quality renderings are needed.
As a rule of thumb, use MIP mapping initially and switch over to SAT mapping if required.
•MIP and SAT are the best choices for objects in still pictures that extend towards the horizon, such as floors.
•MIP and SAT mapping affect the render time. On the one hand, MIP and SAT mapping take slightly longer to render. On the other hand, you may be able to reduce the antialiasing setting.
•The downside to MIP and SAT mapping is that they require extra memory. MIP mapping needs an extra byte of memory per texture pixel, SAT mapping requires an extra 12 bytes per texture pixel.
Other Sampling Methods
•None: When Sampling is set to None, the original texture values are used without interpolation. This method is fast, but often produces poor results and in general is best avoided. Textures tend to look jagged with None interpolation. You can try to reduce the jags by using a high antialiasing setting.
•Circle sampling uses a circle of texture pixels (the ones surrounding the intermediate value). Textures that are enlarged at render time tend to look more natural with this type than with the None type. However, straight lines are problematic and tend to look frayed. In addition, the texture is very jagged near the horizon. Circle sampling is, however, a good choice for very small textures (e.g. 3 x 3 pixels), because it helps the pixels to blend softly.
Issues can, however, occur on objects that reach deep into 3D space. For example, a surface at the end of a horizon can end up looking very turbulent.
•Square uses a square of texture pixels (the ones surrounding the intermediate value). This leads to a softer transition between texture pixels than with None. The picture quality is good.
•Alias 1, Alias 2 and Alias 3 blend the texture more strongly than Circle and Square. Alias 3 blends the most, Alias 1 the least. Alias3 can give smoother results than Alias 1, but it also takes longer to calculate. However, even Alias 3 cannot prevent jags near the horizon.
Use Alpha Channel Only
An Alpha Channel is a transparency channel for a given pixel, rendering it black or white or a shade of gray in between; no RGB color channel is used. If you use Alpha Channel only, your image will be rendered in shades of gray.
Mirror on X axis/Mirror on Y axis
Apply a mirror effect to the image.

Exposure
Use this setting to adjust the brightness of HDRI as well as normal images.
Black Point/White Point
These points define the darkest and brightest points, respectively, and save this information to a histogram. If one of these points is subsequently moved, the dark and light levels will be scaled accordingly.