Open the Attribute Manager from Options > Element Attributes > Attribute Manager.
Displaying the dialog box might take some time, since it has to list all the attributes of the project.
This dialog box allows you to copy (append, overwrite) attributes (Layers, Layer Combinations, Pens & Colors, Pen Sets, Line Types, Fill Types, Composite Structures, Profiles, Surfaces, Building Materials, Zone Categories and Cities) between two opened files. It can also duplicate or delete attributes in either of the two files.
Note: If you have installed MEP Modeler, the MEP Systems tab page appears too.
On top of the dialog box, the attribute types’ icons represent tab pages that display one type of attribute at a time. The last tab shows all types of attributes in a single list.
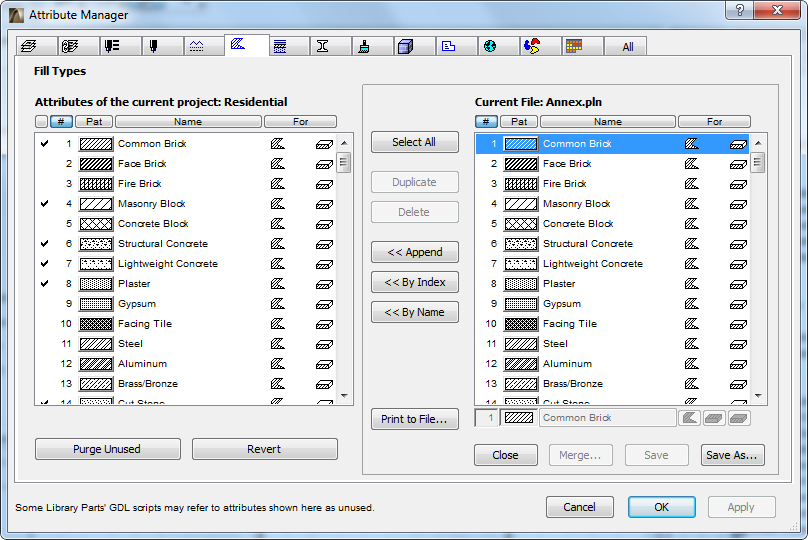
On the left, the attributes of the currently opened ArchiCAD file are shown by their index number and name.
On the right you can either open a second ArchiCAD file (Project, Archive or Module) or an attribute file in a special format that belongs to Attribute Manager. (Use the “Open” command at the bottom right of the dialog box.)
Here, the Fill attributes of two projects are shown. For the current project (whose attributes are listed on the left side), a checkmark means that the attribute is used in the project.
Use the buttons in the middle of the dialog box to manage the attributes between the two files.
- Append: Adds the attribute to the list of the other file, with a new index number.
- By Index: Overwrites the attribute in the other file that has the same index number.
- By Name: Overwrites the attribute in the other file that has the same name.
Include Associated Attributes:
•For the Building Material attribute (which includes Cut Fill and Surface attributes), checkboxes are available to include or exclude the Building Material’s Cut Fill and/or Surface definitions.
•Layer Combinations can include associated Layers
•Composites and Profiles can include associated Line Types, Fills, Surfaces, Building Materials
•Surfaces can include associated Vectorial Fills
•You can select any attribute group and save it as a text file to any location, using the Print to File... button.
On the Pen Set page of Attribute Manager:
•Use the Save as STB button to save any single selected pen set in the format of AutoCAD Plot Style Table (*.stb). The Plot Style Table is used by AutoCAD to map each color in your drawing to line widths on printed/plotted output.
At the bottom of the dialog box a number of buttons allow you to perform different operations on the files:
•Purge Unused: You have the option of purging the unused attributes from your project: click Purge Unused from the bottom of the current project’s attribute list. Those attributes used in default element settings will not be purged. Note, however, that an attribute shown here as unused (it is listed without a checkmark) may in fact be referred by the GDL script of a placed object.
•The Revert button restores the attributes to their previous state. (The Cancel button has the same effect, but also closes the dialog box.)
•The Apply button applies the changes you have made without closing the dialog box.
To sort an attribute list by a particular criterion, click the top of the desired column. For example, you can display pens by line width or cities by latitude.
In the row below the list of the current project attributes, you can edit individual attribute names and some of their properties. For example, for fill attributes you can define its type as Drafting, Cover and/or a Cut Fill.
See Fill Categories.
•Layers: You can modify the visibility and locking state as well as the name of the selected layer.
•Layer Combinations: You can rename the selected layer combination.
•Pen Tables: You can copy, delete, append or overwrite pen tables among the selected projects.
•Pens & Colors: You can modify the color, the RGB components and the line width of the selected pen.
•Line Types: You can modify the name and the scale factor of the selected line type.
•Fill Types: You can modify the name of the selected item as well as its availability for the various fill categories.
•Composite Structures: You can modify the name of the selected item as well as its availability for different element types.
•Profiles: You can modify the name of the selected profile as well as its availability for different element types.
•Surfaces: You can modify the color, name and texture assignment of the selected surface.
•Building Materials: You can modify the name, cut fill, surface and intersection priority.
•Zone Categories: You can modify the code, color, name and zone stamp assignment of the selected item.
•Cities: You can modify the name, latitude and longitude values and time zone settings of the selected location.
•MEP Systems: These attributes are available only if you have installed the MEP Modeler program.
See the MEP Modeler User Guide for information.
•Operation Profiles: These attributes are created with the Energy Evaluation function.
•All: You can display all the attribute types of the current project and sort them by types, numbers and names, or edit the attribute that is selected in the list.
For Teamwork users: see also Reservation in Attribute Manager; Reserve All Attributes.
See also Missing Attributes.