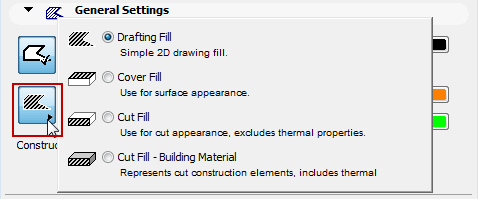
Fill Categories are used to group fills according to their function in the project: Cut Fill (two types), Cover Fill, Drafting Fill.
•For construction elements (Wall/Slab/Beam/Column/Roof/Shell/Morph/Mesh): Cut fills are assigned via the Building Material attribute. When such an element is exploded (e.g. in a Detail Drawing), the resulting fill will be in the Cut Fill - Building Material category. A detail Fill in this category retains the Physical properties of the original construction element.
Assign this Fill category to fills in details used for the Thermal Bridge analysis in the EcoDesigner Star add-on product.
•For GDL-based elements (Objects, Stairs, Curtain Walls), or for a freehand Fill drawn using the Fill Tool, Cut Fills are assigned in their Fill Settings dialog boxes. When such an element is exploded, the resulting fill will be in the Cut Fill category (without any associated physical properties).
Cut fills can be optionally placed onto their own layer during DXF/DWG conversion functions.
2.Cover Fills: Cover fills can be used to display Slabs, Roofs, Meshes, Shells, Morphs and Zones on the Floor Plan: use the Cover Fills controls in the element’s Settings dialog box. When such an element is exploded (e.g. in a Detail Drawing), the resulting fill will be in the Cover Fill category.
Cover fills can be optionally placed onto their own layer during DXF/DWG conversion functions.
See Assign a Cover Fill.
3.Drafting Fills: Drafting fills, like the other categories, can be assigned to display elements, or are simple 2D Fills drawn by hand in any model window. However, you may wish to assign such a fill to the “cover fill” or “cut fill” category, for display or export purposes. (See below.)
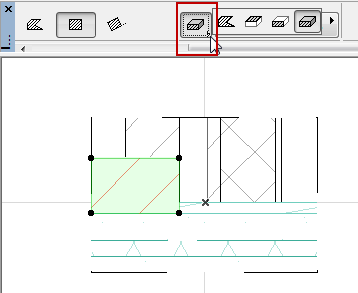
To change a Fill’s category, select it and choose a category from Fill Tool Info Box (or Fill Tool Settings.)
For example, if you draw a fill as a detail patch, to be used as a cut fill, change its category from “Drafting” to “Cut Fill - Building Material”. This way, this fill will behave like the Building Materials of construction elements in the project, if you choose to export them to a DWG layer, or to show/hide all cover fills in the project via Model View Options.
Define Fill Type Availability by Category
Each fill in the Fill Types dialog box has one or more assigned Fill Categories; this will filter the fills available in the fill pop-ups available throughout the interface.
See Defining Fill Availability in Fill Pop-Ups.
Use Fill Categories to Control Fill Display with Model View Options
By default, each fill in the project will be displayed the way you define it in element settings or Fill Settings.
However, in the Override Fill Display panel of Model View Options, you can override these settings-level definitions and create uniform display options for all fills by category throughout the project.
Use Document > Set Model View > Model View Options.
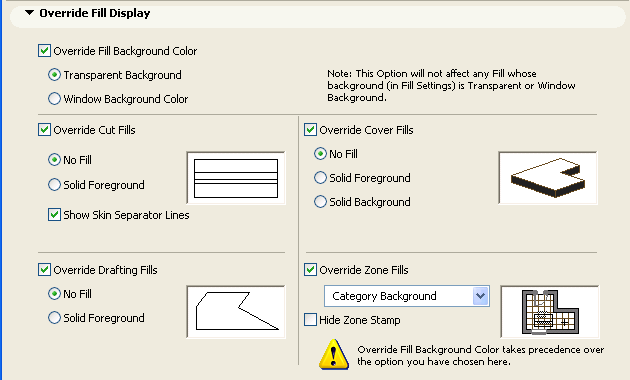
See Model View Options Override Fill Display.
Use Fill Categories to Optimize Export to DXF/DWG
This can useful when exporting the ArchiCAD project to DXF/DWG format: during the export process, you can define, by fill category, the layers of the exported fills.
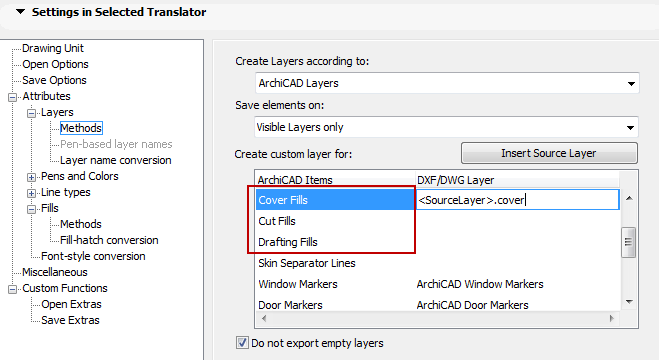
See Layers.
For example, you might have drawn 2D Fills over a Wall/Slab intersection in Section/Elevation. You probably want these fills to go to the same layers in the resulting DWG/DXF file as the fills generated from the model. So the newly drawn 2D Fill (a Drafting Fill by default) should be placed in the Cut Fill - Building Material category, just like the fills generated from the section of the Wall and Slab.