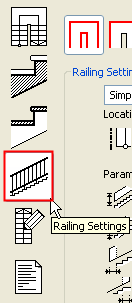
Note: This tab page is part of the StairMaker editing window. To access it, activate the ArchiCAD Stair tool, open Stair Tool Settings, and click the Create Stair or Edit this Stair command. Choose a standard stair type. From the appearing stair editing window, click the Railings button (fourth from top) from among the six buttons at the left.
For detailed information on each control in this tab page, see Railing Settings Tab Page.
You set up the railings of the stair or the slope on the fourth tab page of the stair editing window. Here you will again see a preview of the symbol of the stair showing the current choices for railings.
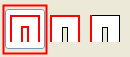
Using the three buttons on the top of the tab page you can define whether the railing settings should affect both sides of the entire stair (All Stair-Rail mode), one side of the entire stair (One Side mode), or a selected segment (One Segment mode). Selection of the segments is indicated by a red line in the preview area. The mode chosen here is also in effect when setting the post.

Clicking the first icon selects all the segments in the preview of the stair. Parameter settings will affect the whole of the stairs. A single railing type will be used for the whole stair with the same offset and parameter value for each segment. With regard to the offset value, the program automatically ensures the integrity of the railing, which means that the segments will intersect accordingly.
When switching to this mode from either of the other two (One Side mode or One Segment mode) each flight inherits the stair-rail and post settings of the lower starting flight’s first left-hand segment.
After clicking the second icon, the left and right stair-rails can be set independently. The left stair-rail is selected by default as displayed in the preview of the stairs. To switch to the right stair-rail, move the cursor to the other side of the stairs until it takes the form of a stair-rail, then click it.
The settings displayed on the screen are always those relevant to the selected railing, and any changes in the values of the parameters will affect only the selected railing. In this mode, the program uses single railing types for both sides of the stairs.
When switching to this mode from All Stair-Rail mode, both sides inherit the settings chosen in the previous mode. When switching to this mode from One Segment mode, the whole flight inherits the settings of the lower starting segment.
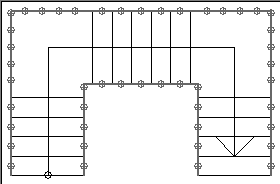
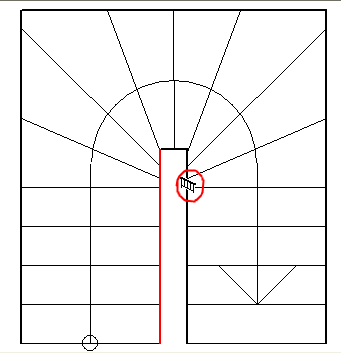
Clicking the third icon allows you to define a railing for each flight (segment) independently. By default, the first segment of the left railing is selected, as shown in the preview of the stairs. To select another segment, simply click it.
Different offset values can be used for each segment. In this case, the elements of the stair-rail belonging to different segments will not fit each other automatically. Positive or negative upper and lower overhang can be defined manually for each railing segment.
When switching to this mode from either of the other two (All Stair-Rail mode or One Side mode), all stair-rails inherit the previous settings. The overhang values of the stair-rails will be identical to those calculated automatically in the previous mode.
In the preview area that displays the floor plan of the stairs, each segment of the railing is represented by a line that shows where the centerline of the railing lies. To switch off a railing, first select it, then choose the No Railing option from the Railing type pop-up. A thin line will indicate the place of the stair-rail.
The types and parameters of the selected railing are set in the Railing Setting section. The available railing types are listed in the pop-up menu placed at the top of the dialog box. The content of the pop-up window depends on the available definitions. In the railing preview area (above the stair-rail type pop-up) you can see the small image of the selected railing type.
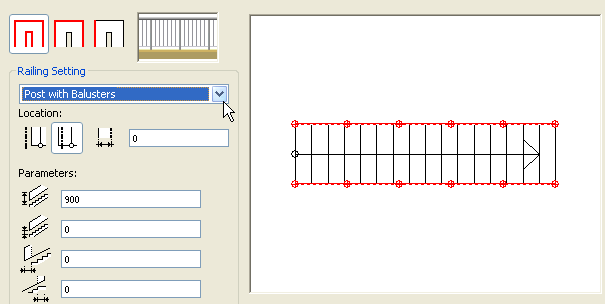
The editable parameters under the pop-up window are generally valid regardless of the railing type. They define the position of the railing as related to the sideline of the stairs, the height of the posts and the baluster as related to the stairs, and the overhang values. In One Segment mode, the lower and upper overhang relates to the current segment, while in the other two modes they concern the lower overhang of the bottom segment and the upper overhang of the top segment.
The parameters of the railing types will be displayed in the list of additional parameters in the Stair Settings dialog box.
Note: If you do not want the railing to go all the way from the bottom to the top of the stair, you can achieve this by using the Lower Overhang and/or Upper Overhang controls: If you set negative values to these options, then the railing will start/end with the overhang value that you defined.
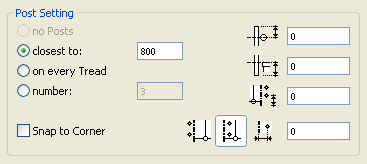
The settings and placement of the posts of the railing are defined in the Post Setting section.
If the selected type does not contain posts, this section will be dimmed.
The position of the posts relative to the centerline of the stair-rail can be defined with the radio buttons and the parameter field. The rule according to which the posts are to be placed along the selected segments of the railings is defined with the radio buttons.
The placement of the posts can be defined by:
•setting up an approximate distance between the neighboring posts (the posts are placed alongside the flight or the segment at a given distance from one another)
•placing a post on every tread (on landings, an approximate distance will be used), or
•setting the number of the posts.
Using the Snap to Corner checkbox, the program automatically places posts to the segment ends and places additional posts on the segments according to the rule defined above.
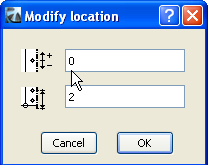
The position of the posts placed automatically by the program can be modified one by one by double clicking on the post on the selected stair-rail segment. A dialog box appears, where the position of the post can be set up numerically.
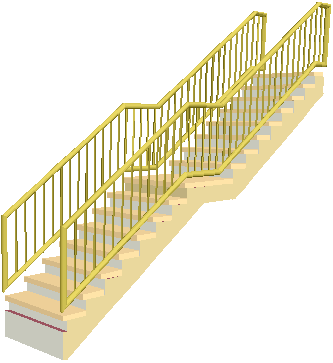
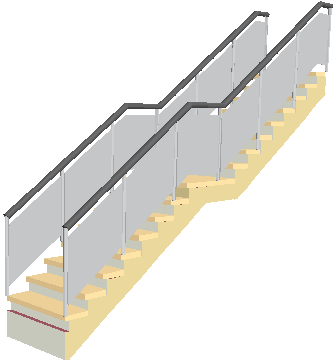
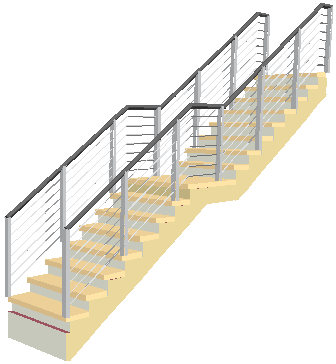
Some of the available railing types are illustrated below.