There are two ways to create a module-type file (.mod):
•Save a Project as a Module File
•Save Selected Elements as Module
Save a Project as a Module File
On the Floor Plan, create the set of elements you want to use as a module.
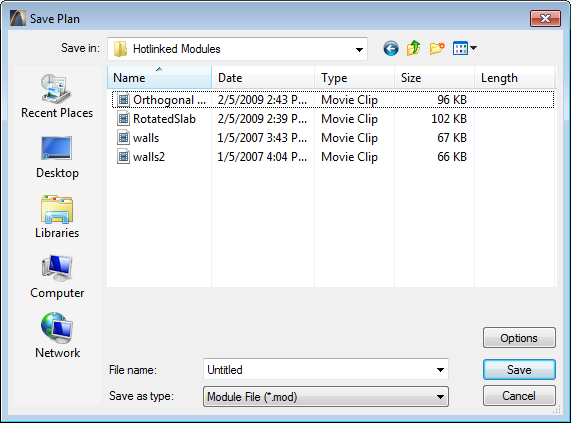
Use File > Save As, and choose the .mod file format.
Module-type files can either be placed as Modules or merged into a project through the File > File Special > Merge command.
See Merging Files to ArchiCAD.
Merged elements cannot be updated from the source file.
It is of course possible to place an entire project file as a Hotlinked Module; you do not have to save it first as a .mod file. However, module-type files are a simplified type of ArchiCAD file (with extension .mod). Only the visible Layers are included, as well as Embedded objects. They contain no Section/Elevation/IE, Worksheet/Detail, or 3D Document data, Library or preferences information and only refer to attributes actually used by their elements. Thus, a .mod file is much smaller than a .pln file.
Important: If you open a .mod file and add drawing elements in its Section window (or Worksheet/Detail/3D Document), those modifications will be lost when you save the .mod file.
This can be useful if, for example, you receive a very large .pln file from a structural consultant - but all you need are three of the project layers. In this situation, you can set those three layers to be visible, the rest invisible. When you save the .pln file as a .mod file, only the three layers you need are included, and the hotlinked .mod file is much smaller in size.
Important: If you open a .mod file and add drawing elements in its Section window (or Worksheet/Detail/3D Document), those modifications will be lost when you save the .mod file.
Save Particular Stories in Module File
If the project contains multi-story elements or several stories, ArchiCAD will, by default, save all of the stories as part of the module.
Alternatively, you can save only certain stories in the module: when you save the module using File > Save As, click the Options button in the Save As dialog box to bring up Save Options.
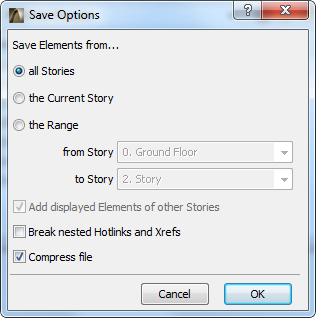
•The default choice is All Stories, but you can choose just the current Story, or a specified range of stories to include in the module file. Any element that falls within this range will be included in the module.
•If you choose either Current Story or a range of stories, you have the option (Add displayed elements of other Stories) to include all elements that displayed on these specified stories, even if these elements are located elsewhere and do not in fact intersect these stories.
•Break nested Hotlinks and Xrefs: If the module file contains any nested Hotlinks and/or Xrefs, you can check this box to break those links if the source files may become unavailable or are no longer needed.
Click OK to create the module file and close the dialog box. You can then place this module file into your project.
See Place Module.
Save Selected Elements as Module
1.Select elements in the Floor Plan. You can select elements from several stories by using the Marquee tool’s multistory option.
2.Go to File > External Content > Save Selection as Module. A directory dialog box will appear, prompting you to save the selected elements as a module file.
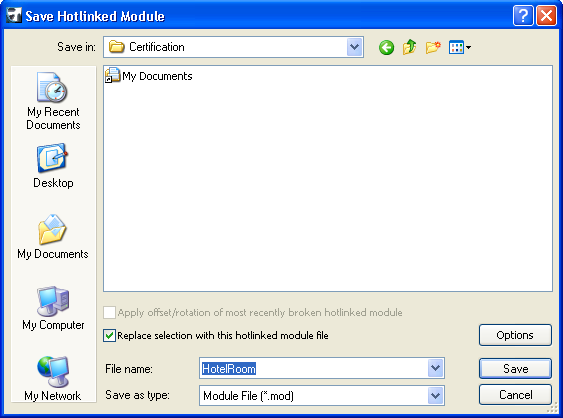
•By checking Replace selection with this hotlinked module file, you can immediately replace the selected elements with the module file.
Note: In Teamwork, the “Replace selection...” checkbox is NOT available. The option is available in solo projects only.
•If you have selected certain elements and copied them to the clipboard, you can save a module that will include those elements only: use File > Save As, then choose the Module File from Clipboard file format.
Note: If the selection contains elements that cannot be modified (e.g. they are locked, located on a locked layer or reserved by another user), an alert will warn you. You will then have the choice of either creating the module with the editable elements only, or canceling the operation altogether.
The Apply offset/rotation of most recently broken hotlinked module checkbox is only available in this dialog box if a hotlinked file link has been broken; otherwise it is gray.
See Apply Offset and Rotation of Edited Module.
3.Click Save.
You can then place this module file into a project.
See Place Module.