The Sun dialog box is accessible from:
•the Camera Tool Settings dialog box, by clicking the Sun... button
•the View > 3D View Options > 3D Projection Settings dialog box, by clicking the More Sun... button.
The Sun dialog box contains a series of sunlight/shadow settings, which are relevant to:
•PhotoRenderings
•Sun Studies
•3D Projections (and views created from these)
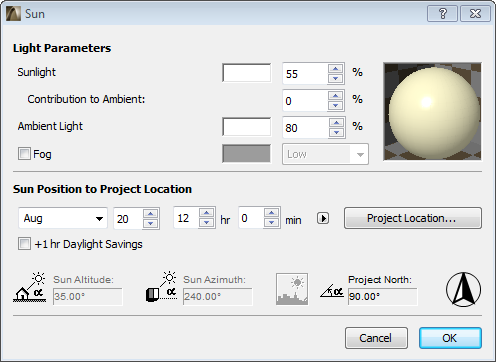
Light Parameters
Set parameters for each component of the light: Sunlight (directional normal), Ambient Light and Fog.
•Sunlight is the directional light falling on the project.
- Double-click inside the color sample box to choose a Sunlight color.
- Choose a sunlight color intensity between 0 and 100%. This Intensity value multiplies the Brightness component of the Sunlight color.
Note: The Sunlight color and intensity settings are considered by the CineRender Rendering Engine.
•Ambient light is general, non-directional light that contributes to the overall brightness of the image, and can brighten otherwise overshadowed surfaces.
Note: Ambient light parameters affect only the 3D Window and PhotoRenderings created with the Internal Rendering Engine!
- Color: Double-click inside the color sample box to choose a color for the Ambient Light.
- Choose an Ambient light color intensity between 0 and 100%. Vary this value to obtain special effects in renderings.
- Contribution to Ambient: Choose a percentage for how much of the Sunlight should be represented in non directional, ambient light.
•Check the Fog box to apply a fog effect to a PhotoRendered image (if rendered with the Internal Rendering Engine). Choose a color and intensity (low, middle, high) for the fog effect.
Note: Fog parameters set here affect only PhotoRenderings created with the Internal Rendering Engine!
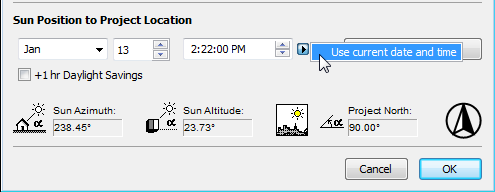
Sun Position at Project Location
Enter the date and time for which sun effects should be applied (based on Project Location).
To use the current data defined in your computer’s date/time settings, click this option from the fly-out arrow. (This is a one-time data entry convenience; it will not be updated automatically.)
Click Project Location to define the location of the project (including Project North).
See Project Location and Project North.
+1 hr Daylight: Check this box to adjust the hour forward for Daylight Savings Time.
Sun position: Below, view the sun position data.
•Sun Azimuth: Displays the Sun Azimuth in ArchiCAD’s polar coordinates system.
•Sun Altitude: Displays the Sun Altitude above the Horizon in degrees. A negative Altitude angle indicates that the Sun is below the horizon (night). This may produce completely black images.
Note: When you first open the Sun dialog box, the sun azimuth/altitude values are not editable - the values are taken from either Camera Settings or the 3D Projection Settings. If you edit other data which affects sun position (e.g. you change the date or the time, or you modify data in the Project Location dialog box), the sun azimuth/altitude fields are updated, and become editable.
See also Project North.
The icon to the right indicates whether the Date/Time/Location will result in a daytime or nighttime Image.


This control gives you feedback on the current project’s Project North definition. To define Project North, go to Options > Project Preferences > Project Location.
See Project Location and Project North.
Click OK to leave the Sun dialog box and apply its settings.
To apply the camera-defined view to the 3D model, select the camera and activate the 3D Window.