Other Panels in Door/Window Settings
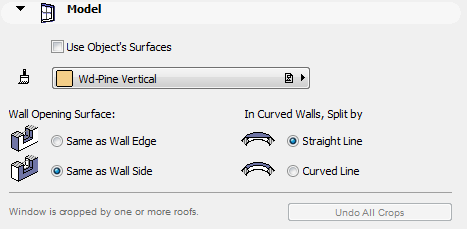
Use this panel to if you want to define one single Surface for the Door or Window. To do this, you must disable the Use Object’s Surfaces checkbox.

Checking the Use Object’s Surfaces checkbox will ignore the surface in the Model Panel, and will apply the surface that was used when creating the Library Part.
Wall Opening Surface: The surfaces of the host Wall can be applied to the opening in two ways.
•If you choose the Same as Wall Edge option, ArchiCAD will apply the surface of the wall’s edge to the opening’s edges.
•If you choose the Same as Wall Side option, the external and internal wall surfaces will be applied to the opening’s edges, with the reveal depth as the division line between them.
For curved walls using both Wall Side surfaces, the two surfaces can be split either along a straight line or a curve.
•Straight Line: Click this button to split the surfaces along a straight line.
•Curved Line: Click this button to split the surfaces along an arc.
Door/Window is cropped by one or more roofs: If this message is activated, it indicates that the currently selected Door/Window (already placed in the project) was trimmed by a roof with the Crop to Single-plane Roof command.
•In this case, the Undo All Crops button is also activated. Click to restore the original height of the selected door/window.
For more information, see Crop Elements to Single-plane Roof.
For Doors/Windows that are not part of the standard ArchiCAD library, use these controls to customize the various elements of the reveal, such as the Head Depth, Sill/Threshold Depth, Reveal or Sill construction, left and right Jamb Depth and Reveal Depth.
Note: Reveal parameters for standard Doors/Windows can be set in the Custom Settings panel of this dialog box.
Door/Window Dimension Marker Panel
The Dimension Marker panel features the customizable Dimensioning options of the Window and Door tools.
To show or hide door/window markers on the plan, use the Door/Window Options in Document > Set Model View > Model View Options.
For more information, see Model View Options for Construction Elements.
Dimension Markers are essentially parametric GDL objects permanently linked to the opening.
The dimension units of Door/Window markers, and the dimension units of sill heights displayed in Door/Window markers, can be customized in Options > Project Preferences > Dimensions.
For more information, see Dimensions Preferences.
From the pop-up list, choose a predefined Marker or browse for a different marker object.
The preview window gives you feedback on the selected Marker’s appearance.
Pencolor/Penweight: Type a Pencolor/Penweight number (1-255) for the marker line pen.
Height: Enter the height of the Marker here.
Use Symbol colors: Check this box to ignore Pencolor setting above and use pencolor used when the element’s 2D symbol was created.
Subfloor Thickness: Use this control if you want the Door/Window marker to indicate a sill height value which takes into account the height difference (if any) between the floor level and the bottom of the wall (for example, due to carpeting or parquet flooring). This value will then be calculated as part of the sill value shown in the Door/Window marker.
This value will not affect the positioning of the Door/Window.
See also Sill Height Using Subfloor Thickness.
Font Type: Click this pop-up field to select a font type.
Font Script: Click this pop-up field to select a font encoding.
Text Format: If desired, check the Bold, Italic, or Underline boxes to format the dimension text accordingly. (To apply a variety of formats to texts in a single marker, turn off the Uniform Text Format parameter.)
Door/Window Custom Marker Settings Panel
The Marker Settings panel may contain options for the dimension marker if a user interface was created for it. This panel contains the same settings as the parameter list on the Dimension Marker panel, but in graphical format.
Door/Window Listing and Labeling Panel
See Listing and Labeling Panels.
For more information on Doors/Windows, see Doors/Windows.
Door/Window Tags and Categories Panel