Resize (Enlarge or Reduce) Elements
The Edit > Reshape > Resize command lets you enlarge or reduce selected elements using numeric or graphical input.
This feature is available only in the Floor Plan and 3D windows, and - for 2D drawing elements only - in the Section/Elevation, 3D Document and Detail/Worksheet windows.
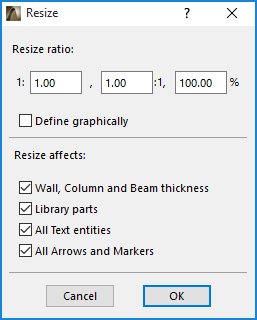
The Resize dialog box offers additional options for resizing the thickness of Walls/Columns, GDL Objects, text elements, arrowheads and markers.
1.Select the elements you wish to transform and choose Resize.

2.In the appearing dialog box, enter a value into any one of the resize ratio fields. (Make sure the Define graphically checkbox is unchecked.)

•Resize ratio: Use any one of the three ways to define the resize ratio you want. (If you enter a value in one field, the other two will be filled in automatically.)
•Resize wall, column thickness: For walls, columns and beams, the thickness will be resized as well as the length/height.
•Resize library parts: Any selected library parts will be resized.
•Resize all text entities: All texts and labels are resized.
•Resize all arrows and markers: The size of all arrows/markers are modified.
3.Click OK.
4.Click in the window to define which point or edge of the elements should remain in its original location.
To perform the operation graphically:
1.Open the Resize dialog box.
2.Check the Define Graphically checkbox.
3.Draw a transformation vector to define both the resizing ratio and the location of the resized elements.
Note: Resizing does not affect grouped elements. To resize grouped elements, ungroup them first or choose Suspend Groups.
See Group Elements for more information.