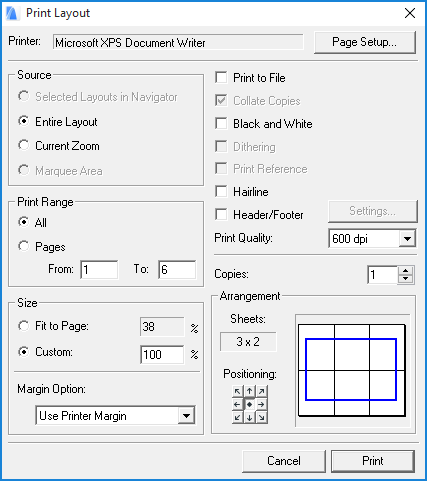
This dialog box is opened with the File > Print command if Layout is active.
Printer: This field displays the printer driver currently set up for your machine. To change the assigned printer, choose the Page Setup button at right.
Page Setup: Click this button to open the Page Setup dialog box, where you can choose a printer and set paper size and orientation.
Source: Choose which layout(s) you wish to print.
•Selected Layouts in Navigator: Click this button to print only those layouts which are selected in the Navigator palette.
Note: This option is inactive if nothing is selected in the Navigator, or if several Layout Books (in the Navigator and Organizer) are open.
•Entire Layout: Print the entire currently active layout.
•Current Zoom: Print only the visible content of the active layout at its current zoom.
•Marquee Area: If you have placed a normal rectangular Marquee in the active layout, click this button to print only the marquee area. (The option is available for other marquee shapes, but the output area will always be rectangular.)
Print Range: Choose either All to print all pages, or choose a page range for multi-page output. See the Preview at the bottom right of this dialog box for how multi-page output will be arranged.
Size: Choose the layout output size.
•Fit to Page: Click this button to make the output fit the page. The size (in percentage) will be adjusted accordingly.
•Custom: Click this button to enter a size for the printed output, as a percentage of the paper size.
Margin Options: Use these controls to assign a margin to the printed output: either the printer margin or the layout margin.
Note: This option is available only if you have chosen Selected Layouts in Navigator or Entire Layout in the Source field.
Print to File: Check this box to save the output as a print file on your computer.
Collate Copies: Check this box if you are printing multiple copies, and would like each copy to be output in sequential order.
Black and White: Check this box for black and white output. With this option, colored elements will be output as follows:
•Lines: All colored lines will be black; white lines remain white.
•Fill: Foreground will be black; background will be white. Fills using RGB colors will be gray.
•Zones: All will be displayed in grayscale cover fills.
•Images: All will be displayed in grayscale.
Dithering: Check this box to reduce the total number of colors present in the output while retaining visual fidelity. Dithering may be necessary due to a limited number of colors available on the display device. For example, if your fills turn out solid black, the Dithering effect may help.
Print Reference: Check this box to include the Trace Reference in the Layout’s printed output.
Hairline: Check this box if you want to print all lines of the document using the thinnest line available on the printing device.
Header/Footer: Check this box if you wish to include a Header or Footer on the printed output. To define the Header/Footer content, click the Settings button at right.
For more information, see Header/Footer Settings.
Print Quality: Enter a dpi (dots per square inch) setting to define print quality.
Copies: Enter the number of copies you wish to print.
Arrangement: This section helps you arrange the drawing on the output sheet(s). A preview window helps you get the desired outcome. In the preview window, the black square(s) represent the page(s) to be printed. The blue rectangle represents the drawing size. The Preview indicates the position of a Header/Footer if you have checked that option.
•Sheets: Shows the number of sheets of the paper size chosen in Page Setup.
•Positioning: Click these arrow-buttons to move the printed content around on the output sheets as shown in the Preview.