For information on customizing Shell edge surface, see Customize Edge of Shell or Edge of Shell Hole.
The Shell hole is created by an editable cutting body. The cutting body is visible when you select the hole itself, not the Shell.
To select the hole, zoom in on the hole and click its edge.
Note: When selecting the hole, you must click the hole on the side of the Shell that coincides with the profile line. Hole edge selection is not available on the side of the Shell opposite to the profile line.

Each cutting body is specific to its own Shell and cannot cut any other elements. However, a Shell that bends back upon itself is automatically cut twice (or more) by the single cutting body.

When you move the Shell as a whole from one place to another, the cutting body moves with it. However, editing the Shell itself (e.g. its profile or drawing its contour) will not affect the hole geometry.
Edit Extrusion Length of Cutting Body
To limit the extent of the hole’s cutting body, select the hole and use the Edit Extrusion Length command from the pet palette to change the length of the cutting body. This way, for example, you can eliminate a hole created by a cutting body that runs through both sides of your Shell.


Edit Hole Contour
Select the hole so that you see its cutting body. Edit either the hole edge itself, or the contour of the cutting body (the result is the same). Use the familiar polygon editing commands from the pet palette.


Edit Hole on its Own Plane
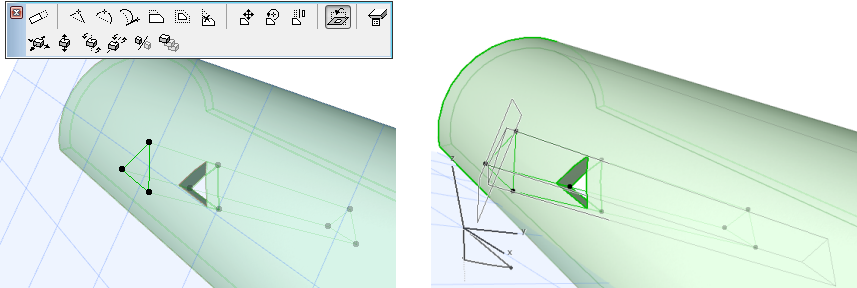
The cutting body that creates the hole has its own plane. When you select the hole, you can edit the hole on this plane using the pet palette commands marked here. Then the hole plane is also displayed.

•Turn Hole Plane: This command rotates the hole plane, and thereby changes the hole geometry within the Shell. You can also rotate the hole itself.
See Rotate cutting body to change hole geometry.
Select the Turn Hole Plane command. Define the rotation arc, then move the cursor to rotate the plane.

•Drag, Rotate, Mirror Hole: These edits move the hole on its own plane.

Edit Hole on Horizontal/Vertical Project Planes
•Drag or Drag a Copy Horizontally/Vertically
These commands drags the hole itself (or a copy) on the project’s horizontal/vertical planes.


Rotate cutting body to change hole geometry
One way to change the hole geometry is to free-rotate its cutting body.
1.Select the hole.
2.Use the Free Rotate command from the pet palette.
3.Define a rotation axis with two clicks.
4.Define the starting point of the rotation arc with a third click, then free rotate the cutting body to its desired location.
5.Click to complete.


