1.Choose File > External Content > Place Hotlink.
The Place Hotlink dialog appears.
If the project already contains one or more Hotlinks:
•The last placed Hotlink is listed. Click Place Hotlink to place it again, or Change Module to choose another one.

If no Hotlink has been placed yet:
•Click Select Module to define one.

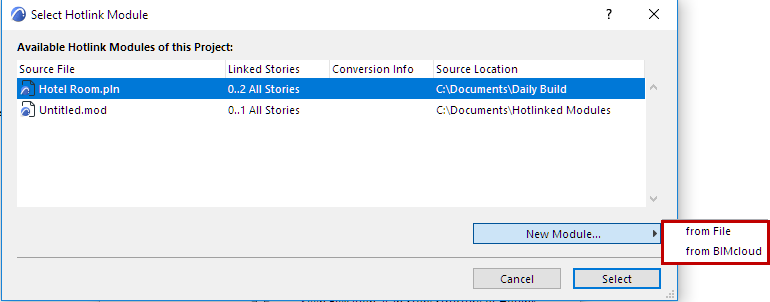
The Select Hotlink Module dialog box appears. Hotlinked Modules in the project (if any) are listed with information on their linked stories and the source file location.
–For IFC-based Modules, the Conversion Info column indicates the Template and Translator files used in converting the file to Archicad.
–For Rhino-based Modules, the Conversion Info column is the timestamp identifying the module.
–For RVT-based Modules, the Conversion Info column contains the 3D View and timestamp.
3.Do one of the following:
–Select one of the existing modules of this project, shown in the list, or
–Click New Module to add a new Hotlink Module to the current project.

If you choose New Module:
Choose the source of the new Hotlink: either From File, or From BIMcloud.

–From File: A directory dialog box will appear. Select the desired file to use as the module.
–From BIMcloud: Choose a BIMcloud, then choose the Teamwork project. If needed, log in to the BIMcloud. See Log in to BIMcloud.
Note: The source Teamwork project must have the same version number as the host project.
If you choose IFC file format:
See Hotlink IFC File for additional options.
If you choose Rhino (.gsm) file format:
See Hotlink Rhino File for additional options.
If you choose Revit (.rvt) file format:
See Hotlink 3D RVT Model for additional options.
4.Click Select.

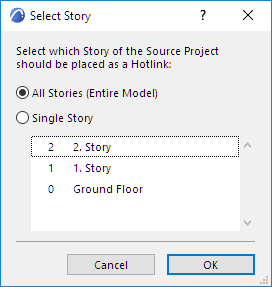
5.If the selected PLN or .mod file has multiple stories, the Select Story dialog box appears.
Note: Select Story does not appear for IFC modules (which are placed with all stories) or Rhino-based modules.

Select an option:
–Single Story: Click on one of the listed stories to place as Hotlink.
–All Stories (Entire Model): Place all stories of the module file into the host project.
6.Click OK.
7.Click Select to return to the Place Hotlink dialog box:

–set Master Layer and Orientation
–optionally Align Module at either the Project Origin or Survey Point
-Available at Hotlink placement only, for module formats that use Survey Point: PLN, MOD, IFC, RVT
-If this is checked, then the Orientation control is grey
–assign an optional Master ID
8.Set Design Options for the Hotlink:
•Choose Design Options to place from the source file. (The Main Model is always placed, but you can choose particular Options or an Option Combination.)
•The Hotlink will be added to the current default Option of the host file.
See Hotlinks and Design Options.
9.Define how to handle elements’ elevation and top linked elements
Note: When hotlinking an IFC file, make sure you set the Elements’ Elevation option to Keep Elevation! Otherwise, the imported model may “fall apart” when its elements are placed in a different story structure.
For details, see Hotlink Settings.
10.Click Place Hotlink.
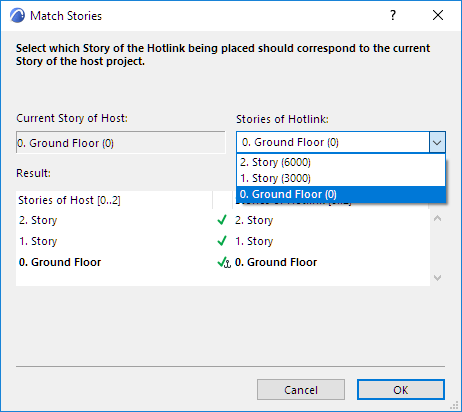
11.Match Stories (for Hotlink Modules with multiple stories):
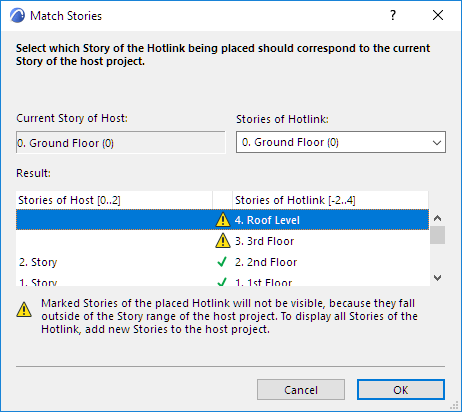
In the Match Stories dialog box, select which story of the module to place onto the current story in the host project. (Not relevant for Rhino-based modules).

If you try to place a multistory module into a host project that contains fewer stories than the module you are placing, the module stories which do not “fit” in the host project will not be visible.

To resolve this, create additional stories as needed in the host project.
12.Click OK to place the Hotlink.