Section and Elevation Settings
The following settings work essentially the same way for the Section and Elevation tools.

For information on creating Sections and Elevations, see:
For a description of generic settings common to all tools in the Toolbox, see Working in Tool Settings Dialog Boxes.
Reference ID: An ID is assigned by default; you can change it by typing any other value into the field.
Name: Appears in the Navigator palette and the title bar of the Section/Elevation window.
Note: If you place a Linked or Independent marker that does not generate a viewpoint, the ID/Name fields are gray.
To Place a New Section/Elevation Marker (Default Settings)
Use the next pop-ups to define what you want to create with the Section/Elevation tool:
If you choose Create New Viewpoint:
its Marker Reference can contain either
•the viewpoint, identifying it by its location in the Navigator Project Map;
or
•the first placed drawing of the viewpoint, identifying it by its location in the Layout Book hierarchy
If you choose Place Linked Marker:
its Marker Reference can contain information from of any of the following:
•a selected viewpoint
•a selected drawing
•the first placed drawing of the selected viewpoint
•the first placed drawing of the selected view
If you choose Place Unlinked Marker:
the Marker Reference will not contain any linked information; you can define a custom text (First Text Row/Second Text Row parameters) in the Marker Panel below.
Reference to: shows the path (location in the Navigator hierarchy) of the chosen reference item.
To Redefine a Placed Section/Elevation Marker (with Marker selected):
The pop-up fields give you feedback on the current status of the selected Marker (either Source Marker, Linked Marker, or Unlinked Marker).
Use the pop-ups to change the status as needed.
To redefine the Marker Reference: Choose from among the pop-up choices, or click the Browse button to select the viewpoint/view/drawing whose Navigator path you wish to display in the Marker. The available choices vary depending on the Marker status (Source Marker, Linked Marker or Unlinked Marker).
For an Unlinked Marker, you can define a custom text (First Text Row/Second Text Row parameters) in the Marker Panel below.
Status (for Source markers only)
Choose an option to define the status of the link between the Section/Elevation and the Floor Plan.
•Auto-rebuild Model: This view will be automatically rebuilt every time it is activated if the Floor Plan has changed.
•Manual-rebuild Model: This view is not rebuilt automatically. It can be rebuilt from the model only by using the View > Refresh > Rebuild from Model command.
•Drawing: Elements are exploded into 2D drawing elements, which are not linked to the Floor Plan and will not be automatically rebuilt from the model. You can, however, update the drawing to reflect recent changes made to the model.
Show on Stories (for Source markers only)
Choose the stories on which to display the marker and lines.
•If the Vertical Range is Infinite: choose All stories or a particular custom story (choose the story shown in the pop-up list, or choose Browse Story)
•If the Vertical Range is Limited, two additional options are active.
Entirely in Range: The marker and line will appear on all stories that are entirely in the vertical range defined in the height value fields.
At Least Partly in Range: The marker and line will appear on all stories that are at least partly included in the vertical range defined in the height value fields.
Horizontal Range (for Source markers only)
The horizontal range defines the depth of model that will be included in the Section/Elevation window:
•Infinite: All elements behind the Line will be shown in the Section/Elevation window, provided that they are not hidden by other elements.
•Limited: Only the elements between the Line and the limit line will be shown in the Section/Elevation window. (The limit line is defined when you click with the Eyeball cursor after you finish drawing the Section/Elevation line.)
Note: The limit line is a display-only Marker item, and is not shown on the Layout.
See Display of Marker Range Lines.
•Zero Depth: Only elements actually cut by the Section Line will be shown. (Not available for Elevations.)
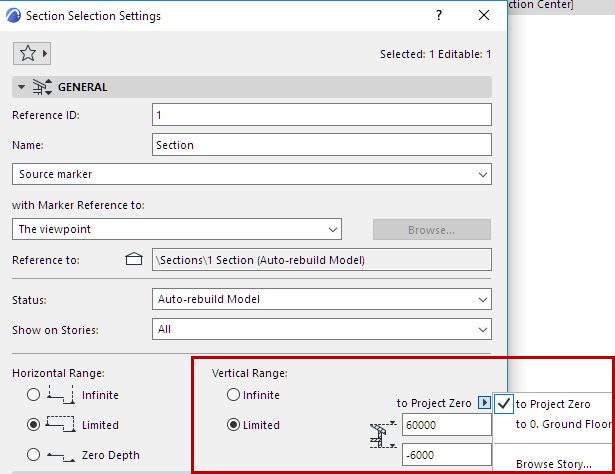
Vertical Range (for Source markers only)
Define the vertical range of the Floor Plan to include in the Section/Elevation window.
•Infinite: Include the entire height of the project.
•Limited: Include a limited vertical range. Enter elevation values for the upper and lower limits of the range. (Click the black arrow to choose the reference for the elevation values: to Project Zero, or to a particular custom story.)
Model Appearance Panel
See Model Appearance (Section-Type Views).
Section Line Settings (Section only)
•Select a Line Type and Penweight/Pencolors for the Section Line and ID.
Note: The Section Depth (limit) line (for a Section of Limited Horizontal range) is an on-screen-only Marker Range item, whose line type and color are set in Options > Work Environment > On-Screen Options.
•Choose Continuous or Segmented.
–Segmented: Use the checkboxes at right to define which segments to display:
-first segment
-internal segments at breaks
-last segment
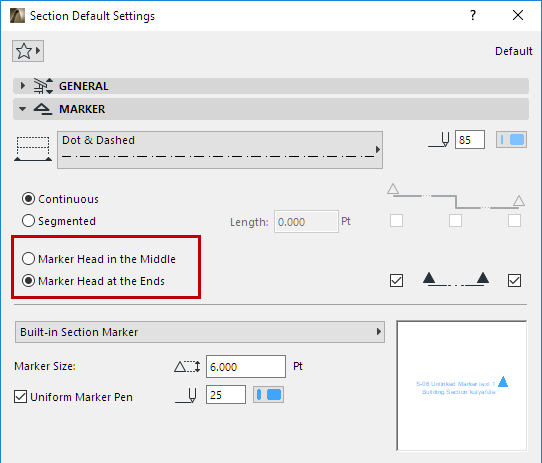
Marker Head and Type
Place the Marker Head in the Middle or at the Ends of the marker.
Enable or disable the Markers at either or both ends of the Section/Elevation Line.
Select Marker Type: The chosen marker’s 2D Symbol appears in the preview window.
Define Marker size and pencolor.
Uniform Marker Pen: Check this box to use this pencolor for all parts of the marker symbol, regardless of any custom colors set elsewhere for this marker.
Marker Text Style Panel
See Text Style.

Use the settings pages to customize the appearance and content of the marker chosen in the Marker Panel above.
For Marker Geometry and Style, options vary depending on the Markers loaded in your library.
Refer to the preview window of the Marker Panel to see how your choices affect the Marker.
Define the display of Story Level lines and Story Handle Markers in this view.
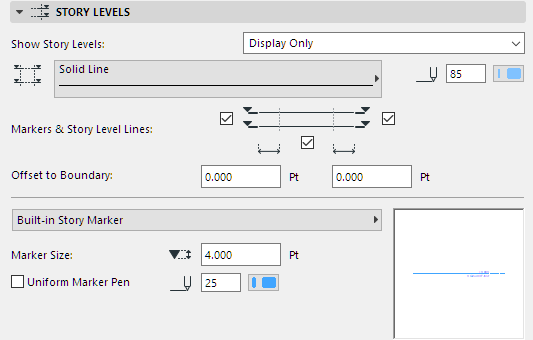
Show Story Levels
•Display only: Story lines will appear only on-screen, but will not be displayed in the output.
•Display and Output.
•None
For more information, see Story Level Lines.
Choose a line type and pencolor for the story level lines.
Display Markers & Story Level Lines
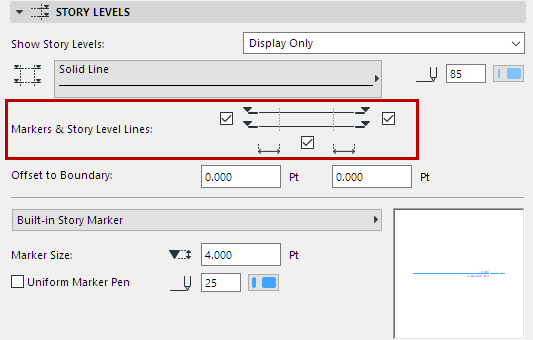
•Display the left and/or right Story Markers
•Display or hide the Story Level Line
Note: You cannot uncheck this box if the Offset values of the Story Handle Markers are both set to zero.
Use the Design > Edit Story Levels command to adjust story levels in this Section/Elevation window.
Offset to Boundary: Enter a value for the offset of the Story Level line beyond the limits of the Section/Elevation.
Select Marker Type: The chosen marker’s 2D Symbol appears in the preview window.
Define Marker size and pencolor.
Uniform Marker Pen: Check this box to use this pencolor for all parts of the marker symbol, regardless of any custom colors set elsewhere for this marker.
Story Levels Text Style Panel
See Text Style.
Story Levels Symbol and Text Settings Panel
Use these controls to set the display of the Story Level Marker (selected in the Story Levels Panel).
Define the display of Grid elements on the Section/Elevation.
Show Grid Elements: Check this to see the Grid Elements.
To narrow the displayed Grid elements:
•Show Grid Elements by Stories: Click Selected to narrow the set of displayed Grid elements by Story: click Select stories to choose the stories whose Grid elements you want to display. (If a Grid element is visible on the selected stories, then it will be visible on this Section/Elevation as well.)
•Show Grid Elements by Name: Click Selected to narrow the set of displayed Grid elements by Name: click Select elements to select individual elements.
Note: These two filtering criteria are related as an “AND” statement: if you set filters both by Story and by Name, then the Section/Elevation will display only those Grid elements which fit the both the Story criteria AND the Name criteria.
Dimension lines: Place a dimension between each grid line. Enter the vertical location of this dimension chain and set the reference level.
Total Dimension: Place a dimension line between the two grid lines on the far left and far right end of this Section/Elevation. Enter the vertical location of this dimension chain and set the reference level.
These dimension lines will use the default dimension settings. When a new Grid line is inserted on the Floor Plan and it appears on the Section/Elevation, then it will be included in the dimension chain.
Auto-stagger Grid Markers if they overlap: Automatically stagger Grid markers sideways to avoid overlapping, if the markers would otherwise overlap.
Show non-perpendicular Grid Elements: By default, the Section/Elevation will display only Grid elements that are perpendicular to the Section/Elevation line and are located within the Section/Elevation depth. (By default, no Grid elements that are curved on the Floor Plan will be displayed on a Section/Elevation.)
Check this to show Grid elements which are not perpendicular to the Section/Elevation line, but which intersect the Section/Elevation on the Floor Plan. These Grid lines will appear at the intersection point with the Section/Elevation line.