Fly-Through
Use the Fly-Through feature to create a movie of the project.
Access this function from Document > Creative Imaging > Create Fly-Through.
The Create Fly-Through command will only be active if you have at least one Parallel Projection pre-set, or if a Camera path with at least two cameras is active on the Floor Plan.
The Camera path is created by the Camera Tool. Placed cameras along this path are defined as key frames, and the number of images between each camera is set by the in-between frames (defined at Camera Path Options). Only one camera path will be active at a time (cameras and their markers visible on the Floor Plan). Use Camera Tool to select the active Camera path.
The Parallel Projection Pre-sets are created from the 3D Projection Settings > Parallel Projection Settings > Pre-Sets: These are defined as key frames, and the number of images between each Pre-set is set by the in-between frames.
The frame can be saved from either the 3D window or PhotoRendered, as an animated movie file or as a sequence of still images. If you save the Fly-Through as an external movie file, you can view the animation with most common movie viewers on any platform. Alternatively, immediately view the animation on screen.
Create Fly-Through
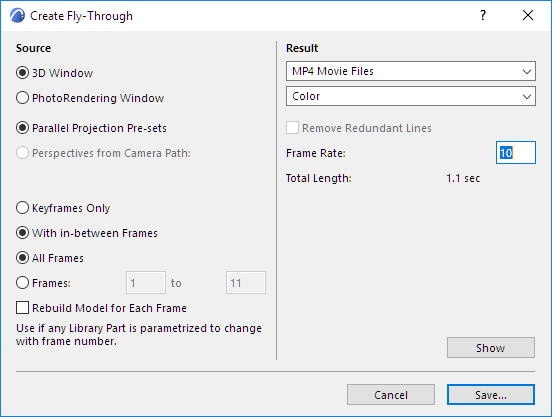
The Fly-Through dialog box allows you to set the source and results of the Fly-Through.
Source
- Click 3D Window to use the 3D Window as the image source and preview window.
- Click PhotoRendering Window to use the PhotoRendering Window as the image source and preview window.
Define the route of the Fly-Through:
- Click Parallel Projections Pre-sets to create animated transitions between parallel projections.
- Click Perspectives from Camera Path to create a fly-through animation along the active Camera Path. The name of the current Path is shown below.
Define the content of the Fly-Through:
- Click Keyframes Only to image key frames without any in-between frames.
- Click With in-between Frames to image both key frames and in-between frames.
- Click All Frames to image all animation frames in the current Path.
- Click Frames to specify a range of animation frames (first and last) for imaging from the current Path.
Rebuild Model for Each Frame: If you check this option, Archicad rebuilds the project after each frame and creates a new view from the rebuilt model.
Result
Specify the format of the Fly-Through.
Remove Redundant Lines: Check this box to remove overlapping lines from the saved image(s).
This option is available if:
- the 3D Engine is the Vectorial Engine (not Hardware acceleration)
- you are exporting particular Frames (not All Frames)
- the chosen file format is either PMK or Archicad 2D Lines.
Frame Rate: Enter the frame rate per second value here.
Total Length: Length of the animation is displayed in seconds, which divides the total number of frames with the frame rate, as an indication of how long the saved animation will be.
Show: Click to process the Fly-Through and preview the images without saving them. You can save the resulting animation afterwards by reopening the dialog and clicking Save.