Formatting Palette and Text Editor Controls
The Text Editor and Formatting Palette appears as soon as you click on the Floor Plan (with the Text tool active) and begin typing into the text box.
Use the Formatting palette and the indent/tab controls of the Text Editor to format individual characters, lines and paragraphs that have been typed into your text block, or to switch styles while typing.
The controls of the Formatting Palette and Text Editor apply only to the text you are entering in the Text Editor, or to selections inside the Text Editor.
The position of the Formatting palette can be customized using the “Position of Text Formatting Palette” controls in Options > Work Environment > Dialog Boxes and Palettes.
The Info Box is grayed while you are in the Text Editor.
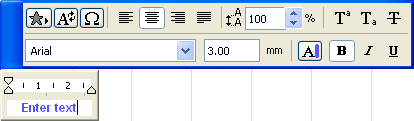
Use the Formatting Palette to apply formatting to selected characters or paragraphs in the text editor, or to insert text symbols. By selecting and formatting different segments of the text blocks, you can have multistyle formatting within a single text block.
Note: If the selected text contains multiple styles, the Formatting Palette settings reflect the formatting of the first character in the selection.
Choose Favorites: This pop-up contains a list of Text Settings that you have saved as favorites, as well as the default settings. If you have not saved any favorite Text Settings, this button is grey.

To apply text settings saved as Favorites, select text inside the text editor and click on the stored Favorite from the pop-up list.
Note: Only the text-specific settings of the Favorite can be applied to selected text in the Text Editor.
To apply Favorite settings to the entire text block, use the Favorites button at the top of Text Tool Settings.
For more information, see Favorites and Apply Favorite to Placed Element.
Insert Autotext: Use this control to open a dialog box to choose from available Autotext categories and items. The Preview area depicts the selected Autotext.

See also Autotext.
Insert Symbol: Click this button to access a Character Map (Character Palette on MacOS) to choose and insert a symbol.

Alignment Buttons: (left, center, right, justify): to set particular alignments for the selected paragraph within your text block.

Leading: Use this control to modify the leading value (in percentage) for a selected line in the text block. Enter a number or use the up-and-down arrows to change the value in increments of 25 percent.

Note: In Windows, if you enter a leading value of less than 100 percent, the text in your text editor will not reflect this accurately (it will still appear as if your line spacing were set to 100 percent). However, your text will be displayed correctly on screen.
Superscript/Subscript/Strikethrough: Click either Superscript or Subscript to raise or lower the typed text compared to the text line. Strikethrough will draw a line through the text.


Text format for selected text: Set font, font size, character style or font color for any one or more characters or paragraphs that you select inside the text block.
Note: If you use the “Automatic pen color visibility adjustment for Model Views” feature (Options > Work Environment > On-Screen Options), the text in the text editor will reflect this (modified) color.
For more information, see More Options.
The text editor appears (together with the Formatting Palette) every time you activate the Text tool and place a text block in the project. The flashing cursor indicates your place in the text editor.
The background color of the text editor is the same color as the text block’s background.
When creating a new “breaking” text block, indents appear in the ruler of the Text Editor:
At left, the first-line indent marker (on top) and the left-side indent marker (on the bottom)
At right, the indent that shows the width of the text block.

To reposition these indents, just click and drag them to the desired position.
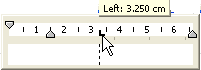
Set a new tab stop by clicking on the ruler. Drag it to a new position as needed. To delete a tab, click and drag it off the ruler entirely.
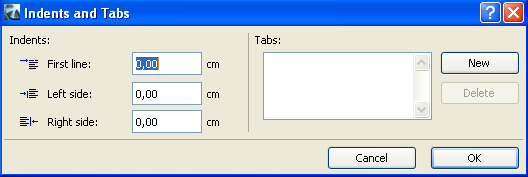
Alternatively, you can use the Indents and Tabs commands:
1.Click inside the paragraph whose indents or tabs you want to set or edit.
2.Choose the Indents and Tabs command from a context menu opened by right-clicking on the Text Editor’s ruler bar.
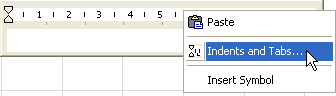
The Indents and Tabs dialog box appears, where you can enter values for indents of the first line, left side and right side of the text block. You can set new tabs: click the New button and enter a desired value. To modify tabs, select the existing value and enter a different one in the Tabs fields.
Note: Depending on the unit set in Options > Project Preferences > Working Units, you may set values in centimeter (cm) or inches (in).