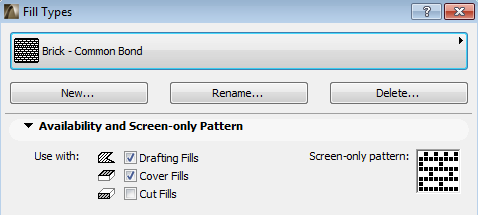
Fill Availability and Screen-Only Pattern Panel
This is a panel of the Fill Types Dialog Box (Options > Element Attributes > Fill Types.)

Check one or more of the Use with checkboxes to define its Fill Category, which determines how the selected Fill type can be used in the Project:
See Defining Fill Availability in Fill Pop-Ups for more information.
•Drafting Fills: Check these boxes to allow using this Fill type as a drafting fill. Drafting fills are not applied to construction elements; they are drawn by hand using the Fill tool.
Note: If this box is not checked, the current fill type will not be available in the Fill Settings dialog box.
•Cover Fills: Check this box to allow using this Fill type as a cover fill.
Note: If this box is not checked, the current fill type will not be available in Slab, Roof, Shell, Mesh, Zone, Object settings dialogs and on the 3D hatching panel in Surface settings dialog.
•Cut Fills: Check this box to allow using this Fill type as a cut fill.
Note: If this box is not checked, the current fill type will not be available in the settings dialogs of GDL elements (which use cut fills), or in the Building Materials Dialog box.
Depending on the Fill Categories you set here, you will be able to hide or show the fills in your project by using the options in the Override Fill Display panel of Model View Options. (Document > Set Model View > Model View Options).
The Screen-only Pattern window shows the bitmap pattern of the selected Fill type; this pattern is used only to identify the fill in the fill pop-up menus, and is also used if you disable the “Vectorial Hatching” on-screen view option (View > On-Screen View Options); the fill will be displayed, on screen only, using this bitmapped pattern.
See also Fill Display Mode: Vectorial vs. Bitmap.
To edit this screen-only pattern, click with the arrow cursor in the pattern window to turn pixels on or off.
The new pattern remains associated to the selected name and vector fill.