Reflectance (CineRender Surface Channel)
Use the Reflectance page to set a surface’s ability to reflect.
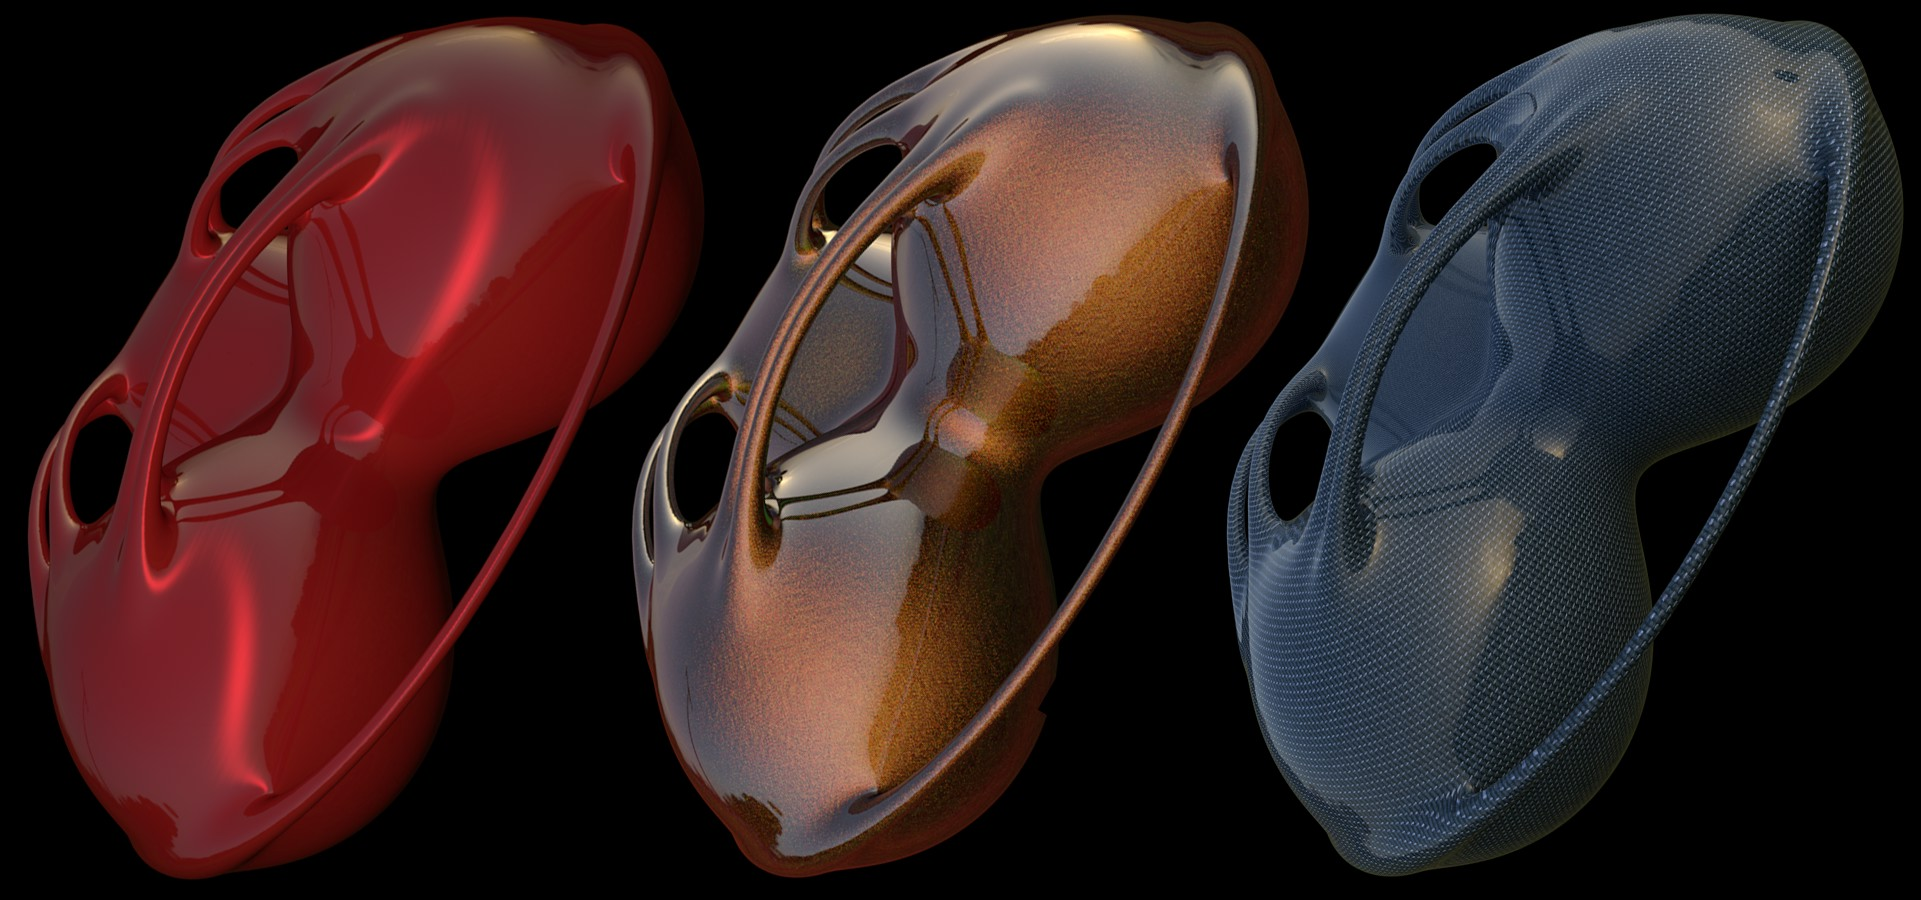
The Reflectance channel combines the Reflection and Specular channels of earlier versions. Reflectance can be stacked and organized in layers to create effects such as metallic car lacquer.
In CineRender, a maximum of two Reflectance Layers plus the *Transparency* Layer can be used. Each layer can have its own Alpha, Bump or Normals channel.
To use additional reflectance layers, please use Maxon’s Cinema 4D R16.
New Reflectance Features in ARCHICAD 20
The Reflectance channel in ARCHICAD 20 combines the reflective effect of three channels of earlier versions:
•the Color channel, which reflects real light sources (diffuse).
•the Specular channel, which also reflected real light sources (even if the specular highlight couldn’t actually be made to appear physically correct with regard to its shape and intensity).
•the Reflection channel, which reflected the environment.
The Reflectance layers and textures can define numerous properties that, in previous versions, were defined in separate surface channels (Bump, Normals, etc.) or shaders (Fresnel reflections).
Theoretically, it is now possible to define a surface only using the Reflectance channel, which means that the Color channel can be ignored in some cases. However, this should not be done across the board.
On the one hand, special effects that were previously difficult to create - such as car lacquer, stacked specular highlights, etc. - can be created using the Reflectance channel. On the other hand, Global Illumination bases its function on the Color channel’s settings (and not on reflections) and cannot do without the Color channel. Furthermore, real diffuse reflections are much more complex to render than are those generated using the Color channel.
Topics in this section:
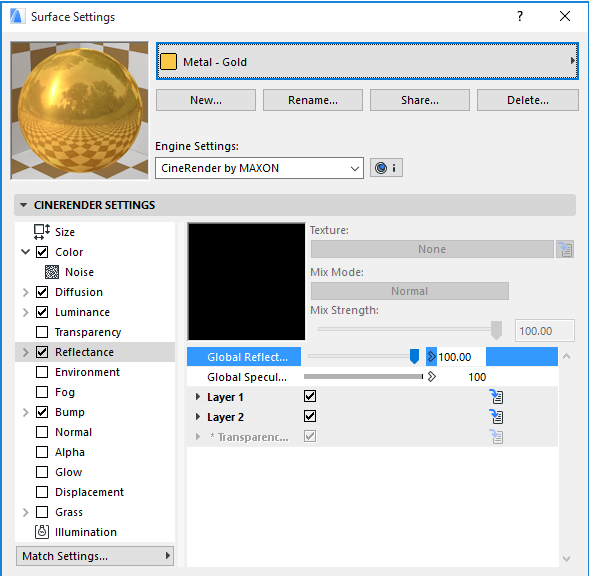
Compared to the Reflection Strength setting, which is defined per layer, the Global Reflection Brightness setting regulates the strength of the overall reflection. For example, if you create a complex combination of reflections, each with its own reflective strength and the overall reflection is too intense when rendered, this slider can be used to tone the reflection down without having to adjust individual reflection settings.
Use Global Specular Brightness to adjust or fine-tune a surface’s overall specular brightness.
Layer 1 and Layer 2
Lists the reflective layers of the Reflectance surface. Each layer’s effect can be combined with another layer using one of the two available mix modes.
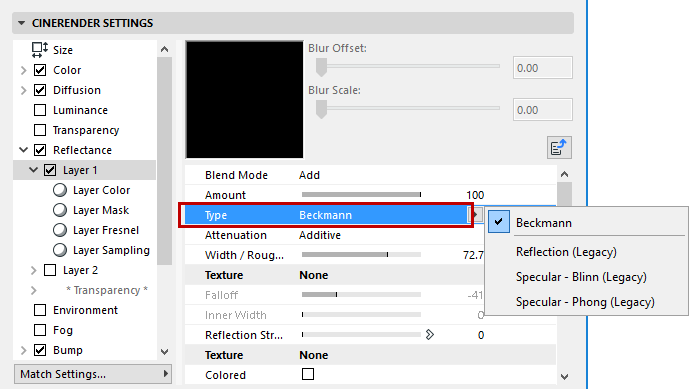
Beckmann
Beckmann is a physically correct and fast type and should therefore be the preferred method for normal use.
Reflection (Legacy), Specular - Blinn, Specular - Phong (Legacy)
These three are only available for reasons of compatibility if an older file is loaded. It is recommended that a different mode be used that works physically correctly. If Specular Blinn/Phong (Legacy) is selected, specular highlights can be adjusted freely without having to take roughness into consideration.
Attenuation
These options define how the Color channel should be mixed with the Layer Color with various Reflection Strength settings.
Note: If the Color channel is disabled, these settings will have no effect!
Note: If the selected Type is a “Legacy” Specular type, then the only available Attenuation modes will be those of older CineRender versions (Additive and Metal).
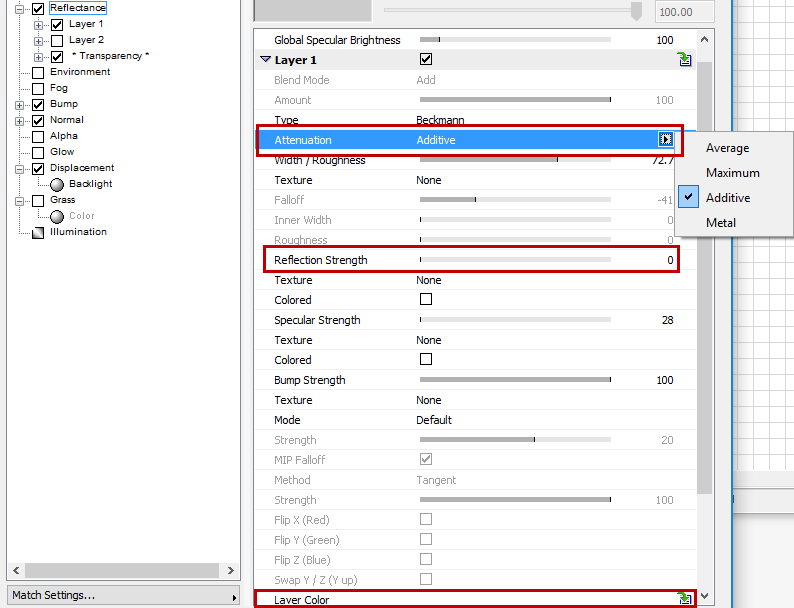
•Average: Both colors will be averaged. This mode produces the most realistic-looking results. (If no color is defined in the Layer Color setting, then the effect is the same as the next mode, Maximum).
•Maximum: This mode is best suited for creating colored reflections: The Color channel’s effect will be reduced and the Layer Color will dominate.
•Additive: Both colors will be added. (In the real world, the Color channel’s effect should weaken as the surface’s reflectivity increases, which is something that the Additive mode ignores completely. To achieve a physically correct result, the Color channel must be darkened manually.)
•Metal: Only available for reasons of compatibility if an older Project is loaded (in older versions of CineRender, this mode was found in the Specular channel’s Mode setting; it used the color defined in the Color channel to color the specular highlight).
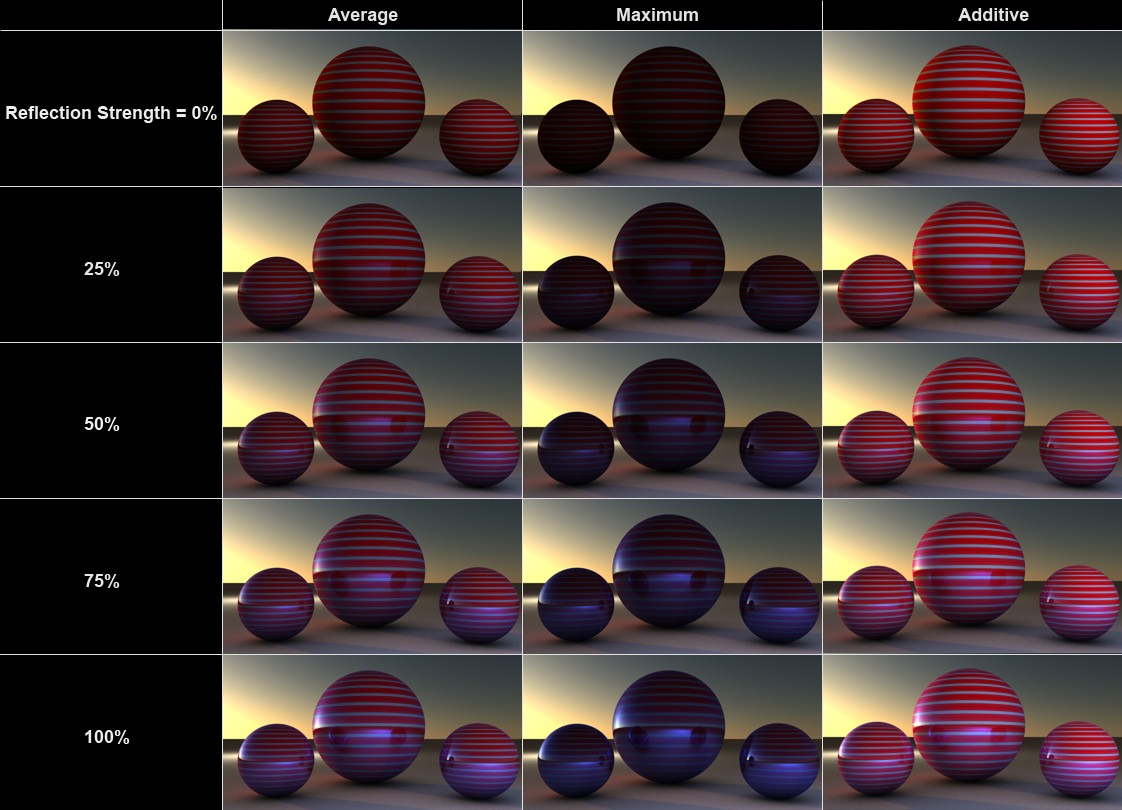
The sphere surface has a red-and-white striped Color channel
and a Reflectance channel with Layer Color set to blue
Roughness
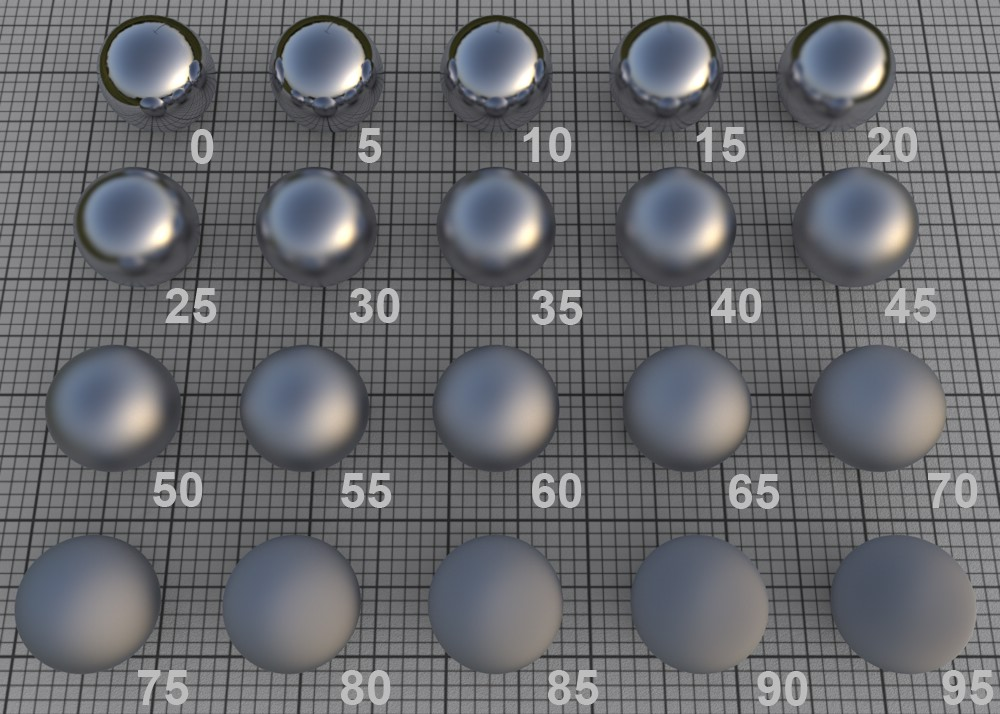
Roughness values in increments of 5
In the real world, surfaces are made up of an innumerable number of microscopic reflective facets, each with a different orientation, which, when viewed from a distance, produce a specular highlight or reflection.
A perfectly polished (reflective) surface is made up of facets with the same orientation. The rougher a surface is, the more random the orientation of these micro facets is, which produces a correspondingly more spread out and duller specular highlight.
A roughness of 100% is referred to as a Lambertian surface. This type of surface reflects light in a circular dispersion in all directions, which constitutes a perfect diffuse surface. This is exactly what is defined in the surface channel Color: a diffuse surface’s color without reflective properties. You can even ignore the Color channel completely and use the layer color to control the diffuse surface color (which, however, takes longer to render).
Note that the render time will increase as roughness increases, because reflections from a correspondingly wider range of reflections must be included.
Note: A Roughness value of greater than 0% is required for the calculation of specular highlights.
Texture
The Texture setting can be used to apply the Roughness setting (described above) to an entire texture.
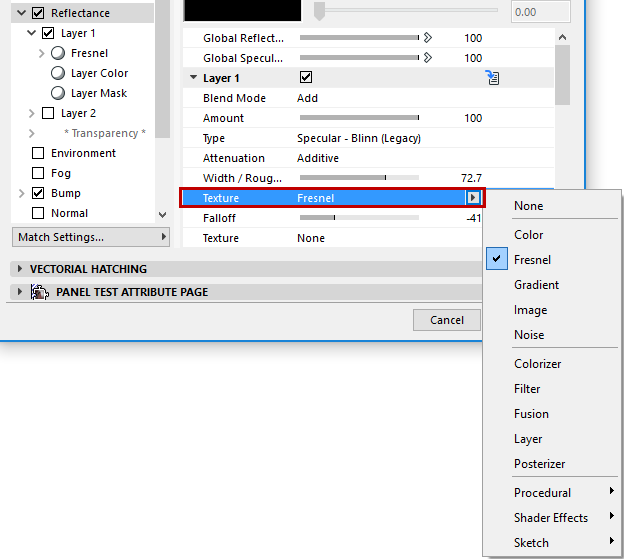
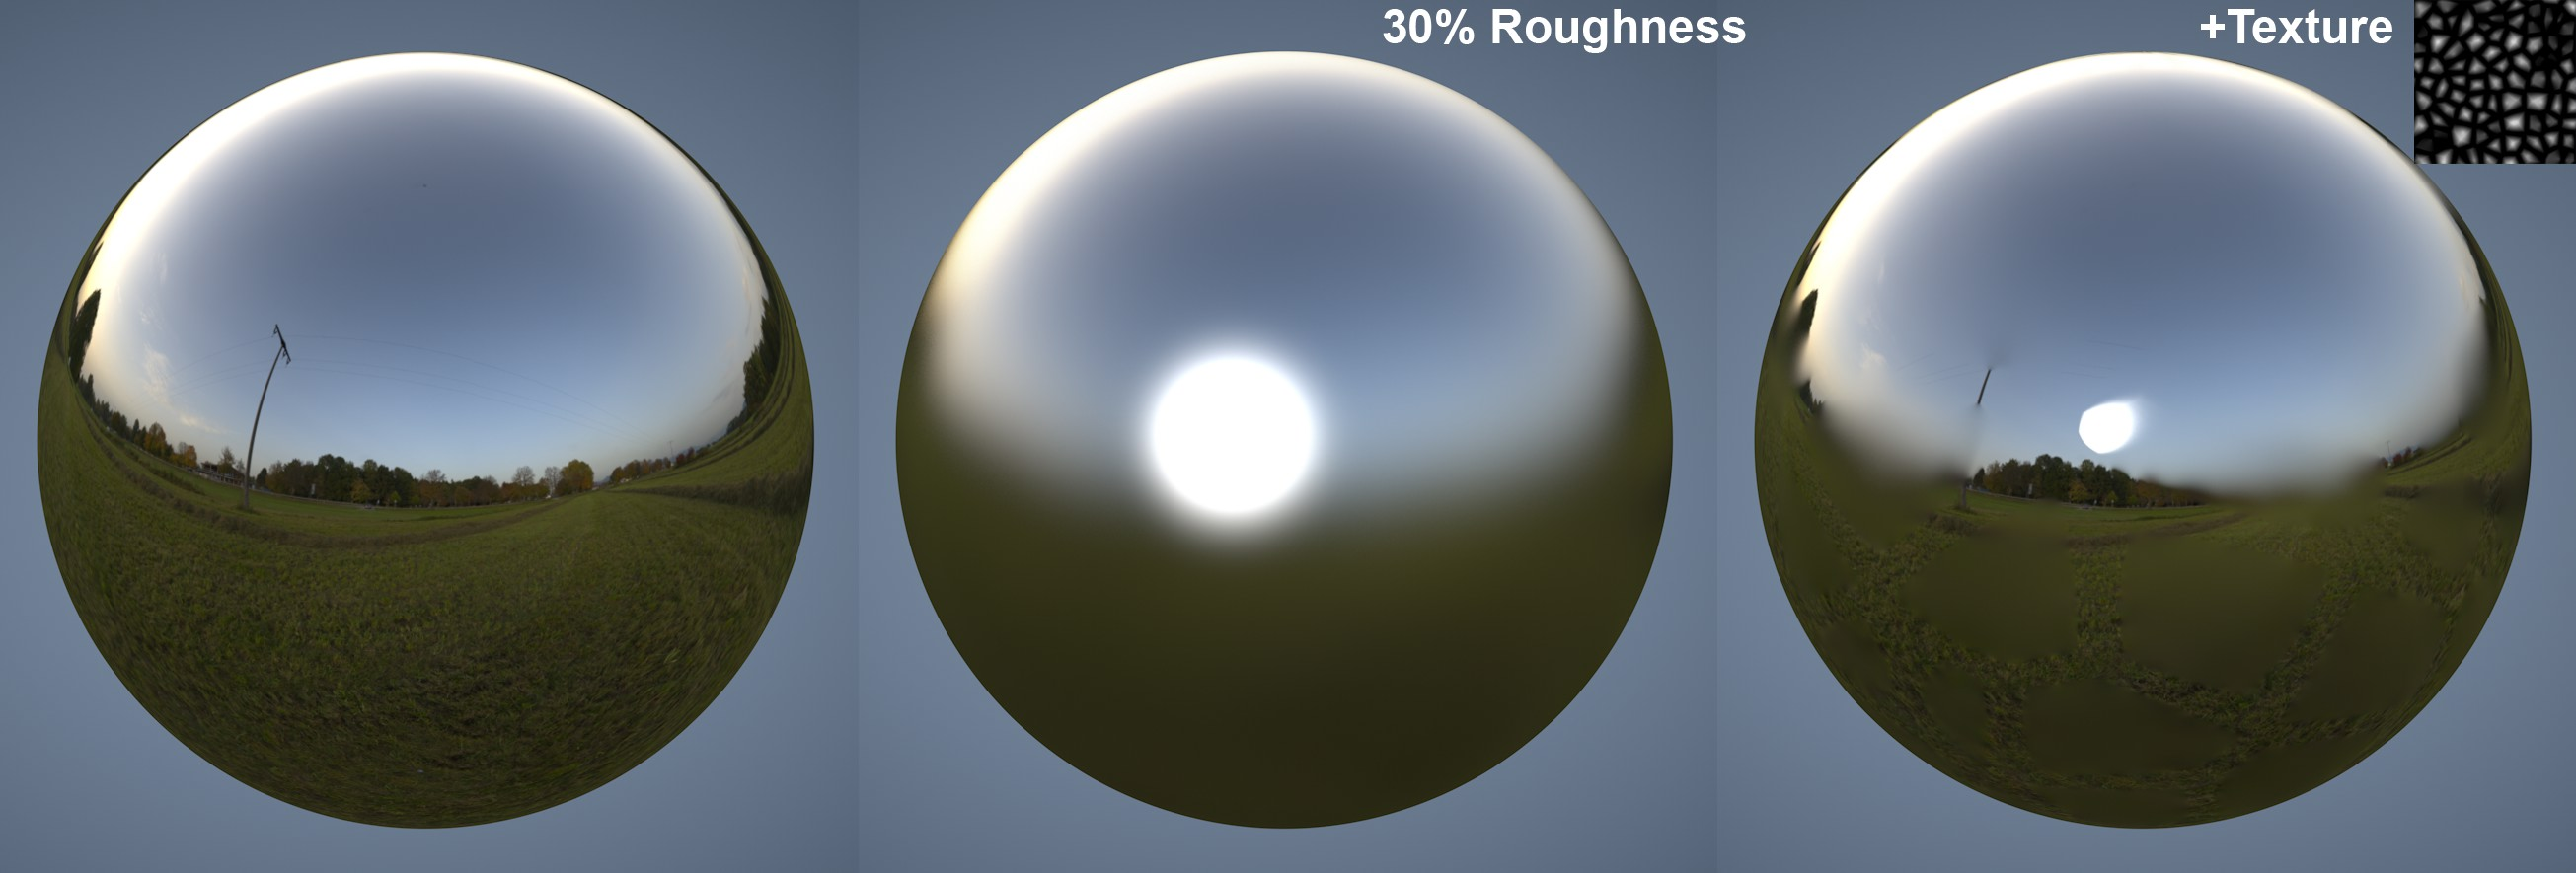
Matte reflections can be controlled using textures
See Textures (CineRender Surfaces).
The grayscale values of the texture loaded here control the setting as follows: white represents the setting’s full value and black = 0. In-between gray values have a corresponding effect.
Reflection Strength
This setting defines the strength with which the surface should reflect. The Attenuation setting above defines how this setting should work in conjunction with the surface channel Color.
Generally speaking, the intensity of the surface’s color subsides as reflection strength increases (which occurs for all modes with the exception of Additive). This effect is also known as energy conservation.
If Reflection Strength is set to 0%, the surface will not reflect at all; a value of 100% will produce the maximum amount of reflection. Every surface in the real world reflects to some degree, even if it is very minor. Keep this in mind when creating highly realistic textures.
Note: The layers’ combined reflective strength can be adjusted together using the Global Reflection Brightness slider.
Colored
If this option is enabled, the Color defined in the Color channel will be used as the reflection color (rather than the Color setting in the Layers Color sub-menu).
Specular Strength
This value defines the strength of the specular highlight. The use of specular highlights is a trick to add simple reflections to surfaces without noticeably increasing render time.
In the real world, specular highlights are nothing more than light sources reflected in objects’ surfaces. If you want to create a photo-realistic scene, set this value to 0 and use the Reflection Strength setting (above) instead.
Note on Specular Highlights: The size and appearance of specular highlights (with the exception of Type = Specular Blinn/Phong (Legacy)) depends on Type and Roughness (must be set to a value greater than 0% for most modes). This is different from pre-AC20 versions of CineRender, which let you make physically incorrect adjustments to the specular highlight’s height and width. This can, however, still be done, if necessary, if Type is set to Specular Blinn/Phong (Legacy).
Each light source in a project generates specular highlights. Note that specular highlights are only generated by real ARCHICAD light sources - as well as by Area lights (however, these differ in size and other aspects from real, reflected Area lights):
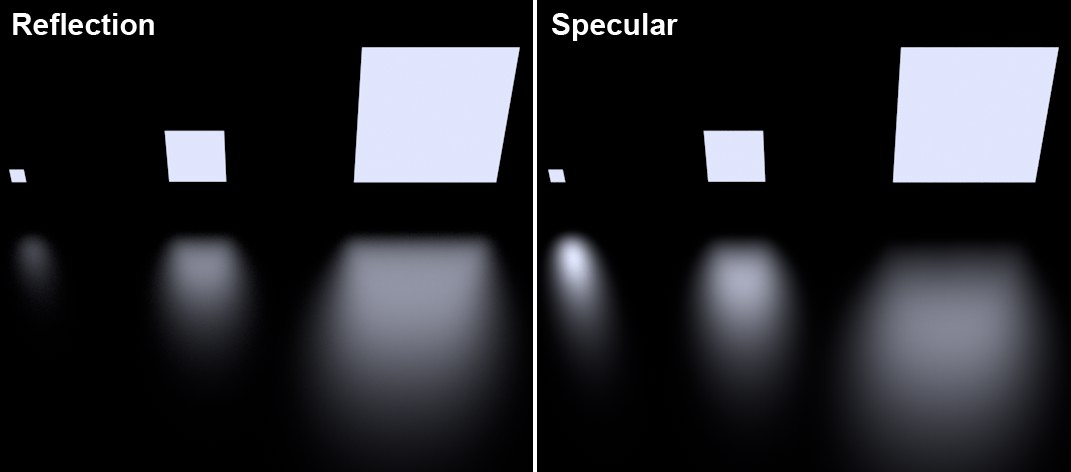
Area lights reflected on the floor
Note how the small Area light is rendered far too large, making it look unrealistic.
For example images of the effect of different Type and Roughness settings, see Type.
Tip: Note that the combined specular highlight strength of multiple reflective layers can be adjusted together using the Global Specular Brightness slider in the Reflectance tab.
Specular highlight settings
The following 3 settings apply only to Specular Blinn/Phong (Legacy):
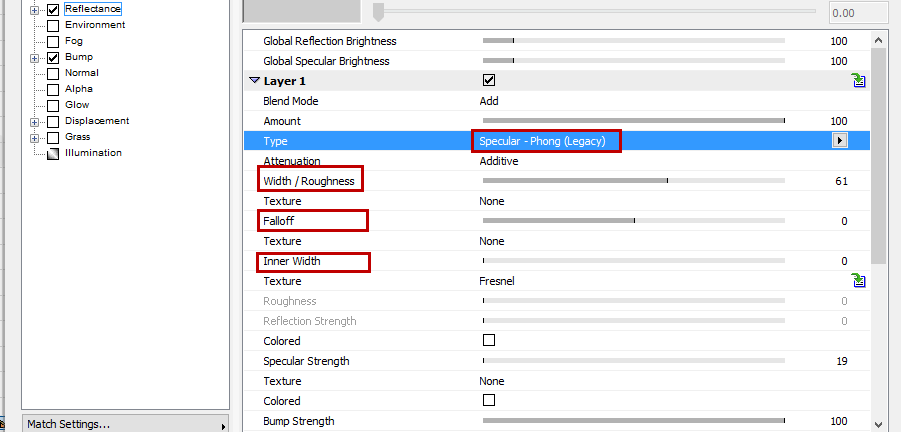
•Width/Roughness: Defines the width of the specular highlight. Larger widths should be used for matte surfaces (for less specular strength). Polished and shiny surfaces should have very small widths (for greater specular strength).
•Falloff: Defines the curve of the specular highlight - anything from pinpoint to bell-shaped or rectangular shapes can be created.
•Inner Width: Defines the specular highlight’s inner region, which is not affected by abatement of brightness.
Each reflection layer can have its own, autonomous Bump or Normal channel (see Mode, below). They function exactly like the surface channels of the same name.
Use this slider to adjust the strength of the bump or normal effect. If set to 0%, the effect will be disabled; 100% is the maximum effect.
This setting defines the type of Bump or Normal channel that should be used.
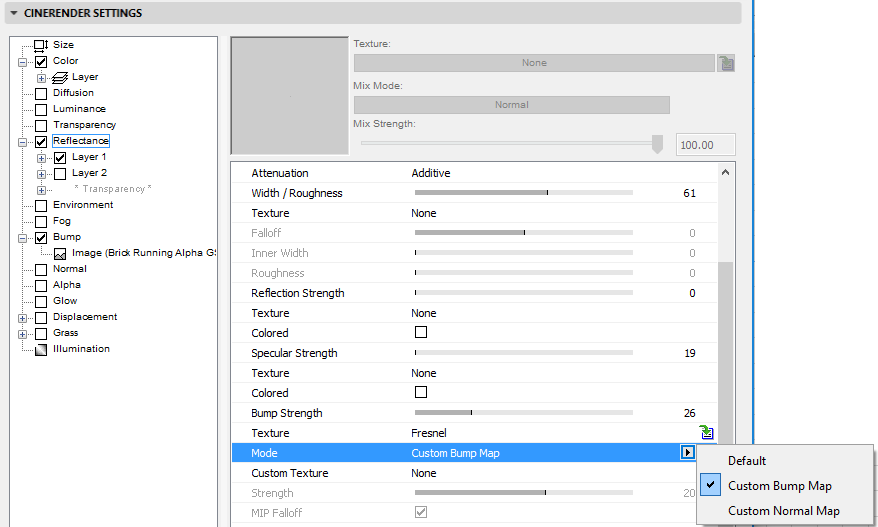
•Default: No specific reflection layer channels.
•Custom Bump Map: Select this to load a custom bump map into the Custom Texture field. You can also load a normal map (using the next option) for better results.
•Custom Normal Map: elect this to load a custom normals map into the Custom Texture field. This can also be a bump map in a Normalizer shader.
A very common use for layer-specific Bump channels is for glitter in metallic car lacquer. The reflective particles are simulated using a very small Noise Texture.
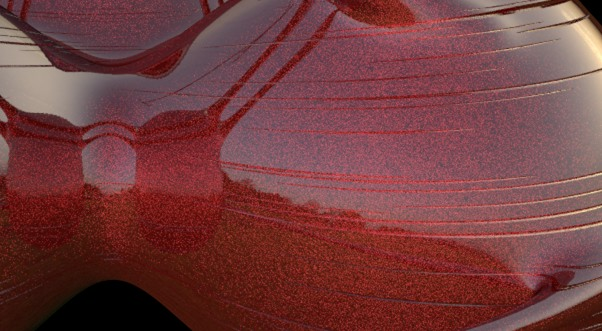
Metallic glitter and scratches were created using separate Noise shaders
in both reflection layers
Strength
Use this value to define the strength of the bump/normal mapping.
For details, see Strength (Normal Channel) and Strength (Bump Channel).
MIP Falloff
Used with Custom Bump Map. Enabling this option will reduce the bump mapping the farther away it is from the camera (see also MIP Falloff).
Method
Used with Custom Normal Map. Use this setting to define the coordinate system for the Normals map. Details can be found under Method.
Use these settings to define which axis should have which color, with a Custom Normal Map:
•Flip X (Red)
•Flip Y (Green)
•Flip Z (Blue)
•Swap Y & Z (Y up)
See also Flip X (Red)/Flip Y (Green)/Flip Z (Blue) and Swap Y & Z (Y up).
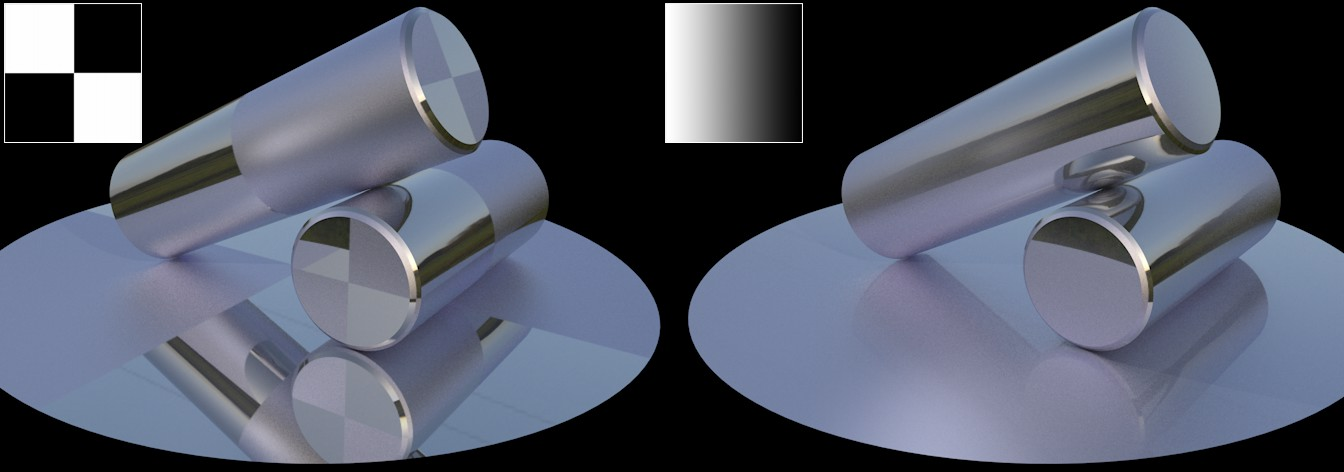
This menu’s settings serve as a type of color filter for the reflections.
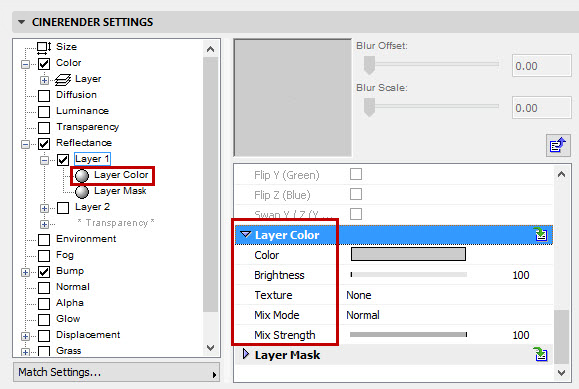
The layer color and the color from the surface’s Color channel will be added. This method lets you use a black-and-white texture to define where reflections should take place (white = yes; black = no).
This is also the color you should use if you want to create colored metal surfaces.
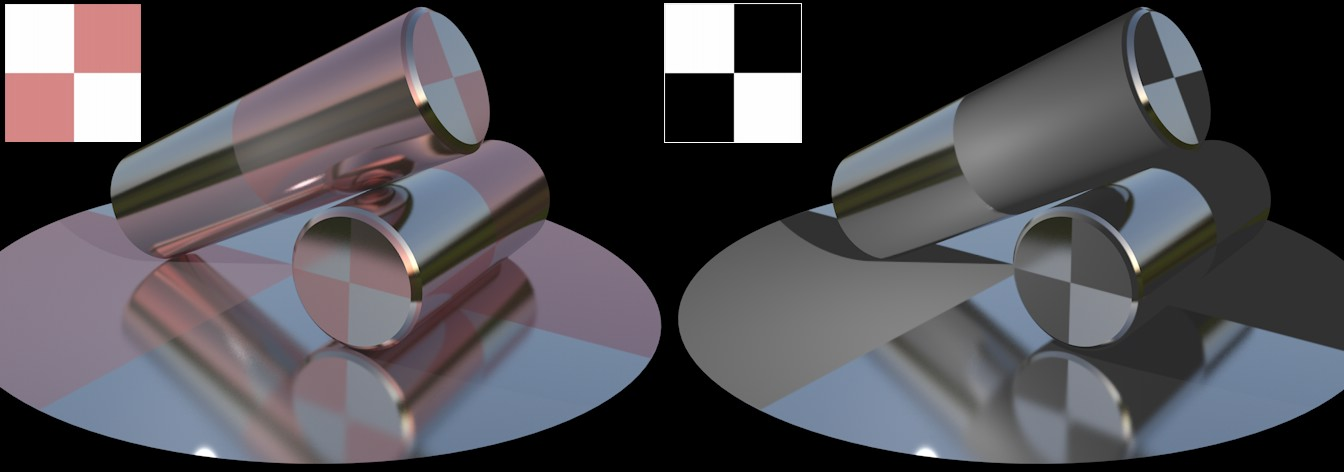
The textures from the Layer Color menu. White produces total reflection,
black shows the Color channel’s color.
•Color: Defines the layer filter color. The default color is white, which allow reflections without having to modify the color.
•Brightness
See Defining Color and Brightness Values.
•Texture
See Textures (CineRender Surfaces).
•Mix Mode
•Mix Strength
See Mix Mode and Mix Strength (CineRender Surfaces).
This menu’s settings can be used to create an alpha channel for a layer that defines the visibility of the layer beneath it. White will not hide anything, black hides all, grayscale values hide accordingly.
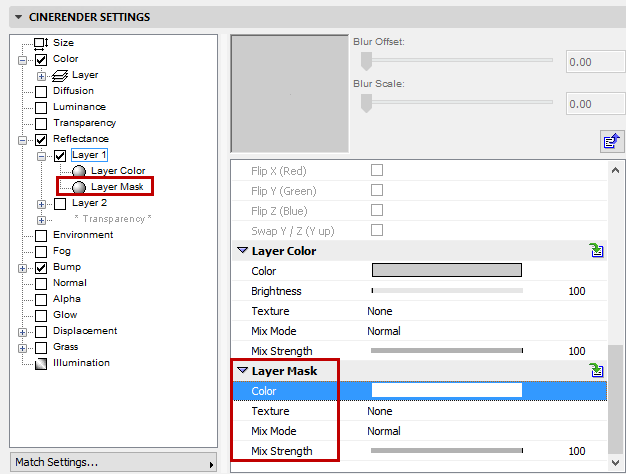
Color: This setting is used to define the color of the alpha. The default color is white, which allows reflections without having to modify the color.
These settings define the degree to which the reflection will increase as the surface normals increase their angle to the surface, which is referred to as Fresnel reflection.
Make sure that the reflectance strength is greater than 0. Otherwise, no Fresnel effect will appear.
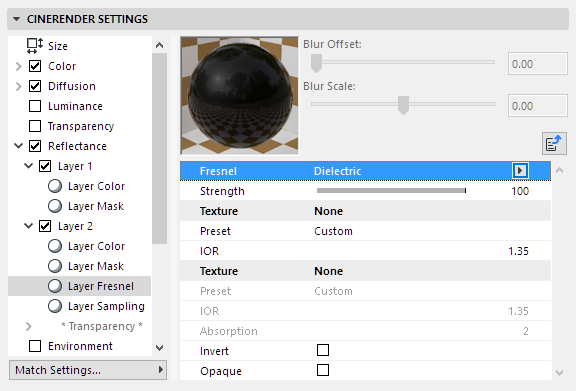
Fresnel
Select from:
•Dielectric for transparent surfaces such as glass, water, clear coat lacquer, etc.
•Conductor for opaque, reflective surfaces such as metal, minerals, etc.
Make sure that the Color channel is disabled for more realistic-looking results. Metal surfaces use reflections almost exclusively.
Preset
A series of presets (primarily for metals) is integrated that are based on real-world values. These cannot be modified individually using the Fresnel settings described below.
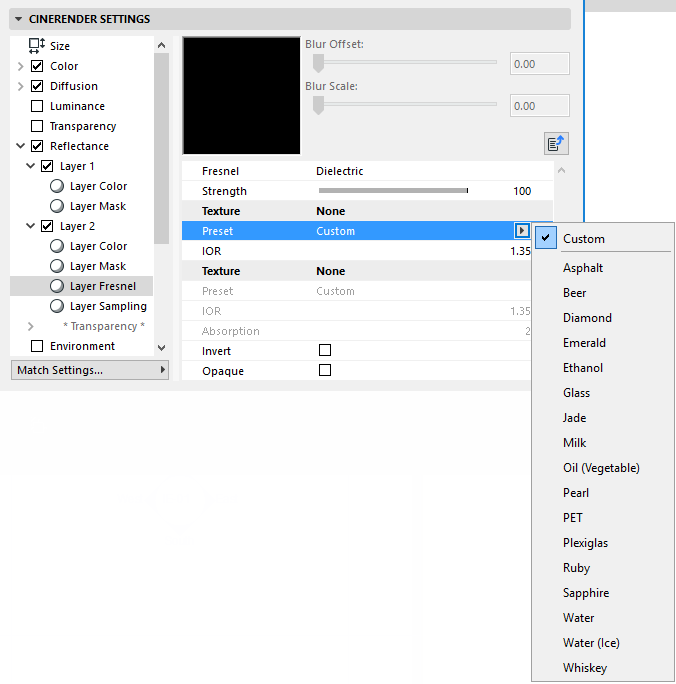
Different surfaces will be made available for selection depending on the Fresnel mode. selected. Select Custom if you want to modify the settings yourself.
Note that the Conductor presets will affect the internal color system (the Layer Color should be 100% white!).
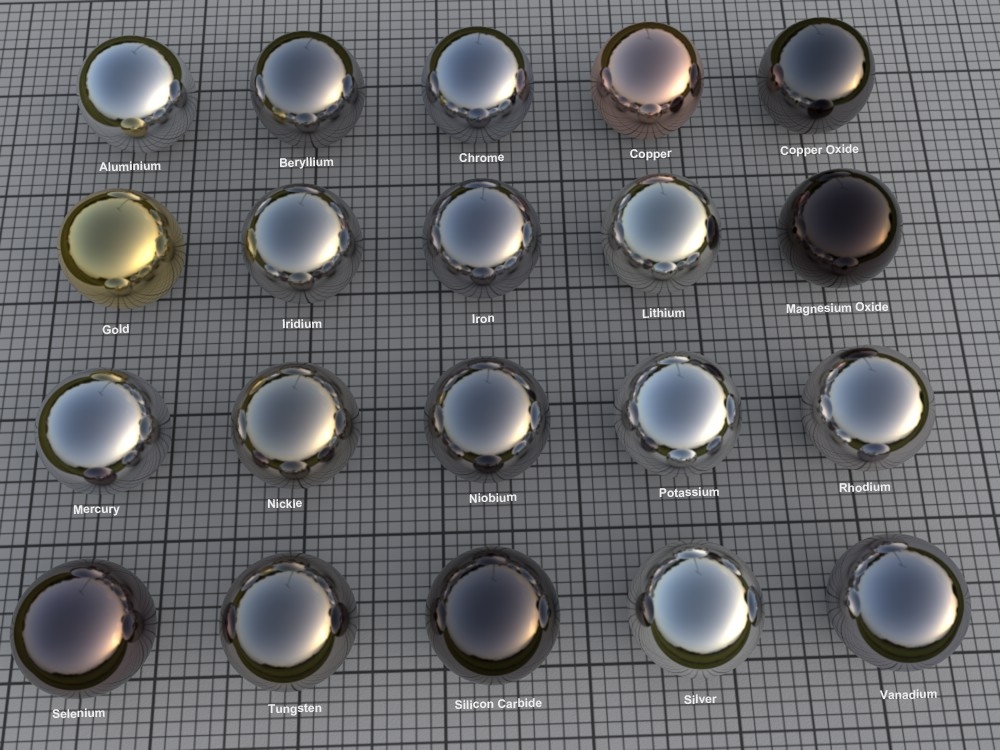
A selection of Conductor presets
Strength
The Strength slider can be used to seamlessly move from reflection (0%) to full Fresnel reflection (100%).
IOR
The IOR is mentioned mainly in conjunction with refractive light effects, but it is also a measure for the angle of incidence for a surface’s light reflections (regardless if it’s transparent or opaque). As you can see in the images above, low values cause the surface to reflect almost exclusively in regions at which the camera’s angle of view is extremely low. Larger values cause the reflection to move correspondingly more to the frontal regions.


The Conductor mode behaves similarly but the reflections are generally much more pronounced. (However, the increase in reflection that corresponds to the increased IOR is not linear, because it is also affected by the Absorption value; it is recommended that you use the preset values to achieve a higher degree of realism)
Invert
Enable this option to invert the Fresnel reflection. Example (on a sphere): the maximum reflection that is normally at the sphere’s center will be switched to its edges.
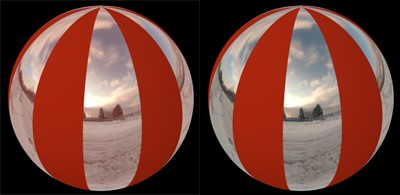
Opaque
In some cases you might want to prevent the Fresnel effect of neighboring surfaces from affecting a given object. In this image, a reflective surface with an alpha map lies on top of a red, diffuse layer. The Opaque option is disabled at the left: note how the red color from the underlying layer shines through while it is blocked on the right side of the image where the Opaque option is enabled.
Absorption
This setting is only available for the Conductor mode. Increasing values will produce correspondingly stronger overall reflections. This setting can be used to fine-tune the degree of reflection.
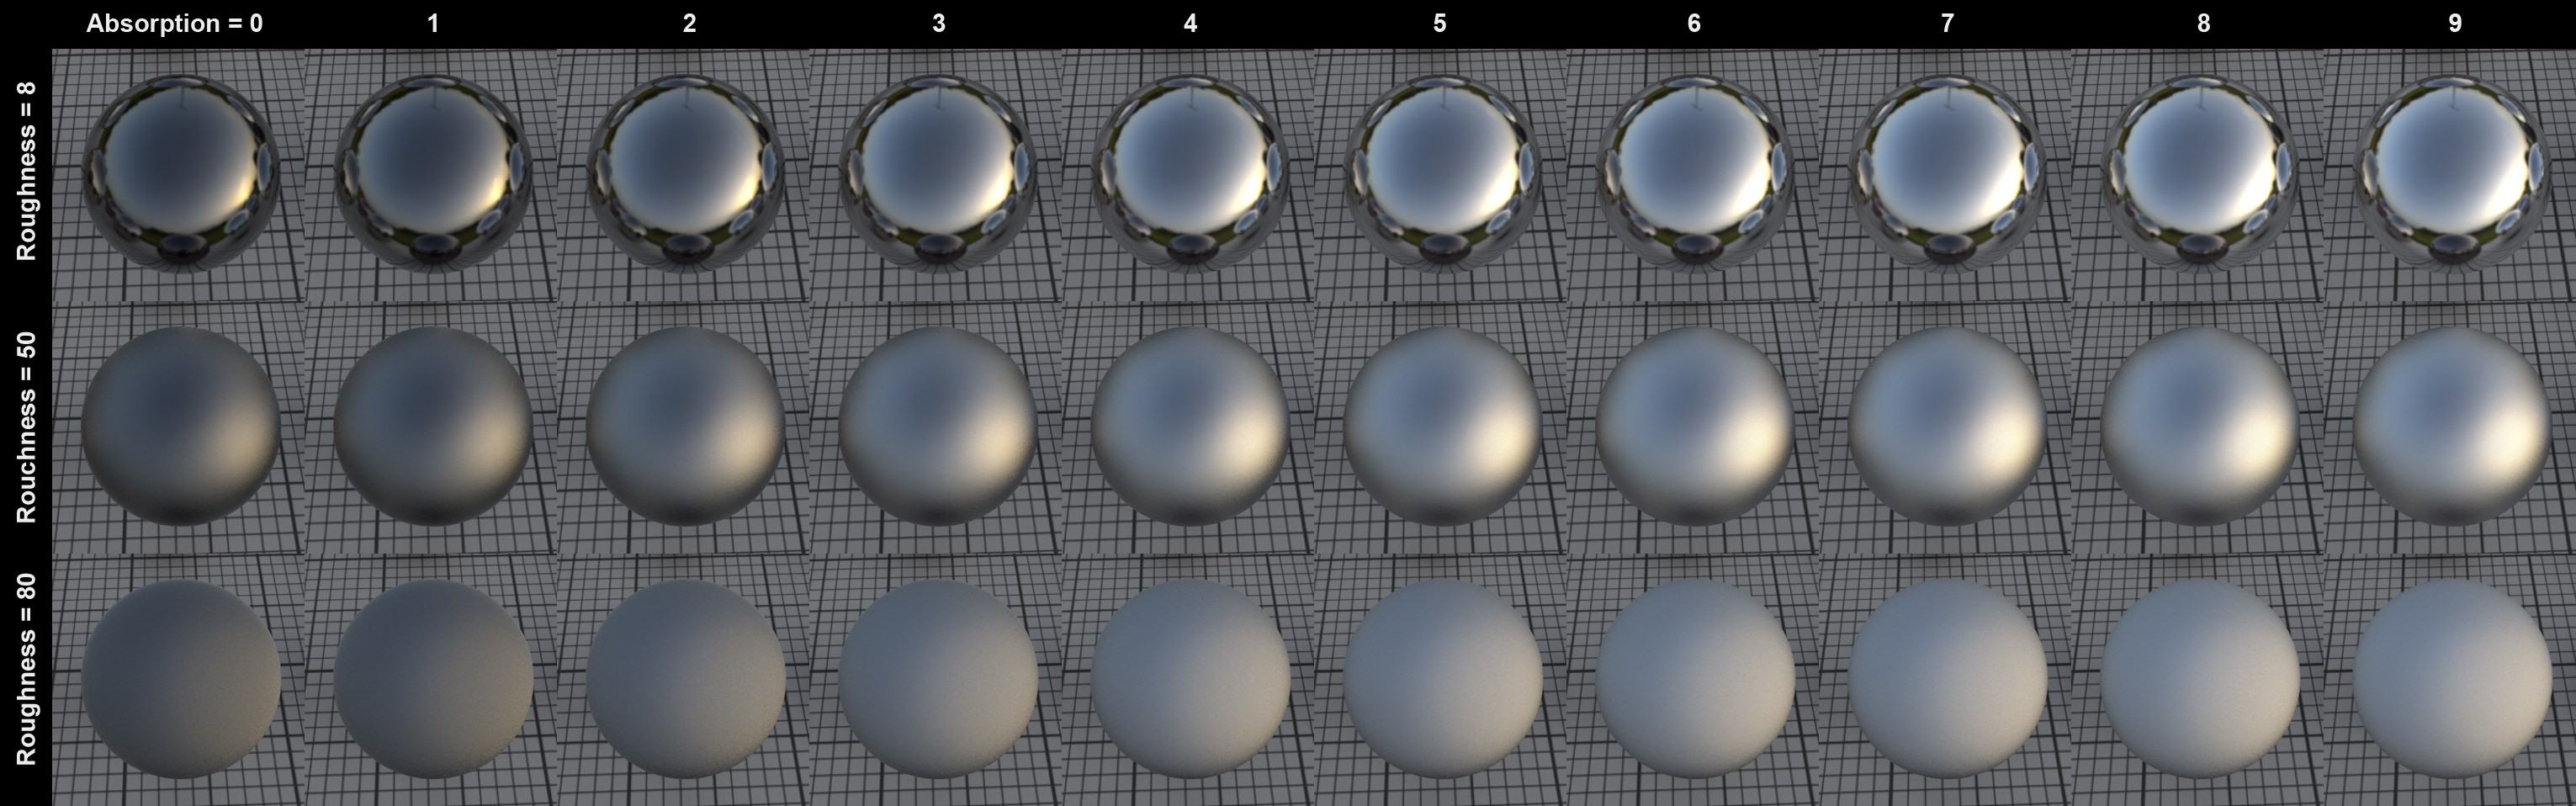
The Absorption effect in conjunction with Roughness (IOR = 2.97)
Sampling Subdivisions
This setting is designed for use with the Standard Renderer only (not the Physical Renderer). It can be used to define the quality of matte reflections.
Larger values will slow rendering and increase quality correspondingly.
Clamp Secondary
A reflected HDR image/sky can produce extremely bright points (fireflies) on a third object - i.e., a reflection of a reflection. To prevent the sampling settings from being increased dramatically, this setting can be used to limit the intensity of this reflection. The higher the value, the more the intensity of the reflection will be restricted.
Cutoff
This is a threshold value that defines the degree to which weak reflections will be calculated, if at all. Let’s say you have a project with numerous reflective objects. An object at the rear of the image that is reflected in a small object near the front can be omitted because its role in the overall image is so small. The smaller this value is, the more reflections will be ignored.
The image below is an example of how this setting can be applied (the very bright HDR image helps make the effect more pronounced). A sphere with a Fresnel reflection reflects a HDRI sky. The Cutoff value on the left is too large; the corrected value is on the right.
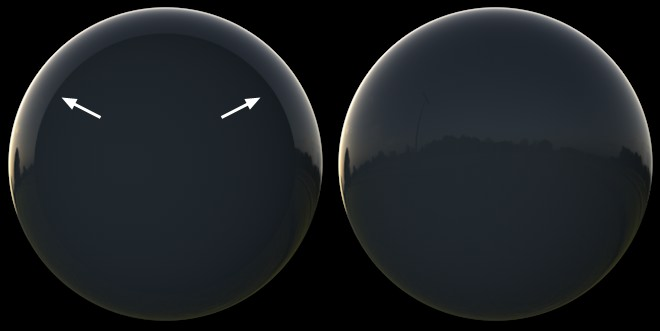
If the effect at the left takes place, then the Cutoff value needs to be reduced
Exit Color
The Reflection Depth PhotoRendering setting (Options/General Options) defines the number of reflections that should take place. For example, if you have two mirrors facing each other, this setting can be used to limit the number of reflections that take place. Otherwise an endless number of reflections would be rendered with a more-or-less endless amount of render time.
See Reflection Depth.
The Exit Color setting defines the color the reflection should assume in the end. In previous versions of CineRender, this was black by default. However, as you can see in the image below, this produced unwanted black spots. This can be avoided if a fitting color is defined for the last reflection, as seen below.
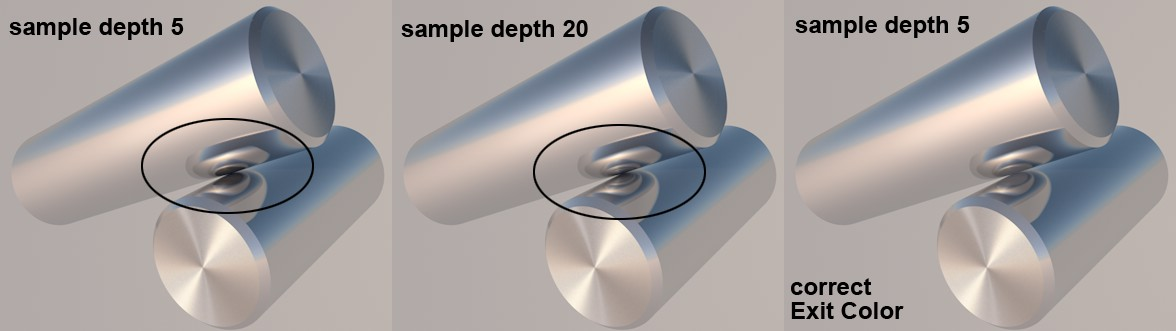
A fitting exit color is used to create a realistic-looking result without increasing the diffuse depth
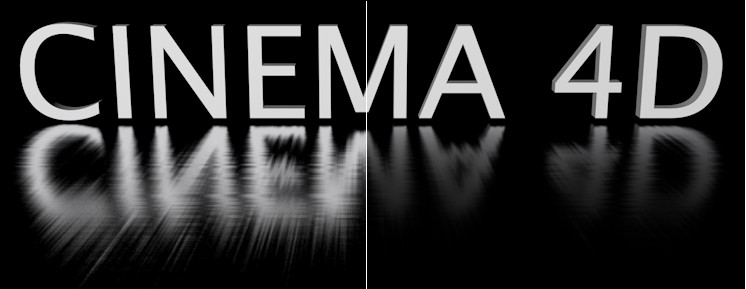
Left: Distance Dim disabled, Right: Distance Dim enabled
Distance Dim can be used to omit objects from a surface’s reflection depending on their distance from the surface.
•If Distance Dim is disabled, all objects will be reflected.
•If enabled, the Distance value defines the distance at which an object will no longer be reflected.
•The reflection falloff up to the Distance value is defined using the Falloff value. A value of 0 produces a linear falloff; other values produce the effects shown in the example above.
The reflection of the Sky object was disabled because it is considered to be an endless distance away.
Distant Color
For this setting, imagine a sphere with a Distance radius around the reflective object. This sphere’s color is reflected when the reflection samples are longer than the Distance value defined. Normally, black would be the correct color in this case because it would prevent anything from being reflected. Other colors can be used depending on the intended result.
The * Transparency * layer will be added when the Transparency channel is enabled.
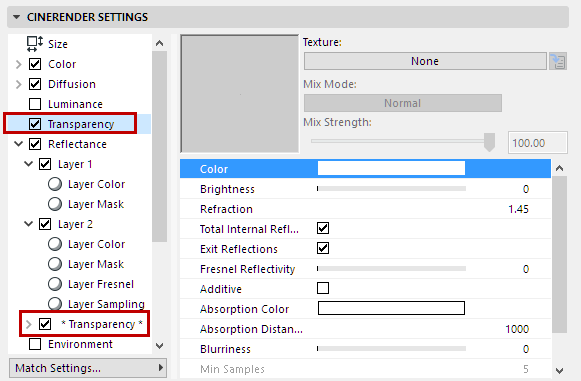
This page contains reflection settings, but does not include Color or Mask settings, among others. These settings let you control the Total Inner Reflection’s reflective properties (which was not possible prior to AC20).

The Total Inner Reflection is also part of the Reflectance channel;
the Roughness was increased on the right
Normally, these settings do not have to be modified. If you’re not trying to achieve a very unusual effect, these settings can be left as they are.
Note: The Total Inner Reflection must be enabled in the Transparency channel and Refraction should be set to 0.