To edit a selected Curtain Wall Grid or individual Grid Line, you must use Curtain Wall Edit mode. Available operations include:
•Move or delete a selected Grid Line
•Rotate all the Grid Lines of one of the Grid directions
•Rotate or Move the Grid as a whole
Note: Rotate Grid is not available for cylinder-based or Chained Curtain Walls.
•Add a new Grid Line
Note that moving or rotating a Grid, or one or more Grid Lines, means that the Frame(s) assigned to that Grid or Grid Line are moved or rotated along with it.
Deleting a Grid Line will delete the Frame on it. The Panel(s) will change in size to conform to the resulting new Frame pattern.
To make editing the Grid easier in Edit mode, make sure that the Scheme is visible (and turn off the other members’ visibility as needed).
Edit Grid Pattern and Position
Edit Grid Pattern and Position
In Curtain Wall Edit mode, you can customize the Curtain Wall’s Grid Pattern by editing Scheme Settings. As soon as you edit any aspect of the Curtain Wall’s Scheme Settings, that Scheme becomes “Custom,” rather than System-defined.
See Curtain Wall Settings: Scheme Page: Grid Pattern and Preview Panel.
To edit a Curtain Wall grid pattern graphically, go into Curtain Wall Edit mode.
Make sure that Scheme display is On. (To make selection easier, turn off the display of Frames, Panels, Junctions and Accessories.)
Select the Scheme, then double-click the Scheme Tool to access Scheme Settings.
A Chained Curtain Wall has as many Schemes as it has segments: you can select one Scheme at a time and customize each Scheme separately.
See also Create a Chained Curtain Wall on the Floor Plan.
Make any changes in the Grid Pattern, or modify the Grid Pattern’s origin. The selected Scheme is now a Custom Scheme.
Click OK to apply the changes.
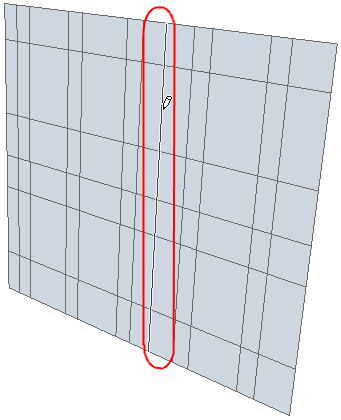
To move an individual Grid Line, select it with the Mercedes cursor (clicking any node will select the entire Scheme). Choose the Move Grid Line command from the appearing pet palette:
Drag the Grid Line to its new position (it will remain parallel to its original position). Click to place.
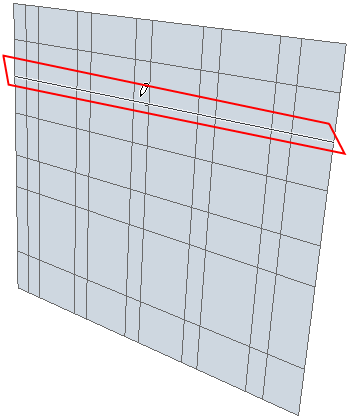
To move an entire Grid orthogonally, select either a Grid Line or the entire Grid and use the Move Grid command from the pet palette.
If you defined the Grid origin as a defined point (as opposed to Custom Origin) in Scheme Settings, then the Grid origin is locked, and you can move the Grid only in one direction.
See Pattern Position.
To rotate all the Grid Lines of one direction (e.g. all the Grid Line rows), select one of the Grid Lines you want to rotate, then choose the Rotate Parallel Grid Lines command from the pet palette.
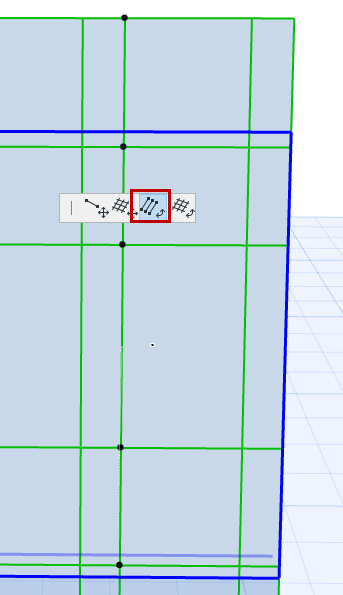
Note: If the Curtain Wall is Curved or Chained, you cannot rotate the column grid lines, just the rows.
As with other rotation commands in ARCHICAD, draw a rotation vector or enter a rotation angle in the Tracker. Click to complete the transformation.
To rotate the entire grid, select one Grid Line or select the entire Grid. Choose the Rotate Grid command from the pet palette.
Note: Rotate Grid is only available for Curtain Walls having an infinite Base Surface (it is not available for cylinder-based or chained Curtain Walls).
As with other rotation commands in ARCHICAD, draw a rotation vector or enter a rotation angle in the Tracker. Click to complete the transformation.
You can delete an individual Grid Line in Curtain Wall Edit mode: Select the Grid Line and press Delete.
You cannot delete the Grid as a whole.
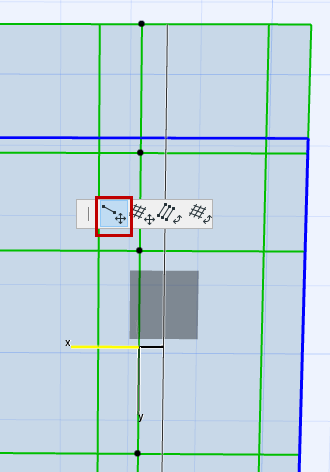
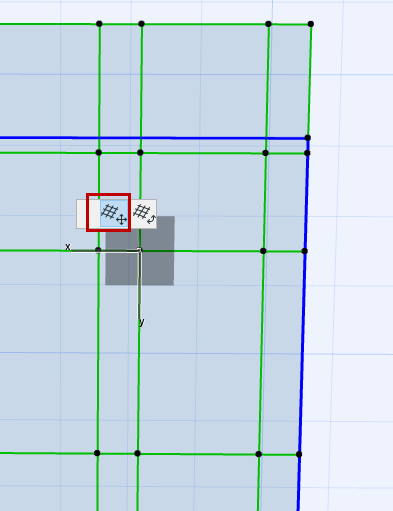
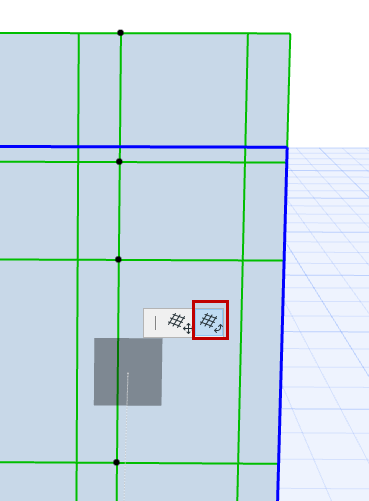
To add a new grid line, make sure the Scheme tool is active and the Grid Input method is selected in the Info Box:

Click on the place at which you want to place a grid line. Move the cursor around the point you clicked: use the feedback and click either of the orthogonal grid lines to place it: