Public MCP Connection
This feature allows you to connect your desktop AI tool, such as Claude Desktop or Cursor, to Archicad. By connecting your AI tool to Archicad, it allows your AI tools to manage and edit your Archicad project through the MCP Server - similarly to how AI Assistant works natively in Archicad.
Requirements
- An Archicad subscription plan that supports the Public MCP Connection - e.g. Archicad Collaborate or Archicad Max.
- A local desktop AI tool that supports connecting to a local 3rd party MCP server – your AI tool will be able to confirm this.
General workflow to establish connection
To establish a connection between Archicad and your AI tool, you’ll need to create a connection. Your AI tool will do this with the information you can access from Archicad and then provide to your AI tool. This only needs to happen once per AI tool.
- In your AI tool, you can ask: “Can you tell me how I connect a local MCP Server? I have a command line and argument from that application to create this connection.”
- After your AI tool has informed you of the connection method, switch to Archicad to gather the necessary information.
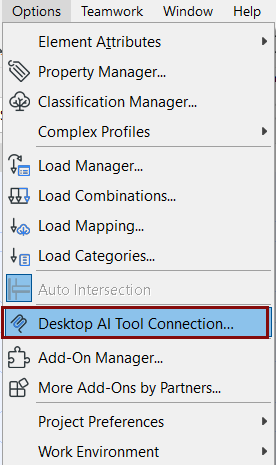
- In Archicad, open the ‘Desktop AI Tool Connection’ dialog (Options menu):
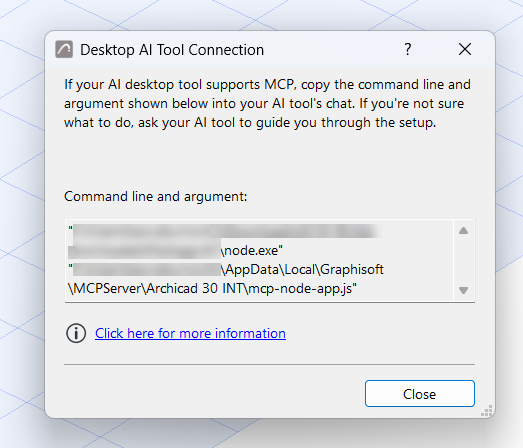
- Copy the “command line and argument” text shown in this Archicad dialog.
- Return to your AI tool and paste this text to the location your AI tool suggested (usually within the chat interface itself).
- Your AI tool may need to know the type of server. If so, use ‘stdio’.
- Your AI tool will establish the connection using the above information.
- A restart of your AI tool may be needed.
- You can verify the connection by asking: ‘Which Archicad projects are currently open?’ If you have multiple projects open, your AI tool will list them all.
- Once connected, you can start asking relevant Archicad MCP prompts.
To learn more about Archicad MCP tools and sample prompts, see: Supported MCP Tools
Sample configurations
Claude desktop
- Open the configuration file from File > Settings > Developer > Edit Config. It will point to your claude_desktop_config.json file, which should be opened in a text editor.
- Extend mcpServers section with the command and args obtained from Archicad by clicking Desktop AI Tool Connection command.
- Save changes to configuration file and restart the Claude desktop app. Please note that closing the main Claude window does not exit the app. To exit, use File > Exit.
- Restart Claude and test the MCP server connection by using this prompt: ‘Tell me running Archicad instances’.
The configuration file location is computer-specific; here is an example:
Windows exampleC:\Users\<your_user>\AppData\Local\Packages\Claude_pzs8sxrjxfjjc\LocalCache\Roaming\Claude \ claude_desktop_config.json
 "mcpServers": {
    "Archicad Public MCP Server": {
      "command": "C:\\Program Files\\Graphisoft\\Archicad 30\\node.exe",
      "args": [
        "C:\\Users\\<your_user>\\AppData\\Local\\Graphisoft\\MCPServer\\Archicad 30 INT\\mcp-node-app.js"
      ]
    }
}/Users/<your_user>/Library/Application Support/Claude-3p/claude_desktop_config.json
  "mcpServers": {
    "Archicad Public MCP Server": {
      "command": "/Applications/Graphisoft/Archicad 30/Archicad 30.app/Contents/Frameworks/node",
      "args": [
        "/Users/<your_user>/Library/Application Support/Graphisoft/MCPServer/Archicad 30 INT/mcp-node-app.js"
      ]
    }
  }
Cursor
- Go to customize menu, select MCPs tab.
- Click New MCP Server. It will open mcp.json file, where the servers section should be extended with the command and args obtained from Archicad by clicking Desktop AI Tool Connection command from the Options menu.
{
  "servers": {
    "Archicad Public MCP Server": {
      "type": "stdio",
      "command": "C:\\Program Files\\Graphisoft\\Archicad 30\\node.exe",
      "args": [
        "C:\\Users\\<your_user>\\AppData\\Local\\Graphisoft\\MCPServer\\Archicad 30 INT\\mcp-node-app.js"
      ]
    }
  }
}{
"servers": {
"Archicad Public MCP Server": {
"type": "stdio",
"command": "/Applications/Graphisoft/Archicad 30/Archicad 30.app/Contents/Frameworks/node",
"args": [
"/Users/<your_user>/Library/Application Support/Graphisoft/MCPServer/Archicad 30 INT/mcp-node-app.js"
]
}
}
}ChatGPT desktop
- In your ChatGPT desktop app, go to Settings > Plugins > Add > Add MCP server.
- It will show Connect to a custom MCP, specify here:
- Name: Archicad Public MCP Server
- Type: STDIO
- Command to launch: Full path to node, copied from your Archicad Desktop AI Tool Connection dialog
- Arguments: Full path to mcp-node-app.js, copied from your Archicad Desktop AI Tool Connection dialog
- Save and restart ChatGPT desktop app.
- Test the MCP server connection with the 'Tell me running Archicad instances' prompt.
VS Code
- Create an mcp.json file in your .vscode folder with the following content.
- The value of command and args is obtained from your Archicad Desktop AI Tool Connection dialog.
- Start this mcp server.
- Test the MCP server connection with the ‘Tell me running Archicad instances’ prompt.
{
  "servers": {
    "Archicad Public MCP Server": {
      "type": "stdio",
      "command": "C:\\Program Files\\Graphisoft\\Archicad 30\\node.exe",
      "args": [
        "C:\\Users\\<your_user>\\AppData\\Local\\Graphisoft\\MCPServer\\Archicad 30 INT\\mcp-node-app.js"
      ]
    }
  }
}{
"servers": {
"Archicad Public MCP Server": {
"type": "stdio",
"command": "/Applications/Graphisoft/Archicad 30/Archicad 30.app/Contents/Frameworks/node",
"args": [
"/Users/<your_user>/Library/Application Support/Graphisoft/MCPServer/Archicad 30 INT/mcp-node-app.js"
]
}
}
}