Shaders List (Cineware Surfaces)
To choose a shader for a particular channel in Surfaces, enable the channel, then click the Texture chooser button and pick one.

These shaders are tiny applications, most of which offer their own specific settings for modification.
In general, shaders are designed for a specific purpose, e.g. to depict a gradient or surface structure (wood, marble, etc.). Since shaders are made up of color information they can also be multiplied with other color or brightness values via the Mix Mode.
See Mix Mode and Mix Strength (Cineware Surfaces).
Once a shader has been selected, its settings can be accessed by clicking either on its name in the Texture setting or on its preview image below its name.
For a particular Surface channel, you can combine several shaders/textures in a layer, to achieve more nuanced effects.
See Using Layers to Combine Shaders (Cineware Surfaces).
The following is a list of shaders and shader groups with a brief explanation of their parameters:
Procedural Shaders (Cineware Surfaces)
Shader Effects (Cineware Surfaces)
Sketch Shaders (Cineware Surfaces)
Additional Effects for Shader Layers/Folders (Cineware Surfaces)
Define a color using the color chooser.
The simplest of all shaders is the Color shader. Only the basic color fields are available for modification. This shader can of course be used within a Layer or Fusion shader in combination with other shaders or textures.
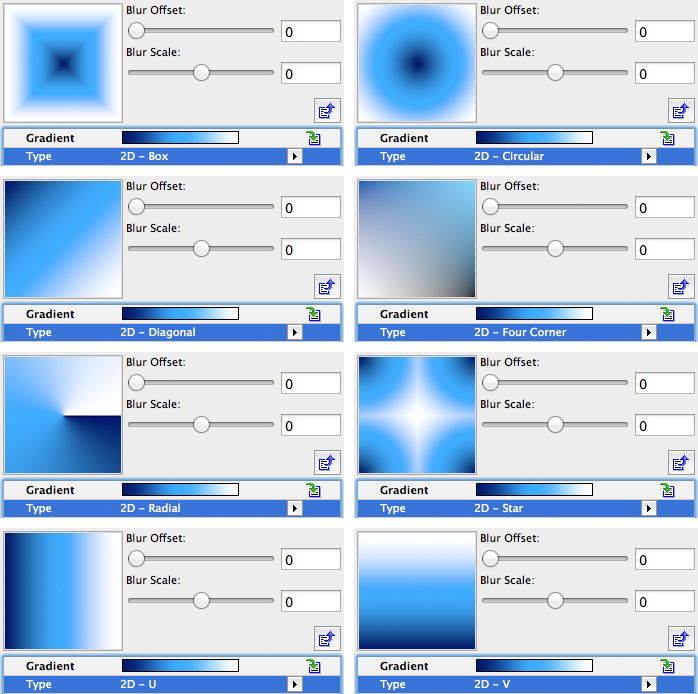
Use the Gradient shader to create custom color transitions in different directions and with different patterns.
•Use the Type pop-up to choose among several standard patterns.
•Most of the gradients can be rotated using the Angle value.

•Turbulence: This setting distorts the transition between colors. Setting the Turbulence value to greater than 0% will activate the Octaves, Scale and Frequency options below i
–The Octaves value defines the detail depth of the Turbulence effect.
–The Scale value defines the density of the effect.
The larger these values are, the more distortion will be created within the gradient.
–The Frequency value can be used when animating the gradient surface. The value entered here defines the speed with which the turbulence will be modified.
–Modifying the Seed value will result in the turbulence being recalculated. This lets multiple Gradient shaders be used in a single surface without generating identical results.
Normally a gradient is limited to the area of a texture tile, i.e. the area displayed in the preview image. If the surface with the gradient should be used on an object multiple times, the Cycle option should be enabled. This will cause the surface to continue around the object.
An example of this is shown in the image below. The example at the left shows a surface with a Gradient shader assigned to a simple Plane object. Since the gradient is restricted to the size of a single tile the gradient is repeated across the surface of the object. When the object is rendered (center), only a single gradient is shown that has simply been extended to the edge of the object. Activating the Cycle option will remedy this and the Gradient shader will cover the Plane object entirely (right).

In addition to the normal 2D gradients, 3D gradients are also available. 3D gradients cover an area in 3D space along a given axis and can be used to cover a 3D object.

•The coordinate system used is defined by the Space setting
•Cycle: Sometimes the needed texture map can become much larger than the original texture. Enable Cycle to tile the shader.
•For spherical or cylindrical gradients, the Radius value is used to define the volume. The Start and End values define the position and orientation of the 3D gradient.

3D Gradient, of cylindrical type (cycle OFF)

3D Gradient, of linear type (cycle OFF)
This shader can make numerous types of surfaces, especially glass, car finish, etc.) look more realistic.
The greater the angle at which you view a surface, the more reflective any surface becomes.

Left: a Fresnel shader in the Color Channel.
Right: a Fresnel shader in the Transparency Channel.
The Fresnel shader orients itself according to the angle of the surface to the viewer. The color from the left end of the gradient will dominate if the surface is viewed at an angle; the color from the right end of the gradient will dominate if the surface is viewed frontally.
This behavior reflects natural phenomena. A storefront window, for example, is barely noticeable when viewed frontally but looks like a mirrored surface when viewed from an angle.
Although the Fresnel shader can be used in any surface channel (the Reflectance channel is preferred), it does not affect the Bump or Displacement channels unless used as a secondary channel
•Use Bump: To make the shader affect not only geometry but the shadows on the surface as well, enable the Use Bump option. Bump refers to all surface characteristics that affect the Normals and thereby the object surface, i.e. the Bump and Normal channels.
Enable the Physical option to access additional options (IOR- Index of Refraction, Presets, and Invert) for fine-tuning the fresnel shader:
This shader creates a random pattern that can be used, for example, for sun surfaces and stone reliefs. The advantage of 3D noise is that you don’t have to worry about mapping or seams in the texture.
Noise is an integral component of any render system because it turns an otherwise far too smooth surface into a more or less randomly uneven surface (e.g. when used in the Bump channel).

Below are examples of some Noise types available in the Noise Shader. Their respective effects are shown using Sub-Polygon Displacement (see Sub-Polygon Displacement, in the Displacement channel).
On the left is the Noise Shader as a normal grayscale image; on the right is the same Noise Shader on a sphere, with different Noise scales (Global Scale parameter).

Colorizer takes the value of an input channel and remaps it based on a gradient. This is very useful for colorizing shaders such as noise and for coloring grayscale gradients.
•Input: Use the Input pop-up to select which of the texture’s characteristics should be used when calculating the gradient. The Gradient will then be applied from left to right in accordance with the texture’s input intensity.
If, for example, Input is set to Luminance, and the Colorizer contains a black-to-white gradient, all black areas of the texture will be assigned the colors at the left of the gradient. White areas will be assigned the color from the right side of the gradient.
•Cycle: If Cycle is enable, then a texture that contains Brightness or Intensity values greater than 100% will be re-calculated to a range of between 0% and 100%.
You can also use a Colorize effect applied to shader layers or folders.
See Additional Effects for Shader Layers/Folders (Cineware Surfaces).
The Filter shader filters another shader or a bitmap.
Use the Filter shader to adjust a shader or bitmap’s brightness, contrast, hue, and saturation. You can also clip the color (to reduce the color range and increase the contrast).
The Filter shader is especially useful for adjusting HDRI textures.
You can also use a Filter effect applied to shader layers or folders.
See Additional Effects for Shader Layers/Folders (Cineware Surfaces).

left = original
middle = hue edit, colorize on, and increased saturation
right = brightness and contrast adjusting
Low Clip/High Clip
These parameters clip or cut colors on two borders. The fastest way to understand how the parameters work is simply to try them.
Inverting the Low Clip and High Clip values can result in the texture being inverted.

Gradation Curves

Gradation curves can be used to precisely modify brightness and color regions of the original image. For example, brighten only the dark regions of an image; or brighter regions can be colored.

Gradation curves can be used to brighten, darken or color specific brightness regions
Use this curve (in addition to the RGB curves) to define the overall brightness.
How the Curve Works
A gradation curve defines where a new brightness value will be assigned along the X axis. The curve applies a brightness value of 0 to the first third, i.e., black. The second third has a linear gradient that assigns proportional brightness values to the region. The last third has a maximum value, which means it appears white.

The gradient curve is applied to the linear grayscale at the left. The result is shown on the right.
Intensity
Use this setting to define the strength of the Gradation Curve’s effect on the shader. A value of 0% will result in no effect, a value of 100% produces the maximum effect.
RGB
Use this curve to define the overall brightness.
This can also be done for individual color channels using the separate red, green and blue gradient curves. This makes it possible to color dark or bright regions only:

Dark regions in the center were colored red, and bright regions at the right were colored blue
Fusion allows you to combine two textures with a mask using the blending modes standard in photo editing applications, as if they were layers. However, you can use the Layer shader (see below) to achieve the same effect.
See Using Layers to Combine Shaders (Cineware Surfaces).
Interesting effects can be achieved by allowing only certain brightness or color characteristics of a given texture to be shown. For example, any number of brightness bands can be arrayed next to one another.
The number of color or brightness bands is defined by the Levels value. The Filter Width value serves to soften any hard edges by blurring them slightly.
The Posterizer shader can be used to remove unwanted color transitions or to create a comic look. In the example below, a Lumas shader in the Posterizer shader was applied to achieve the comic look.


You can also use a Posterize effect applied to shader layers or folders.
See Additional Effects for Shader Layers/Folders (Cineware Surfaces).