In 2D and 3D windows, you can zoom in on details, or use zoom out to display more elements. The Zoom control on the bottom scrollbar gives you feedback on the current zoom.
To return to Actual Size (zoom at 100%), double-click the Zoom button.
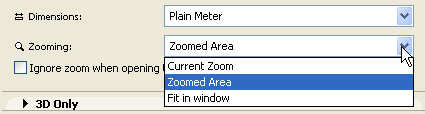
When you save the current contents of the screen as a view, you can opt to save either the current Zoom value in View Settings, or else the Fit in Window zoom level. (A view’s saved Zoom value includes the Pan and the Oriented View, if any.)
For more information, see: View Settings, Pan, Oriented View.
There are several techniques you can use to achieve Zoom effects:
Zoom with Mouse Scroll Button
If you have a mouse with a scrolling button, use it for zooming in on (or out of) the area where the cursor is located.
Note: In Work Environment, you can set a different preference for using the scroll-wheel (with or without the alt button) for Zoom and Pan. See Mouse Constraints and Methods Dialog Box.
If you don’t have a scrolling button on your mouse, you can still emulate its operation: First click the Scroll-Zoom button on the bottom scrollbar.

Then click anywhere in the window; move the cursor upwards to zoom in, downwards to zoom out. The greater distance you move the cursor, the greater the scope of the zoom. Click again to activate the zoom.
Zoom with Keyboard
You can use numeric keypad shortcuts to achieve the scrolling zoom effect: press the ‘+’ key for zooming in and the ‘-’ key for zooming out.
Zoom In/Out with Scrollbar Buttons
Click the Zoom In or Zoom Out button on the bottom scrollbar of the active window to activate the corresponding shortcut.


Draw a rectangle around the detail you want to enlarge with the Zoom In cursor. The area enclosed by the rectangle is enlarged to the size of the current window. With Zoom Out, the entire current view is squeezed into the rectangle that you have defined. The operation is optimized so that no distortion will result.
To rotate the current view in addition to zooming in/out, click Ctrl + Zoom In or Ctrl + Zoom Out. Draw a rotated rectangle at the desired angle. When you click again to complete the rectangle, the program will not only zoom in/out according to this rectangle, but will also rotate the view to reflect the rectangle’s rotation angle.
See also Oriented View.
Note: To double the current magnification or reduction level, double-click the appropriate icon.
Zoom with Menu Commands
•Choose View > Zoom > Zoom In or Zoom Out.
Note: If these commands are not available in the View menu, you can use Options > Work Environment > Menus to add them.
For more information, see Customizing Menus.
•Zoom to Selection: Use this command (View > Zoom > Zoom to Selection) to move in on only selected elements. (This is also available from the context menu, if you right-click in an empty space on the screen.)
•Previous/Next Zoom: If you wish to move one step back from your previous Zoom In, Zoom Out, Pan, Home Zoom or Fit in Window operations, you can click its shortcut button in the bottom scrollbar of the active window.

•Up to 20 previous steps are stored. To go to the next zoom, use the Next Zoom command or shortcut button.

If you need to return frequently to a part of your project, you can define it as the home zoom by choosing the View > Zoom > Set Home Zoom command. You can return easily to this view by choosing the View > Zoom > Home Zoom command. This home zoom is saved with the project.
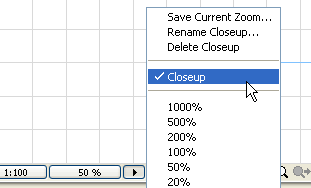
Predefined Zooms
Click the arrow pop-up button in the bottom scrollbar of the active window, then choose one of the predefined zoom values.
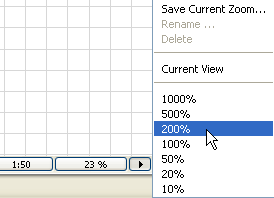
The pop-up menu commands allows you to save, access, rename and delete predefined zooms. Home Zooms are not included in the list of saved zooms.
See Home Zoom.
You can save different zooms for future use:
Click the arrow pop-up button in the bottom scrollbar of the active window, then choose Save Current Zoom.

In the appearing dialog box, give the saved zoom a name.
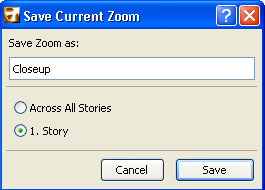
By default, this zoom will be available only for the current story (here, 1. Story). To have this zoom available in all stories, click Across All Stories.
(A view’s saved Zoom value includes the Pan and the Oriented View, if any.)
See: Pan and Oriented View.
Custom-saved zooms you name here can be applied to any view, from the Zooming pop-up list in the 2D/3D Documents Panel of View Settings.
Custom-saved zooms can be renamed as needed. Click the Rename command from the arrow pop-up of the window’s bottom scrollbar.
See View Settings 2D/3D Documents Panel.