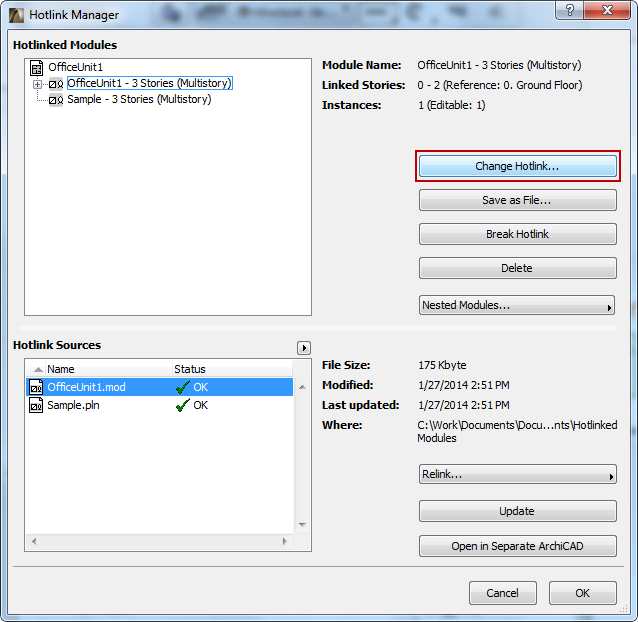
Use the Hotlink Manager (File > External Content > Hotlink Manager) to gain an overview of and manage all the modules in your project.
The “Hotlinked Modules” list (in the top half of the dialog box) displays the hierarchy of modules hotlinked into the current project. Each module listed here represents a vertical “slice” (that is, one or more stories) of its source file.
The list is hierarchical, indicating any nested modules at a lower level in the tree structure.
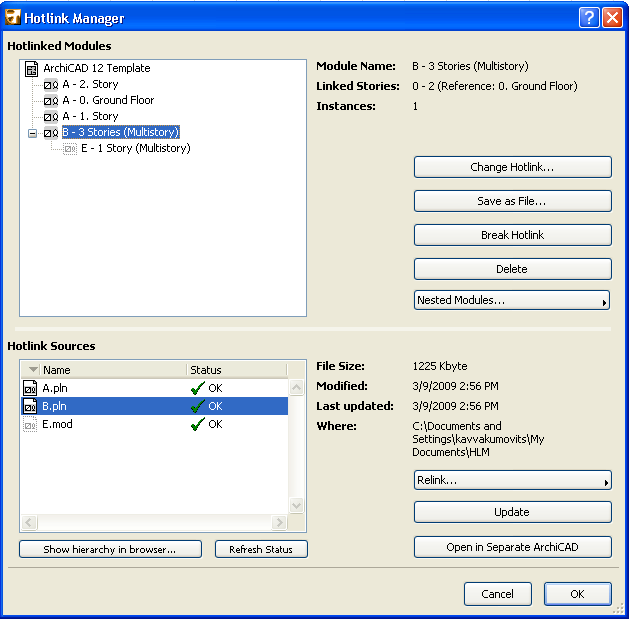
The following image shows three single-story modules placed from source file A.pln, and a multistory module (from B.pln) which also contains the nested module E.mod.
Select any module in this list to view its information: the Module Name, the linked story (or stories), and the number of placed instances of this module in the project. Hovering your cursor over any hotlink displays an information tag with the module’s location in the host file.
Note that selecting a module in this list also highlights the name of its source file in the “Hotlink Sources” list further down in this dialog box.
The “Hotlink Sources” list displays the source files of the hotlinked modules, together with the status of each of these files.
Use the buttons at the right of the Hotlinked Modules list and the Hotlink Sources list to manage the modules, their links and their source files.
For details on each control, see Hotlink Manager Dialog Box.
Topics in this section:
Deleting Modules from the Floor Plan
Change Hotlink (Relink and Relocate)
It is possible to have several levels of hotlinked modules nested into each other. Nested Modules are listed in the Hotlink Manager’s Module list according to their location in the module hierarchy.
Skip or Include Nested Modules in All Placed Instances
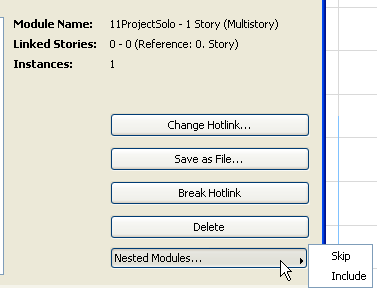
For each module that contains nested modules, you may choose to skip the nested modules. This means the nested modules will not be shown on the Floor Plan. To skip nested modules in all instances of a placed module, select the module in the Hotlink Manager dialog box and choose Skip from the Nested Modules pop-up.
In this case, the elements coming from nested modules will be excluded from this module instance on the Floor Plan (but will, of course, still be present in the source file).
To re-display a nested module, select its parent module again from the Hotlink Manager, then choose Include from the Nested Modules pop-up.
Changes in the display of a module’s nested elements will take effect when you click OK to close the Hotlink Manager dialog box.
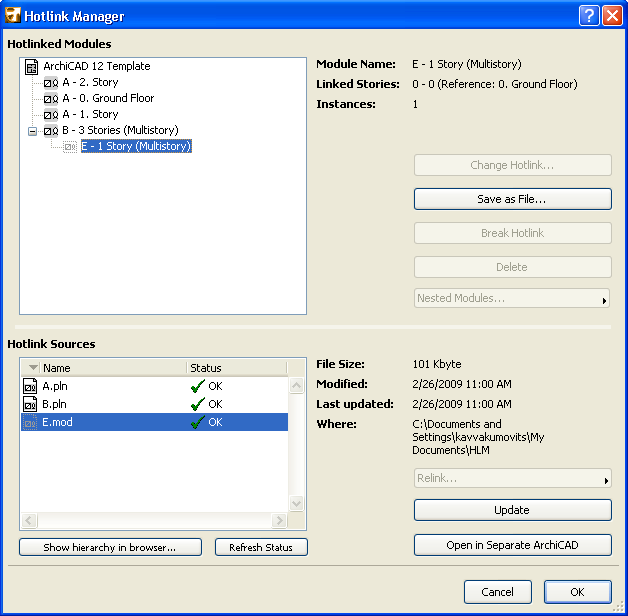
If you select a nested module in the Hotlinked Modules list, you cannot change or break the hotlink (these commands and the module name itself are grayed), but you can save it as a new file.
Skip or Include Nested Modules in Any Single Instance
You can set the option to “Skip Nested Modules” separately: for each placed instance of a hotlinked module, select the module, go to Module Settings, and check the Skip Nested Modules box.
See Module Settings.
When placing any instance of a module containing nested modules, the same option is available: in the Place Module dialog box, check Skip Nested Modules. This will apply to the currently placed instance only.
Source File of Nested Module
You can open or update the nested hotlink’s source file in just one step, by clicking the Update or Open in Separate ArchiCAD buttons in the “Hotlink Sources” section below. However, the Relink command is available only for the source files of modules at the top of the hierarchy, not for nested modules.
Deleting Modules from the Floor Plan
To delete a module placed on the Floor Plan, select it and press Backspace or Delete. (To select it, Suspend Groups should be disabled; that is, the module should be in grouped mode.) All the elements making up the module will be cleared from your Project.
If you want to clear all the instances of the same Hotlinked Module, you can go to the Hotlink Manager dialog box, select a Hotlink’s name and click the Delete button.
Note: The Break command is not available for Hotlinked Modules in Teamwork. Instead, you can explode a Hotlinked Module instance. (See Explode Hotlinked Module Instance in Teamwork.)
To break the hotlinks and preserve the elements of ALL instances of one or more modules, select the module in the Hotlinked Modules list in Hotlink Manager (File > External Content > Hotlink Manager). Then click the Break Hotlink button. The result: the elements contained in the module are now regular editable ArchiCAD elements, no longer part of a module and no longer linked to any other source file.
To break the hotlink of any single instance of a placed module, select the module and use the Break Hotlink of Selected Module in File > External Content > Hotlinked Module Settings.
Once the hotlink is broken, the placed elements can be edited.
See Edit Module in Place: Break Link, Edit Elements, Replace Hotlink.
After you break the Hotlink of a placed Module, the elements will be automatically grouped. However, restrictions on grouping will be valid (e.g., Dimension Chains will not be included in the group).
If the source file of a hotlinked module is changed, the placed instance of the module will be updated only if you use the Update command in Hotlink Manager. (File > External Content > Hotlink Manager.) The Hotlink Sources list indicates which source files, if any, have been “Modified” and thus are out of date. Select the file and press Update.

Once you press OK to close the dialog box, the module instances originated with this source file will be updated in your project.
Note: If stories have been deleted from the hotlink source file, then after an update, you will be warned of the missing stories.
If you click the Update, Relink or Relocate commands for selected Hotlink Source files, these scheduled actions are noted in the files’ status column with a yellow triangle (at this point, you can still cancel the operation). The actions are not carried out until you press OK to close the Hotlink Manager dialog box.
Warning: Carrying out these actions means that your ArchiCAD project’s entire Undo queue will be cleared!

When pasting or merging data containing placed modules into a file containing instances of the same Hotlinks but with different update times, it is always the more recent module content that will be used, forcing the updating of the older instances.
Warning: After this operation, the Hotlink may still be outdated.
To set update preferences when opening a file containing hotlinks, go to Options > Work Environment > Data Safety & Integrity > Hotlink Update.
See Hotlink Update.
The elements making up the module are actual elements, not just references to items. This means that when you save the project file containing the hotlinked module, all the data you need is saved, even if the source files are not available anymore. You can work with a project file containing modules whose source is not available just like with any other modules, except that the modules cannot be updated.
To recreate a live Hotlink to a module whose source is lost or not available:
Choose File > External Content > Hotlink Manager.
1.In the list of Hotlinked Modules, select the name of the hotlink which needs a new source file.
2.Click the Save as file... button and name the newly created file (it will be a module-type file with extension.mod).
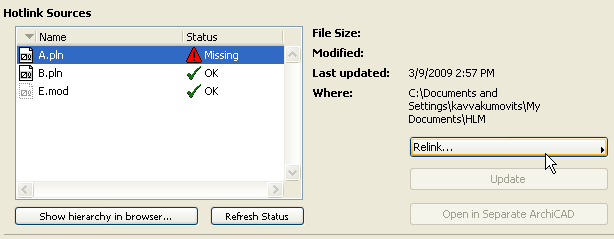
To redefine the location of a Hotlink Source listed as “Missing” in Hotlink Manager:
Click Relink and use the appearing “New Hotlink” directory dialog box to provide the location of the Hotlink Source (which is probably missing because it was moved to a new location.) As long as a Hotlinked Source is missing, ArchiCAD cannot update its module instances.
Note: Relink is available only for source files of top-level hotlinked modules; you cannot relink the source file of a nested hotlink. If the source of a nested hotlink is shown as “Missing,” open the file into which the nested hotlink is placed, and relink the source file.
Change Hotlink (Relink and Relocate)
To replace an existing hotlink with a different hotlinked module, select the hotlink from the Hotlinked Modules list at the top of the Hotlink Manager, and click Change Hotlink.
From the appearing dialog box, choose another hotlinked module from this project, or click New Hotlink to create a new one.
You can also replace a Hotlink Source file with another one: in the Hotlink Sources list in Hotlink Manager, select the source file to replace and click Relink. All module instances based on the original source will now be replaced by modules based on the new source you relinked here.
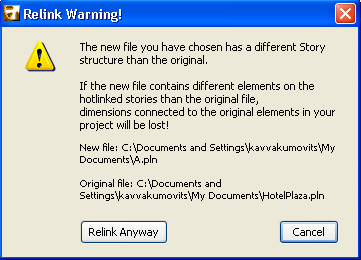
If the new source file has a different story structure than the host file, you will be warned that some dimensions may be lost if you continue the relink process:
You can replace multiple source files with a different set of source files if the replacement files are all in the same folder: select the files in Hotlink Manager, then click Relocate. In the directory dialog box, define the location of the folder containing the new source files. The Relocate command is available only if you have selected multiple Hotlink Source files.