The Detect IFC Model Changes function (File > File Special > IFC 2x3) detects the geometric differences between two versions of a single model that has been exported as IFC - that is, it compares two IFC files that are two versions of the same project. The elements affected by the modifications are generated and merged into the currently running project (that project can also be an empty one). Modifications can be viewed and managed using ArchiCAD’s Mark-Up tool in both 2D and 3D views.
Naturally, you can restrict the change detection to only a part of the model (for example, to elements on the ground floor) or to particular element types (for example, just columns). Since the two file versions differ by timestamp, the following geometric differences are detected:
•New Elements: elements created in the newer version that did not exist in the earlier version.
•Deleted Elements: elements that existed in the earlier version but were deleted from the newer version.
•Modified Elements: elements that have been modified (in their position and/or size) from one version to the next.
Notes:
•It is important that the two IFC files being compared originate from a single application and a single project, because the comparison process (more specifically, the pairing of the modified elements) is based upon the elements’ GlobalId numbers in the IFC model. If there are no identical IFC GlobalIds in the two versions, then all elements will be considered either new or deleted.
•It is also important that you correctly identify which IFC file is the older project version and which the newer version.
•The change detection applies only to 3D elements - not to any of the 2D IfcAnnotation (lines, texts, fills etc.) and IfcGridAxis elements that may be stored in the IFC file.
•Since the changes are merged into the current ArchiCAD project, we recommend that you save the ArchiCAD project before using the Detect IFC Model Changes command.
Hints:
•Independently of any model exchange workflow with other applications, the Detect IFC Model Changes function can also be used to compare two versions of an ArchiCAD project: you must have saved both versions of the project as IFC files. This works if the export process is set to store the GlobalId numbers in each of the two versions.
•You can use other Mark-Up functions (e.g. Comment, snapshot) to manage changes, which can be used as part of a BCF-based workflow.
See Workflows for Using BCF in Project Mark-Up.
See Export Options of IFC Translators.
Follow these steps to compare two IFC files:
Step 1: Browse for the two IFC Files
Start the Detect IFC Model Changes command. Use the Browse buttons to locate and select the IFC model, noting the order in which the two files were created (“Older” and “Newer”). Keeping track of the versions is crucial to ensure the proper detection and interpretation of the changes.
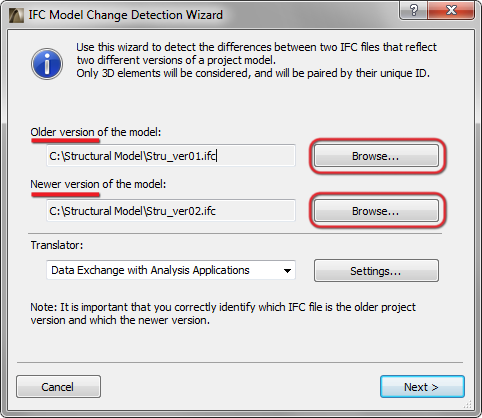
From the pop-up list, choose an IFC Translator.
The Translator shown is the one defined as the default for IFC import. Translator settings which will be applied in this process include:
•the “IFC Domain” and “Structural function” Import/Export Filter Options (these are the default filters for comparing elements); and
•the Material Conversion (Import Options) settings.
Assigning the elements to layers is not governed by any setting in the translator, but rather set in a later step (see Step 4).
Step 3: Define the Element Types to be Compared
Although the translator chosen in Step 2 defines the default filters to be used for the elements being compared, you can use the next dialog box to further limit the model. In fact, you can define entirely different filters or customize them.
Thus, use this dialog box to optionally narrow the set of elements to be compared in the two files:
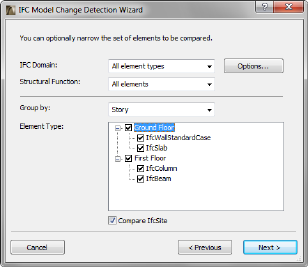
•Filtering by IFC Domain: use one of the predefined domain filters to define the element types to be compared. The default value here is the IFC Domain (Import/Export Filter Options) setting of the translator chosen above. “All element types” will compare all elements from the two files. The “Structural” or “HVAC” domains will consider only IfcBuildingElements (IfcWall, IfcBeam, IfcSlab etc.) or IfcDistributionElements, respectively. The “Custom” domain filter can be created using the Options button – e.g., you can consider just beams (IfcBeam) or just columns (IfcColumn).
•Filtering by Structural Function: if the IFC files to be compared include elements classified by Structural Function (that is, LoadBearing IFC Property is assigned to elements), then use this setting to filter load-bearing elements, for example as part of a structural-architectural data exchange. The default value here is the Structural function (Import/Export Filter Options) setting of the translator chosen above.
Note: You should use this filtering option only if you are certain that your fellow professional, with whom you are exchanging data, is using and able to export the LoadBearing IFC Property.
•Filtering by Story/Layer/Owner/Element type: the elements of the two files are listed in a tree structure under (IFC) Element Type. The initial filtering is carried out by the IFC Domain and Structural Function filters set above; this part of the dialog box enables further fine-tuning of the filter, by checking or unchecking element types one by one. Elements can be grouped in this structure, to make it easier to gain an overview. For example, you can group the element types by Story, by Layer, or by both Story and Layer. For example, you can combine an element filter with a story filter to compare just columns on the floor plan.
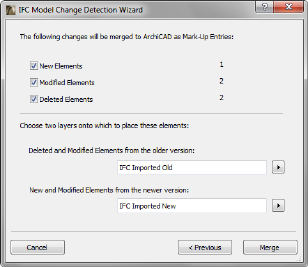
Step 4: Differentiate Between Elements from Each Version
Based on the filters you have set up, a list will summarize the detected changes, by number and by the type of the change. These changes will be merged to ArchiCAD as Mark-Up Entries. To be able to differentiate between elements from each of the two versions, the affected elements will be placed on a separate layer when they are merged into the current ArchiCAD project. Naturally, you can define a different layer name for this purpose than the layer shown by default.
Step 5: Merge Changes to the Project
Click Merge to send the changes to the project with Mark-Up Entries. Only the detected changes of the filtered and compared elements (see Step 3) will be merged into the project and placed to the selected two different layers (see Step 4).
Step 6: Story Matching
When merging the differences between the IFC file versions, you must define the story of the receiving project on which to place the story structure of the incoming IFC data.
If the two files have differing story structures, you must do the story matching for each of them.
See Story Matching at Import Functions.
Step 7: Use Mark-Up tool
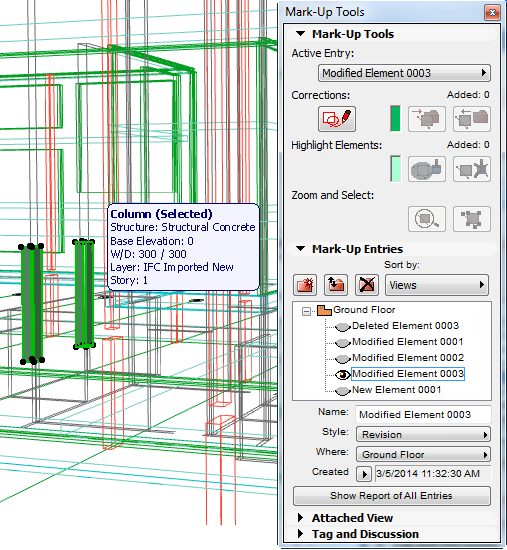
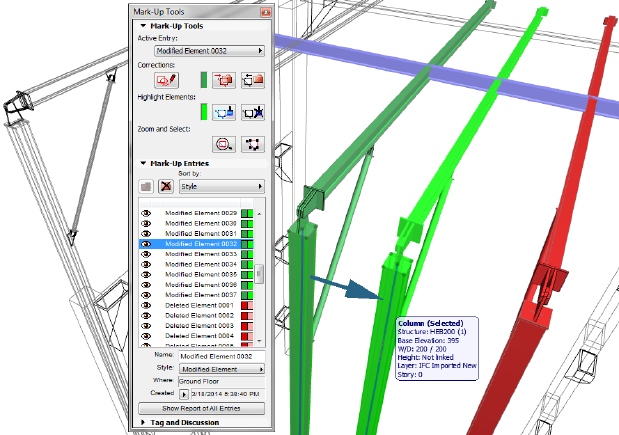
The Mark-Up Palette appears automatically and lists the changes as Mark-Up Entries, using three mark-up styles: New, Deleted and Modified Elements. Thus, the elements are easily distinguishable on screen according to their specific style. Entries can be sorted by Style and by their Floor Plan View.
Elements from the two compared models are categorized separately by the Mark-Up function:
•Elements from the older version (that is, the Deleted and Modified elements from the older version) are shown as “Correction”
•Elements from the newer version (that is, the New and Modified elements from the newer version) are shown as “Highlighted”
Each of these categories uses different Mark-Up Styles and their elements can be edited accordingly.
Functions on the Mark-Up palette enable you to view, select or zoom to the elements in the entries.
See Project Mark-Up.
Hint: The default colors for marking different change types can be modified in the Mark-Up Styles palette (Options > Element Attributes).
Since the elements from each of the two model versions are categorized separately in Mark-Up, each Modified element entry contains a pair of elements: one element from the older model version, shown as “Correction”, and a newer-version element, shown as “Highlighted.” Their different colors make it easy to distinguish them. Moreover, each element in the pair is placed on a different layer (see Step 4). You can check any element’s layer by reading its Info Tag, which appears when you hover your cursor over any element.
See Element Information Pop-up (Info Tags).
Elements detected as changed become part of the project and are placed on separate layers depending on their version (older or newer). To each of these elements, the Mark-Up function assigns these elements a category: either New, Deleted or Modified.
Now what can you do with them?
•Deleted Element: You can leave it in as part of the project (placing it on a separate layer); or you can delete it together with its Mark-Up Entry, by clicking Delete Entry in the Mark-Up Palette. You can also use Delete Entry without deleting the elements in the Entry.
•New Element: Since it has a Highlighted status, deleting its entry will not delete the element, it will just lose its Highlighted status. Then you can use the element as you wish (or even delete it from the project). A New element will be deleted together with its Mark-Up Entry only if you first remove its Highlighted status (click the Remove Highlight button).
•Modified Element: This pair of elements includes one each that is “Old” and “New”, with the same options as described above for “Deleted” and “New” elements. That is, if you do a Delete Entry, the older-version element can be either retained or deleted, while the newer-version element will remain intact, while losing its Highlighted status.
Hint: If you delete a Mark-Up Entry by mistake, use Undo.