Scheme Settings Dialog Box (Interactive Schedule)
To access this dialog box, do one of the following:
•Choose Document > Schedules and Lists > Schedules > Scheme Settings command.
•Use the Schedule’s context menu in the Navigator.
•Select a Schedule from the Navigator, then click the “Settings” button at the bottom of the Navigator panel.
For more information, see Interactive Schedule.
See also Reservation in Interactive Schedules.
The scrollable box on the left lists the available Schedule Schemes defined for your project. Select a name to edit its properties in the Criteria and Fields panels.
•Create New: Click this button to create a new Schedule Scheme. In the dialog box that opens, choose either “Construction Elements” or “Components”, depending on whether you are creating an Element Schedule or a Component Schedule. Enter a name and an optional ID for the new Scheme.
•Rename: Click this button to rename the Schedule Scheme selected on the left. In the dialog box that opens, enter a new name and an optional ID.
•Delete: Click this button to delete the Schedule Scheme selected on the left.
•Import: Click this button to import an interactive Element Schedule file created with ArchiCAD 8 or above or a Door or Window Schedule file created with ArchiCAD 7.0.
•Export: Click this button to export an interactive Element Schedule file that you will be able to import into another project.
This panel lists the criteria and values defined for the scheme selected on the Schemes panel. Clicking a row in the list selects it and makes its fields available for modification.
Criteria column: Lists the criteria defined for the scheme. Click the pop-up arrow to choose a criterion (e.g. Element Type).
The next column includes the relationship between the criterion and the value (is, is not, is equal to, is larger than, starts with, etc.), depending on particular criterion. Choose a condition by clicking the arrow.
Value column: Shows the value assigned to the criterion. Depending on the type of the criterion, you can type a value manually or choose from pop-up controls. For example, if the criterion is Subtype name, click the three-dot button to choose from the list of Subtypes.
Add: Click this button to add a new row.
The and/or operator determines the relationship between adjacent criteria.
The Open Parentheses and Close Parentheses columns enable you to set up nested criteria for more complex schemes. Each “open” must have a corresponding “close” in order for the scheme to be logical. If there is a mistake in your parentheses logic, the Criteria invalid! warning appears at the bottom of the panel.
Remove: Click this button to delete the selected row. Inactive if no row is selected.
Click and drag the up/down arrow at the beginning of any row to move the row up or down within the Scheme.
Click the dropdown button of the main Add button to access this command, which makes the parameters of loaded library parts available for listing as criteria or as fields. The command is only active if you have chosen as a criterion a library part type of element (Object, Door, Window, Lamp or Zone).
Select Object by: Use the pop-up on the right to choose an option for searching for objects to select.
•Folder View: lists all the loaded library folders that contain library parts.
•Folder View (Used Objects only): lists the loaded library folders that contain the library parts used in the current project When you deploy a folder, only the names of the actually used parts will appear.
•Search Criteria: displays a form that allows you to list the library parts whose name matches the chosen criteria.
•Favorite Objects: shows the preview and the name of the library parts defined as Favorites.
Search Object: If the Search Criteria option is active in the Select Object by pop-up field, this area allows you to search for library parts whose name matches some criteria.
•Find names which: With the pop-up control, choose a condition (match, contain, start with, end with) and enter a text string in the field on the right.
•Search in: Use this pop-up control to choose a loaded library to search. Click the Find button to display the results in the Library parts found box.
•Find: Click this button to perform a search based on the condition set with the Find names with and Search in controls.
•Library parts found: Displays the preview and names of the library parts that match the condition set with the Find names with and Search in controls.
Available Parameters: This box lists all the parameters of the library part selected in the Select Object by area on top of the dialog box with their Variable name, Type and Name.
Selected Parameters: This box lists all the library part parameters added from the list of Available Parameters with their Variable name, Type and Name.
Add: Click this button to add the available parameter selected in the box on the left to the list of selected parameters on the right.
Remove: Click this button to delete the selected field from the box on the right.
Available Parameters: This box lists all the parameters that can be used as fields of the element schedule. Parameters are grouped in two types: General parameters and element-type specific parameters. Click the + sign to reveal the entire list of available parameters, then select a parameter and click the Add button at the bottom to display it on the right.
See also Element Listing Parameters in the Interactive Schedule.
Schedule Fields: This box lists the parameters added from the box on the left, which will be displayed as fields of the element schedule. Parameters that cannot be edited in the schedule are shown in black, while editable ones are shown in blue type. You can change the order of the fields by dragging them up and down with the double arrows on the left.
For each selected schedule field, 3 buttons are available at the right to fine-tune sorting criteria.
•Display an up/down arrow to sort the items of this field in ascending/descending order; or leave this field blank, for “None”. “None” means that this field will not be taken into consideration when sorting.
•Display a “sum” to add a schedule cell that will contain the sum total for all items of this field. To show the quantity of items (rather than their sum), choose the “sum1” icon.
•Display the flag icon next to the one schedule field for which you want to display subtotal cells in the schedule, as well as sum/quantity cells.
See also Sort Schedule Fields.
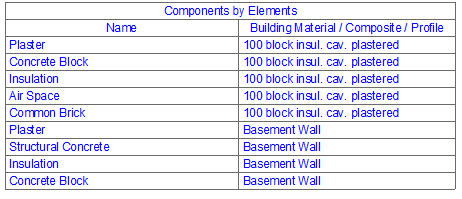
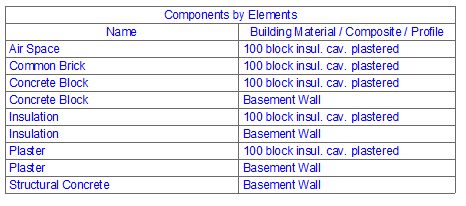
Keep Components together in the Schedule: This checkbox is available in the Scheme Settings of component-type lists.
•If you check the box, components are always grouped together, corresponding to the element they belong to. (For composite elements, these fill components are listed in the same order as in Composite Settings.)
•If you leave it unchecked, components will be listed according to the Scheme Settings (e.g. ordered by name rather than by element).
Add: Click this button to add the additional parameter selected in the box on the left as a schedule field appearing in the box on the right.
Remove: Click this button to delete the selected field from the box on the right.
Once the new (or modified) scheme is defined, its name appears in the Navigator and you can use it like any other view.
Add IFC Parameters