Two grid systems are provided to help you make drafting easier: the Construction Grid and the Snap Grid. You can set these up in View > Grid and Editing Plane Options > Grids and Background.
For more information, see Grids & Background Dialog Box.
As a shortcut, many of these controls are available in the Standard toolbar and the Coordinates palette.
Grids can be defined separately for the Floor Plan and any individual Section/Elevation/IE, 3D Document, Detail/Worksheet, or Layout window. Note that, in Floor Plan window, the same Grid settings will be used for all Stories.
Note: You can also create, place and use custom local structural grids of different sizes and shapes using the Grid Tool.
See The Grid Tool.
Construction Grid
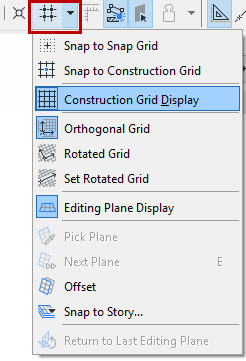
Turn on the Construction Grid using View > Construction Grid or in the Standard Toolbar’s Grid pop-up menu.
Snapping to the Construction Grid
If Grid Snap is enabled (Alt+S), the cursor will snap to the nodes of either your Construction Grid or your Snap Grid, depending on what you set as your preferred option.
See Grid Snap Function.
If you alternate between using the Snap Grid and the Construction Grid, an easy way to toggle the Grid Snap function is to use the Shift+S shortcut.
This shortcut toggles between: No snap; Snap to Construction Grid; and Snap to Snap Grid.
Rotated Construction Grid
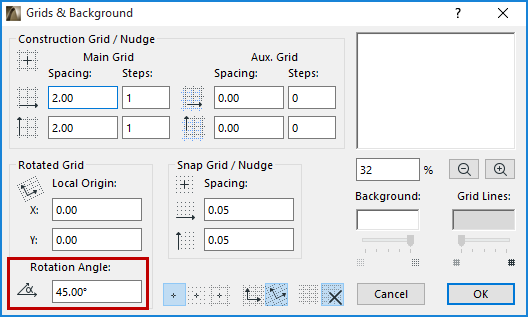
To rotate the construction grid, define a Rotation Angle in the View > Grid and Editing Plane Options > Grids and Background dialog box.
To define a rotated grid by hand: first, choose “Set Rotated Grid” from the Standard Toolbar, then draw a vector on screen or click on an existing straight segment: this vector will represent the rotated grid angle relative to the horizontal axis.
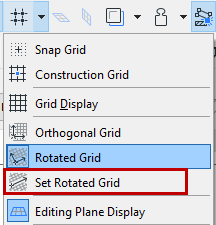
To display the rotated Construction Grid, click the Rotated Grid button in the Standard Toolbar grid menu or the Coordinates Palette.
Auxiliary Construction Grid
You can add an optional Auxiliary Grid, defined in View > Grid and Editing Plane Options > Grids and Background. The Auxiliary Grid is often used to indicate the thickness of concrete walls or foundation footings, and can be used to create periodic or stepped grids.
Snap Grid
The Snap Grid is an invisible grid that you can use optionally to make input easier, by having the cursor snap to a predefined distances. When defining your Snap Grid in the Grids and Background dialog box, you will usually enter the smallest unit of measurement relevant to your Project. You can set different horizontal and vertical Snap Grid increments, allowing you to reflect the unique geometry of your Project.
If Grid Snap is enabled (Alt+S), the cursor will snap to the nodes of either your Construction Grid or your Snap Grid, depending on what you set as your preferred option.
See Grid Snap Function.
Note: The Snap increments you define here can also be used for the Nudge shortcut - to easily move any element by a small defined factor, using a keyboard shortcut.
See Nudging Elements.
If you alternate between using the Snap Grid and the Construction Grid, an easy way to toggle the Grid Snap function is to use the Shift+S shortcut.
This shortcut toggles between: No snap; Snap to Construction Grid; and Snap to Snap Grid.