The BIM Server Control Center runs on the same machine on which the BIM Server has been installed and configured.
Use the BIM Server Control Center to:
•start/stop the BIM Server
•check BIM Server status (if the server is not running, the icon will be red instead of green)
•open the BIM Server Manager, which is used to manage users, projects and roles on the server
•change server preferences.
To monitor server performance, use controls in the BIM Server Manager.
See Server Activities.
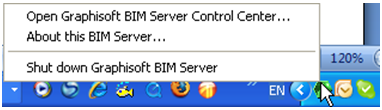
Open GRAPHISOFT BIM Server Control Center
If the BIM Server is running:
•BIM Server Control Center controls are available by clicking the BIM Server Control Center icon in the system tray (on Windows); or from the menubar (in MacOS).
If the BIM Server is not running:
•On Windows: The BIM Server Control Center command is available from the Start menu, in the GRAPHISOFT > BIM Server menu.
•On MacOS: The BIM Server Control Center command is available in the Applications > GRAPHISOFT > BIM Server folder.
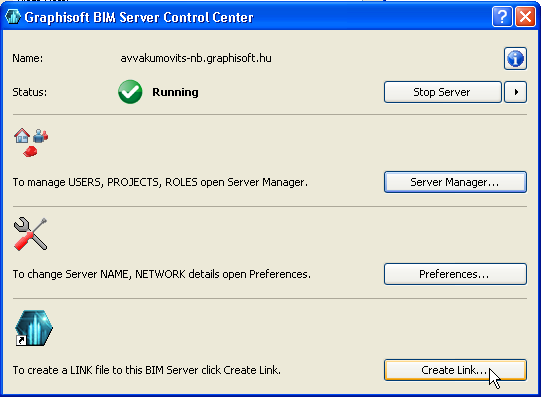
The Open GRAPHISOFT BIM Server Control Center command opens this dialog box:
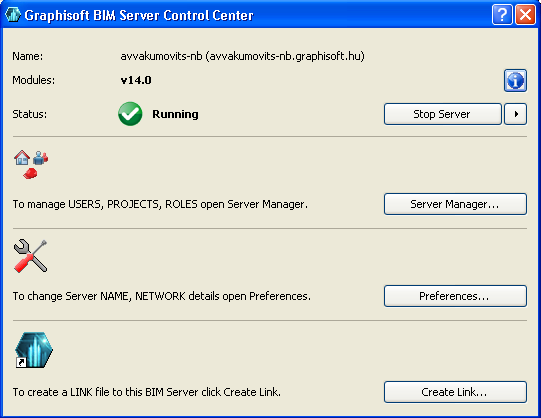
The Server Name is the one defined during BIM Server Configuration.
The Status indicates whether the Server is Running or Stopped.
Click the “information” icon for additional details in About this BIM Server: the computer’s name, IP Address(es), and port number; and the BIM Server’s version and build number.
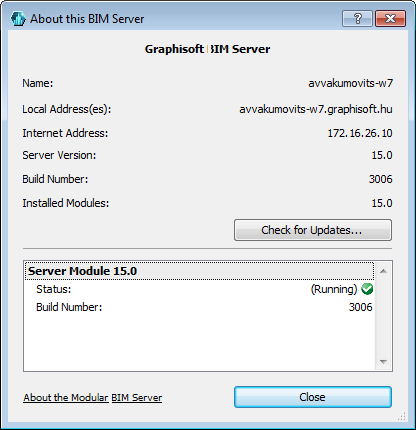
Here, click Check for Updates to access information on the latest updates available for the BIM Server.
The Stop Server or Start Server button is available, as applicable.
Note: Next to the Start/Stop Server button, you can click the black arrow to access a separate command: “Shut down BIM Server services and exit” the BIM Server Control Center.
Note: If the program detects that the server services are not responding, this button changes to Restart Server.
The Server Manager... button takes you to the BIM Server Manager.
Note: This button can open the Server Manager for the local machine only. The “Choose Server” and user authentication controls of the Server Manager will not be available.
BIM Server Preferences is available by clicking Preferences from the BIM Server Control Center window.
Use this dialog to edit server settings. Originally, you entered these server settings - such as server name and project location - during the course of the BIM Server configuration.
Email and other port information is also editable here, but do not change these port settings unless absolutely necessary.
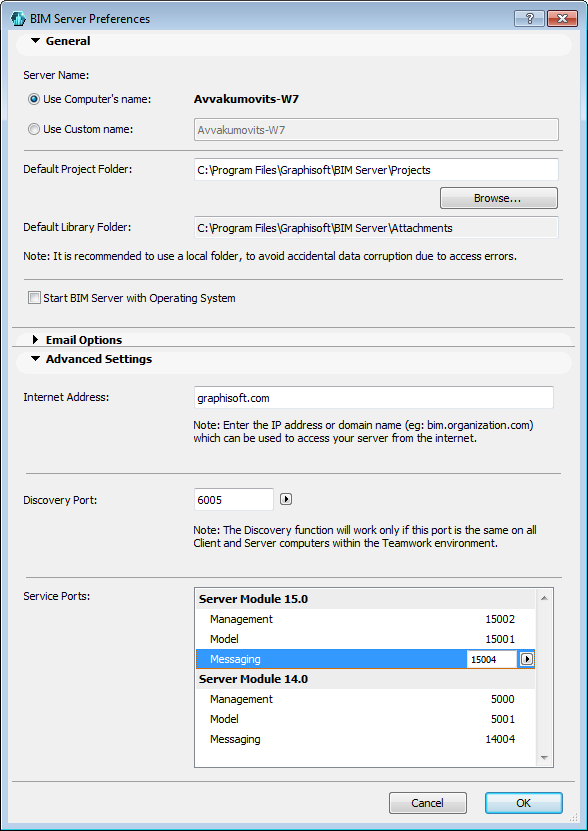
Note: If you change the Default Project Folder path, this means that new Teamwork Projects shared to this server will be located in this folder. However, existing projects will remain in their original locations.
Advanced Settings is a panel of the Teamwork BIM Server Preferences dialog box.
Internet address: Enter either the public IP address or the domain name of your BIM Server’s router. The simplest choice is to use a static IP address obtained from your Internet provider. This information is necessary to enable access to the BIM Server over the Internet.
See Accessing the BIM Server Over the Internet.
Discovery Port: The “discovery” function enables the server to locate and communicate with client machines on the LAN, provided that all machines are using the identical port. Define this discovery port here.
If a yellow warning triangle is displayed here, the port you have chosen is not available. In this case, try the options in the pop-up:
•Find a free port
•Reset to default
Make sure that all client machines are using the same port: this control is found at Options > Work Environment > Network and Update, on each client machine.
The rest of the ports listed in Advanced Settings must be set on the server machine, not on client machines.
Service ports for each module are listed separately. This is the only part of the user interface at which module-specific data can be entered manually. You must set separate ports for each, though the default settings should work.
For information on server modules, see Modular BIM Server.
When you change Server Preferences, the BIM Server Control Center will shut down all server modules while the preferences are reconfigured.
The Create Link command at the bottom of the BIM Server Control Center is an optional function to make it easier for Teamwork users to access the BIM Server when they are opening or joining a project from their client machines. This function is helpful if, for some reason, the client machine is unable to automatically locate the BIM Server on the network (e.g., if the “Discovery” function is not locating the servers in your LAN, or if Discovery is not permitted on your network.)
The Create Link function creates a special link file (extension .twlink) which you can send to any client wishing to access this server through ArchiCAD. The client will be able to access this BIM Server from either the local network or the Internet without having to know its IP address or port numbers.
To create a .twlink file:
1.Open the BIM Server Control Center.
2.Click Create Link.
3.In the appearing directory dialog box, name and locate the .twlink file, which you can now send to the client.
The .twlink file contains all server connection information the client needs to add the server to his/or “Choose Server” list.
To use this .twlink file, the recipient should choose Add More BIM Servers, from the Choose Server list when sharing, opening or joining a Teamwork project, then choose the option “Browse for a server link file.”
See Choose BIM Server.