Configure BIMcloud Server
Set the basic configuration of the installed BIMcloud Server
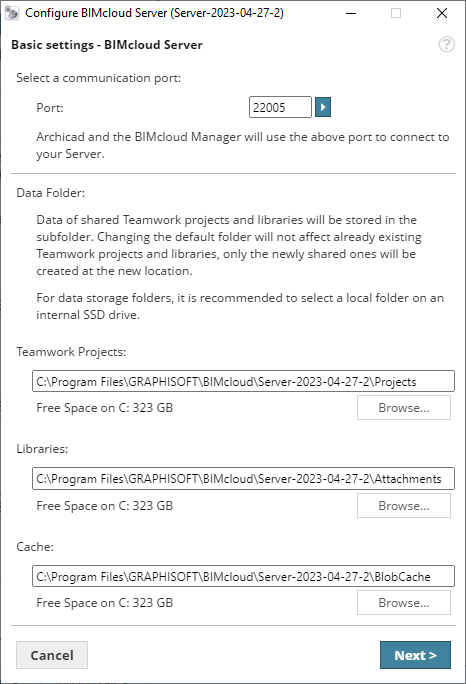
Define basic Server settings on the first page of the Configurator:

- Port: Select a free port or use the “Find an available port” command to automatically find one.
- Data Folders: Enter or Browse the location of the default
Data Folders for Projects, Libraries and Cache.
- Teamwork Projects and libraries on this BIMcloud Server will be stored in these folders
- The default Cache folder stores temporary Teamwork data, which is used to speed up Teamwork processes.
- For Windows users:The Cache folder you choose must be in a drive for which 8.3 naming is enabled. If this is not the case, you will get a warning. Please select a different drive, where 8.3 file naming is enabled, and then you can proceed. Alternatively, you can enable 8.3 name generation for the current drive, then create a totally new folder, and select it as the new Cache location. The new folder’s parent folders (if any) must also be created after you enable 8.3 name generation.
- Click Next to open BIMcloud Only Settings - BIMcloud Server.
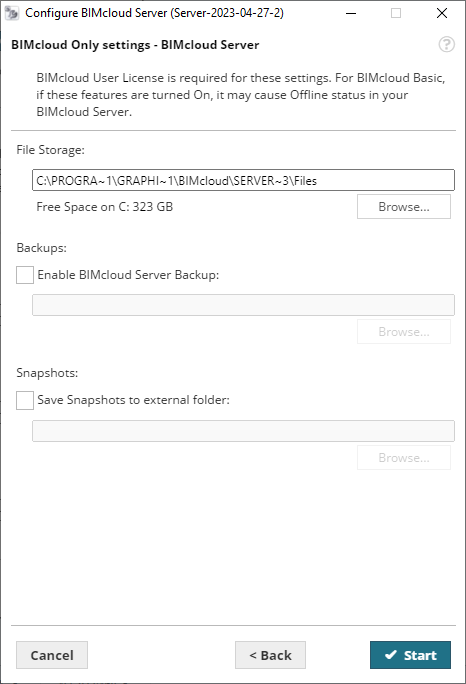
- On the second page, define additional Server settings.These
settings require a BIMcloud User License. If you plan to use BIMcloud
Basic, don’t set these options. They will have no effect, and may
cause anomalies.

- File Storage: Files uploaded to BIMcloud Manager will be stored at this location.
- Enable BIMcloud Server Backup:Check this if you plan to create backups of BIMcloud Server data. After checking the box, you must enter (or browse for) the path of the backup folder location.
- Save Snapshots to External Folder: Optionally, redefine folder to which Project and Library snapshots are saved. (By default, snapshots - with extension .archive - are saved to the folder where you installed the BIMcloud Server.) (If needed, you can later redefine this snapshot folder path.
- Click Start, to launch the newly configured BIMcloud Server.